Editing a Root Cause
You can edit an existing root cause.
To edit a root cause:
1. Go to ServiceMax Setup > Investigations > Manage Root Causes.
The Root Causes page is displayed.
2. To view all root causes, click All Root Causes from the list view dropdown.
A list of root causes is displayed, including the title, description, active status, last modified by, and last modified date.

3. Use the Search box to find a root cause by title or description.
4. Click the Root Cause title to open the Details tab, and then click Edit.
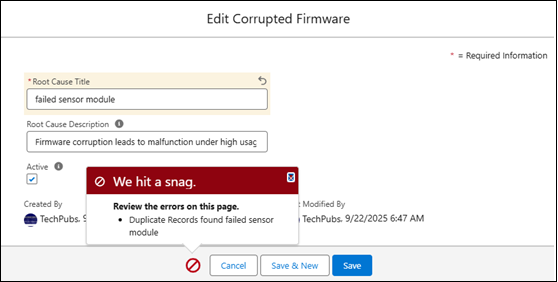
The Edit Root Cause pop-window is displayed.
|
|
You can also update a root cause in the following ways:
• On the Details tab, click the Edit Root Cause Title or Edit Root Cause Description pencil icon, and then update the required field.
• On the Root Causes page, click the More Actions menu next to the Root Cause and select Edit, and then update the required fields in the pop-up window.
• On the Root Causes page, hover over the Root Cause Title or Root Cause Description, click the pencil icon to enable in-line editing, and then make the changes.
In-line edits save automatically when you press Enter or click outside the field.
|
5. After making changes, click Save to apply, Save & New to continue with another root cause, or Cancel to discard your edits.
|
|
If a duplicate Root Cause Title already exists, the system displays an error message and prevents saving. Root cause titles must be unique.
 |
The root cause is updated.