Configuring Setup for Inventory Processes
Inventory Management allows admins to view the standard pre-configured Inventory process and configure the custom inventory process.
To create an inventory process, perform the following steps:
1. Navigate to ServiceMax Setup > Service Flow Manager.
2. Click Inventory Processes.
3. Select an existing Standard Inventory Processes or Custom Inventory Processes from the available list.
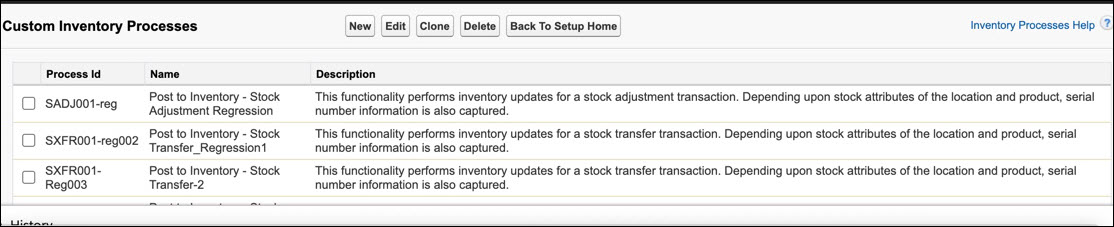
4. For Standard Inventory Processes, select the available process from the available list.
5. Click Clone. Or, for Custom Inventory Processes, select the process from the available list
6. Click New/Edit. The Process Information tab screen is displayed.
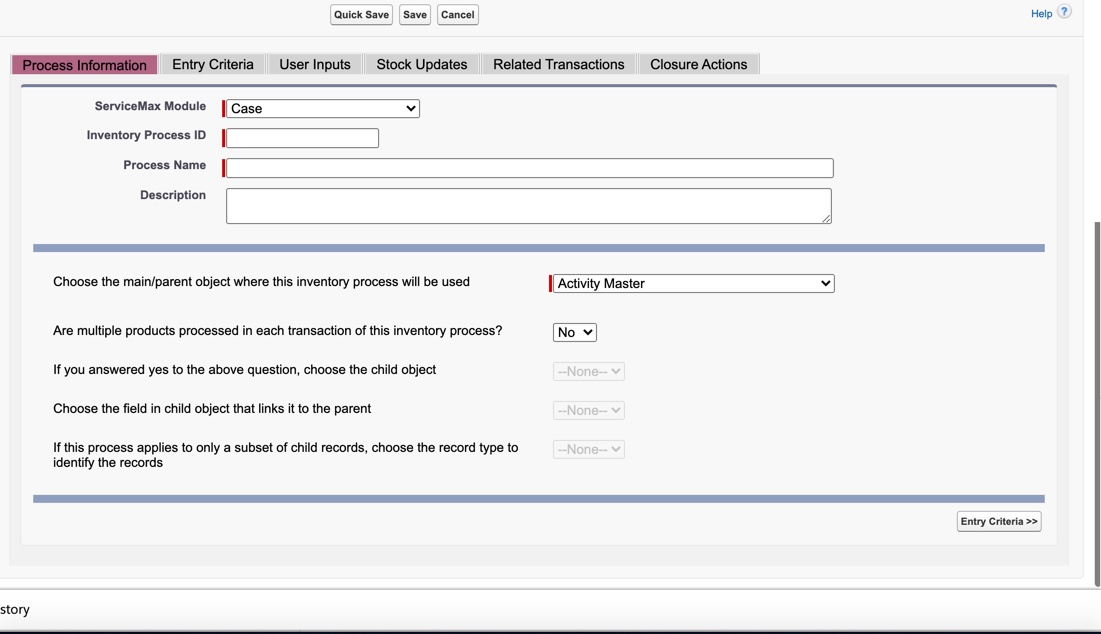
7. In the Process Information tab, enter the details of the following fields:
|
Field
|
Description
|
|---|---|
|
ServiceMax module ID
|
Select the ServiceMax module to which this process is linked.
|
|
Unique ID
|
Enter a unique ID for this process. ServiceMax automatically creates a submodule with the same ID.
|
|
Process name
|
Enter the process name. The name entered here appears on the ServiceMax Inventory Processing screen when the user launches the process.
|
|
Description
|
Enter a detailed description of the process.
|
|
Choose the main/parent object where this inventory process will be used
|
Select the main or parent object for this inventory process. This can be a standard ServiceMax object or a custom Salesforce object created in your implementation of ServiceMax.
|
|
Are multiple products processed in each transaction of this inventory process?
|
Indicate if multiple must be included in each transaction of this inventory process.
|
|
If you answered yes to the above question, choose the child object
|
Select the child object that contains the line information. For example, if the main/parent object for this process is Stock Transfer, the child will be the Stock Transfer Line.
|
|
Choose the field in child object that links it to the parent
|
If the child object contains only one lookup field to the parent object, it is selected automatically. The child object may have more than one reference to the parent object. In such cases, select the specific field that links the child to the parent.
|
|
If this process applies to only a subset of child records, choose the record type to identify the records
|
Indicates if this process applies to only a subset of child records.
|
8. Click the Entry Criteria tab. The Entry Criteria screen appears as shown below:
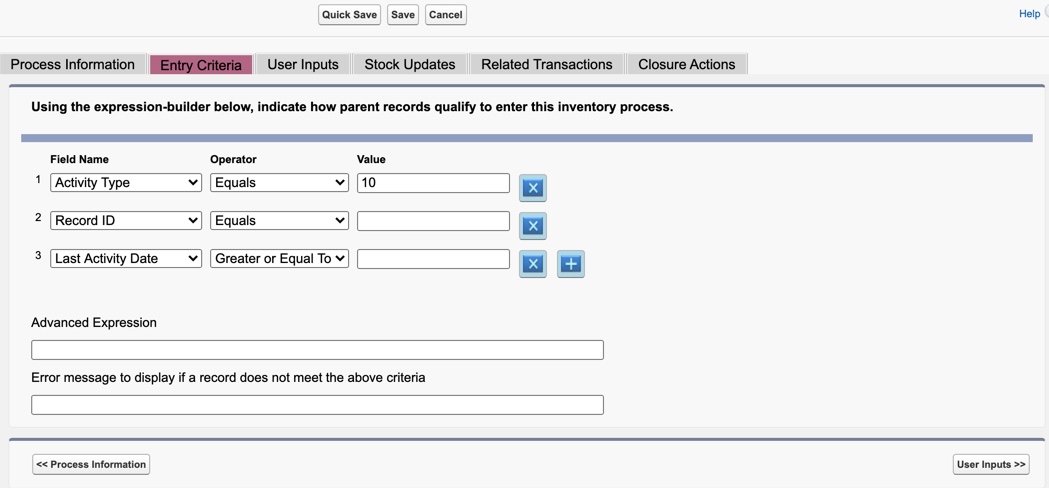
9. In the Entry Criteria tab, enter details in the following fields:
|
Field
|
Description
|
|---|---|
|
Field
|
Select the applicable entry criteria for the main/parent object using the combination of the field name.
|
|
Operator
|
Enter the combination of the field name, operator, and value.
|
|
Value
|
Specify the combination of the field name, operator, and value. For example, use the buttons x and + to remove and add conditions respectively. If required, use the Advanced Expression to enter conditions such as (1 AND 2) OR 3.When entering values, in addition to literal values you can use the predefined values listed below for certain field types.
|
a. Specify the error message to display to the end users if the record does not match the criteria. Note: Similar to the header entry criteria, you must also qualify the line records for this inventory process. Enter the appropriate line criteria and the error message.
b. Using the ServiceMax translation workbench, you can enter various language translations for the header and line error messages.
You can go to Home > ServiceMax Setup > Translations, select the module you entered in the Process Information tab for this inventory process, and select the submodule name that matches this inventory process name. You can check the example in the following table:
|
Field Data Type
|
Literal*
|
Effect
|
|---|---|---|
|
* Literals are case-sensitive.
|
||
|
Date
|
TODAY
|
Match date to today's date
|
|
Date
|
TOMORROW
|
Match date to today + 1
|
|
Date
|
YESTERDAY
|
Match date to today - 1
|
|
Date
|
THIS_WEEK
|
Check if date is in the current week
|
|
Date
|
THIS_MONTH
|
Check if the date is in the current month
|
|
Date
|
NEXT_WEEK
|
Check if the date is in the next week
|
|
Date
|
NEXT_MONTH
|
Check if the date is in the next month
|
|
Date
|
LAST_WEEK
|
Check if the date is in the last week
|
|
Date
|
LAST_MONTH
|
Check if the date is in the last month
|
|
Date
|
NEXT_90_DAYS
|
Check if the date is in (tomorrow + 90)
|
|
Date
|
LAST_90_DAYS
|
Check if the date is in (yesterday - 90)
|
|
Date
|
NEXT_N_DAYS:N
|
Check if the date is in (tomorrow + N)
|
|
Date
|
LAST_N_DAYS:N
|
Check if the date is in (yesterday - N)
|
|
Lookup (User)
|
SVMX.CURRENTUSER
|
Use login user's ID
|
10. Click the User Inputs tab.
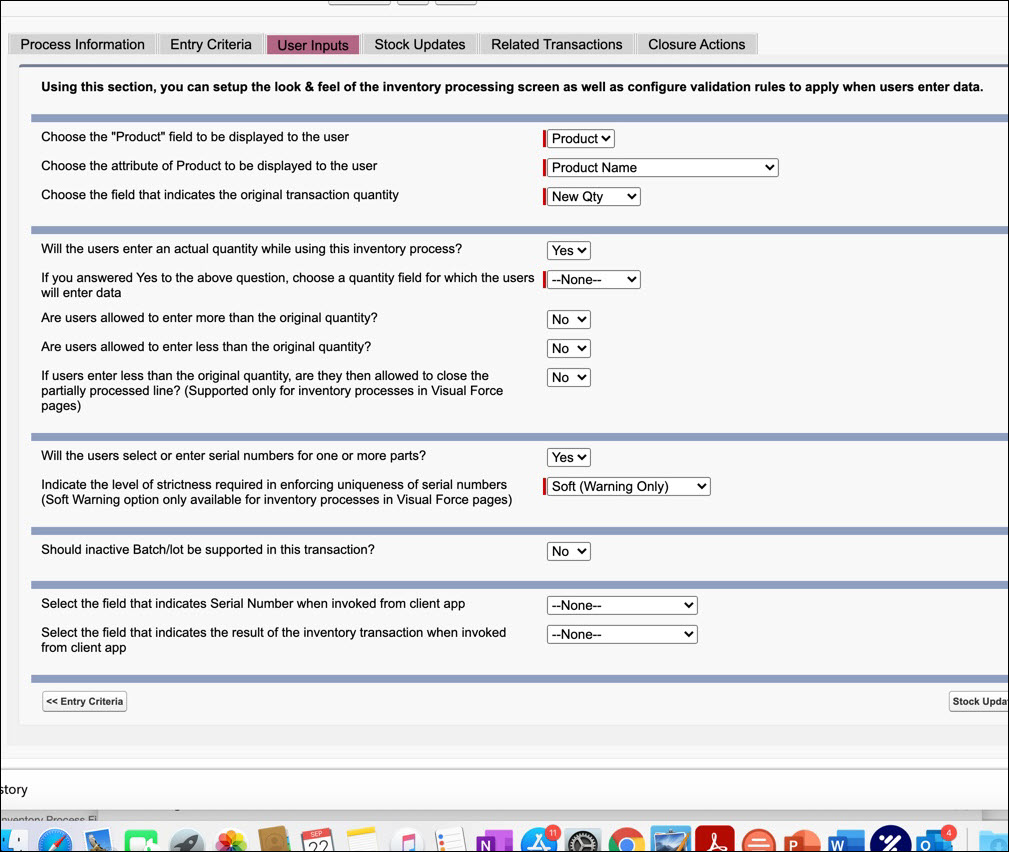
Enter the following fields in the User Inputs tab.
|
Field
|
Description
|
||
|---|---|---|---|
|
Choose the "Product" field to be displayed to the user
|
Choose the header or child objects that reference the Product object. This value is selected automatically.
|
||
|
Choose the attribute of Product to be displayed to the user
|
Select the Product attribute you want the end-users of this process to see in the inventory screen. If you want a combination of Product Name and model number, you can create a formula field in the Product object and select it here.
|
||
|
Choose the field that indicates the original transaction quantity
|
Select the quantity field that should be considered by the inventory screen as the original quantity. If this is a multi-line process, all Number fields from the line object appear.
|
||
|
If you answered Yes to the above question, choose a quantity field for which the users will enter data
|
If you have selected Yes to the above question, then choose a quantity field for which the users will enter data.
The inventory screen will prompt the user to enter a valid quantity for this field.
|
||
|
Are users allowed to enter more than the original quantity?
|
Indicate if users using this process can enter a value that is more than the original quantity value.
|
||
|
Are users allowed to enter less than the original quantity?
|
Indicate if users using the process can specify the quantity value that is less than the original quantity value.
|
||
|
If users enter less than the original quantity, are they then allowed to close the partially processed line? (Supported only for inventory processes in Visual Force pages)
|
Indicates if the process allows the actual quantity to be less than the original quantity, indicate if the users can short-close the lines when the quantity is less. The Inventory screen will show/enable the Close Line checkbox only if this feature is enabled.
|
||
|
Will the users select or enter serial numbers for one or more parts?
|
Indicate if this process requires capturing of serial numbers for the products. While there could be exceptions, it is recommended that this feature be used consistently across all the inventory processes.
|
||
|
Indicate the level of strictness required in enforcing uniqueness of serial numbers (Soft Warning option only available for inventory processes in Visual Force pages)
|
If serial numbers are captured, indicate whether you want ServiceMax to enforce the uniqueness of serial numbers. To ensure high quality of data, Strict (Block Duplicates) is the recommended setting. If you select Soft (Warning only), a warning message appears about duplicate serial numbers but users will be allowed to complete the transaction.
|
||
|
Should inactive Batch/lot be supported in this transaction?
|
Indicate if you want the inactive Batch/Lot information must be displayed in the inventory processing screen.
|
||
|
Select the field that indicates Serial Number when invoked from the client app
|
Select the field that should be considered as Serial Number when invoked from the client app.
|
||
|
Select the field that indicates the result of the inventory transaction when invoked from client app
|
Select the field that should be considered as Transaction Result when invoked from the client app.
|

11. Click the Stock Updates button or the Stock Updates tab. The following Stock Updates screen appears:
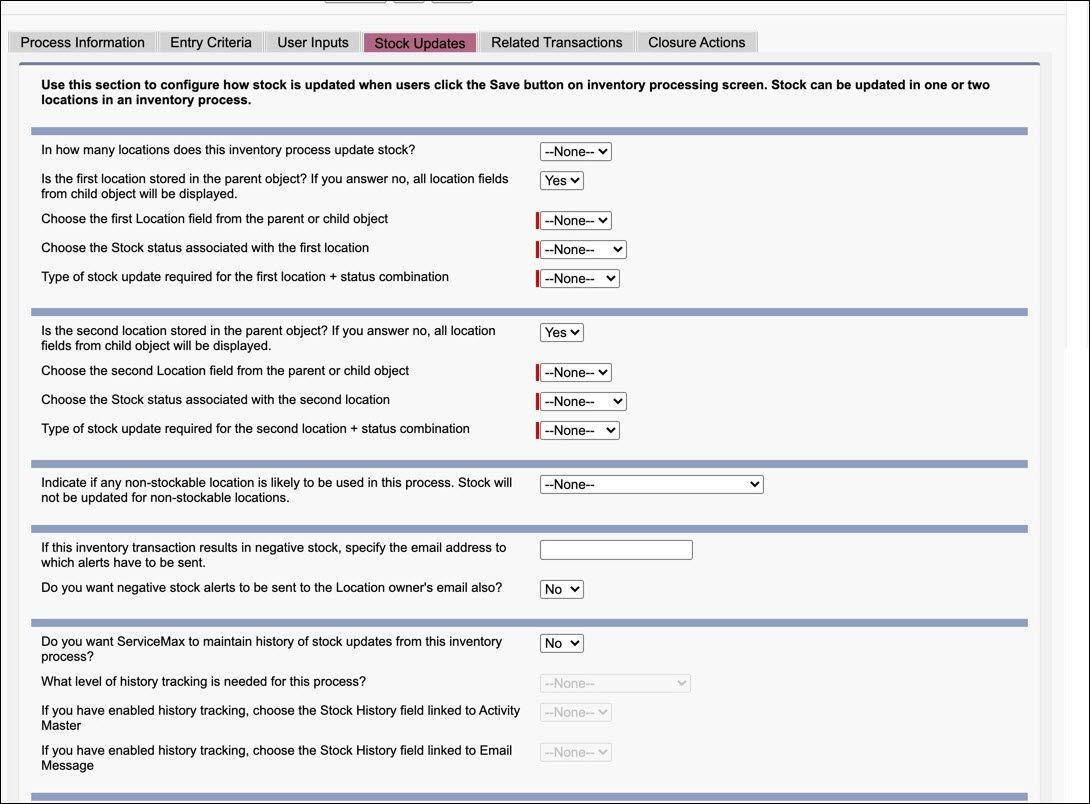
12. The Stock Updates tab is used to configure how stock information is retrieved and saved by the ServiceMax inventory screen. Updated the following fields in this tab:
|
Field
|
Description
|
|---|---|
|
In how many locations does this inventory process update stock?
|
If no stock updates are needed for this inventory process, select None in the number of locations. If the inventory process updates stock in only one stock location, select One. If the inventory process updates stock in two stock locations, select Two. Note: Stock location is a combination of location and status. Even if the inventory process deals with only one location, you must select Two if the stock moves from one status to another. For example, when posting Work Order usage to inventory, stock is consumed from only one location but it moves from Available to Consumed status. Hence it is configured to use two locations.
|
|
Is the first location stored in the parent object? If you answer no, all location fields from child object will be displayed.
|
Indicate if the first location is in the header or child object. Depending on this, all Location lookup fields from the corresponding object are displayed for selection.
|
|
Choose the first Location field from the parent or child object
|
Select the first location, status and type of stock update action to be performed on the first location.
|
|
Choose the Stock status associated with the first location
|
Select the second location, status and type of stock update action to be performed on the second location.
|
|
Type of stock update required for the first location + status combination
|
Select the type of stock update required for the first location and the status combination.
|
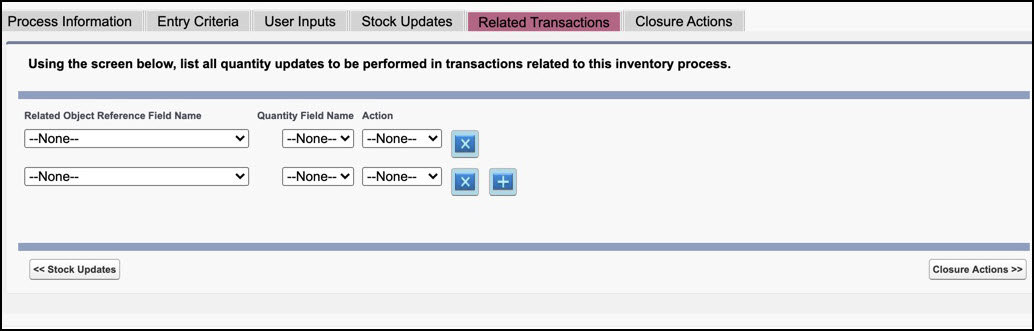
13. The Related Transactions tab is used to configure automatic quantity updates in related transactions. For example, when a shipment is processed against a parts request, the shipped quantity in the parts request can be increased to provide better visibility to the requestors. In the Related Transactions tab:
|
Field
|
Description
|
|---|---|
|
Field Name
|
Select the related object that requires an update.
|
|
Quantity Name
|
Select the quantity field that needs to be updated
|
|
Action
|
Select the action to be performed on the quantity field. Increase or Decrease will result in the quantity field is increased/decreased by the actual quantity entered by the user.
|
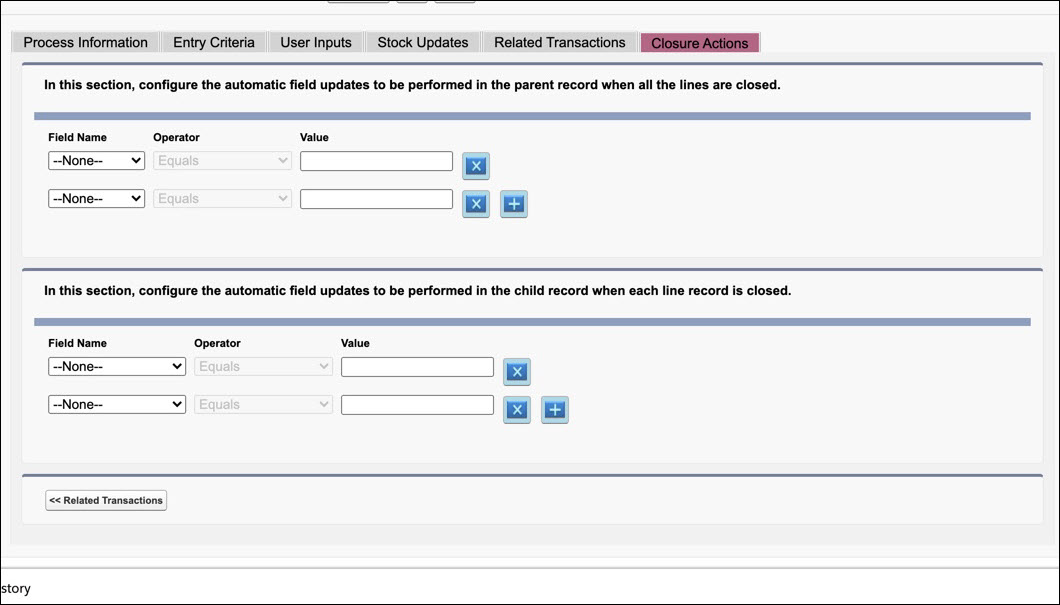
14. In the Closure Actions tab, you can specify the field updates required on the parent and child records when the user completes the inventory transaction. In the Closure Actions tab:
a. Select the field name to be updated.
b. Enter the value to assign to the field. In addition to literal values, you can use the predefined values listed below for certain field types.
|
Field Data Type
|
Literal*
|
Set to today's date
|
|---|---|---|
|
Date
|
TOMORROW
|
Set to today's date + 1
|
|
Date
|
YESTERDAY
|
Set to today's date - 1
|
|
Date
|
NEXT_Nth_DAYS:N
|
Set to Tomorrow + N
|
|
Date
|
LAST_Nth_DAYS:N
|
Set to Yesterday - N
|
|
Lookup (User)
|
SVMX.OWNER
|
Set to ID of the record owner
|
|
Lookup (User)
|
SVMX.CURRENTUSER
|
Use login user's ID
|
|
* Literals are case-sensitive.
|
||
c. Add or remove as many field updates as you require using the buttons marked with + and x.
d. ServiceMax automatically performs the line closure actions when the actual quantity entered is greater than or equal to the expected quantity. Note: ServiceMax automatically performs the header closure actions when none of the lines match the entry criteria specified in the Entry Criteria tab. If you have specified any header-level closure actions, you MUST specify line-level entry criteria. Header closure actions will be ignored otherwise.
15. Click Save.