Select Booking Window Slots
This feature allows you to find available slots in various booking windows in a territory and select an appropriate slot for the Case. In order to use this feature effectively, the following information should be set up effectively in ServiceMax:
• Your service organization’s Territory structure
• Technicians linked to Territories
• Expertise for technicians
• Product specialization for technicians
• SLA Terms
• Booking window definitions
• Booking window access, if your organization has exclusive regional booking windows
In addition, if you like to restrict booking window commitments within the SLA commitment, you must also perform an entitlement check automatically or manually before using this feature.
To initiate booking window selection on a Case, click Book Appointment. The following screen is displayed.

The Booking window screen has the following tabs:
• Territory Selection: Enables you to identify the technicians whose availability must be considered for booking window selection. See below for more information.
• Booking Windows: Enables you to find the number of available slots in the given territory for a range of dates, and select a suitable slot for the Case. See below for more information.
To select a Territory:
1. Click the Territory Selection tab to view the territory tree on the left as shown in the following screenshot.
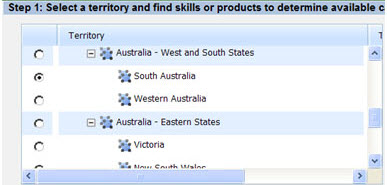
2. Click the radio button against the Territory where you want to find the technician availability.
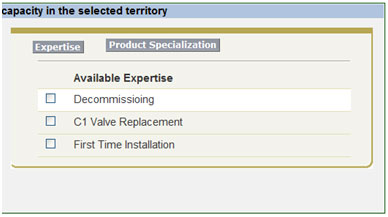
3. Click Expertise if you want to limit the technician availability based on expertise. All the available expertise of technicians in the Territory are displayed as shown in the following screenshot. Select as many expertise records from the list by checking their checkboxes.
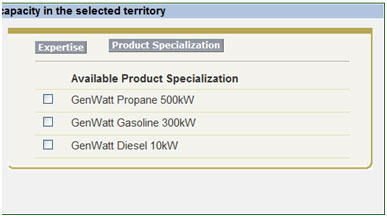
4. Click Product if you want to limit the technician availability based on product specialization. All the products specialized by technicians in the territory appear as shown below. Select as many product specialization records from the list by checking their check boxes.
To select booking windows:
1. Click the Booking Windows tab to display the number of available slots in the given Territory for a range of dates, and select a suitable slot for the Case.
2. Enter the Start Date and End Date. The date range is automatically populated based on your ServiceMax configuration. In addition, the number of days allowed in the range is also based on ServiceMax configuration settings. If you would like to change the default date range or the allowed limit, contact your ServiceMax admin.
3. Check the Apply SLA check box if you would like to see the booking windows within the SLA commitment on the Case.
4. The time zone is automatically filled with your time zone. If you would like to view the results in a different time zone, select the applicable name from the list.
5. Configure how the results should be color-coded at the bottom tab. The booking window results are displayed in the following colors:
◦ Red: If the number of available slots are below a threshold, indicating a densely committed slot.
◦ Green: If the number of available slots are above a limit, indicating a highly available slot.
◦ Yellow: For all the available slots between Red and Green. These are moderately booked slots.
6. Click Show Booking Windows. The results are displayed as shown as shown in the following screenshot.
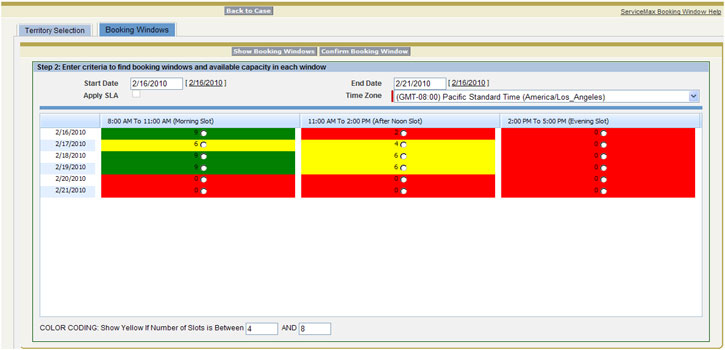
7. Select the applicable slot. Talk to your Subject Matter Experts or ServiceMax admin for guidance on how to select an appropriate slot.
8. Click Confirm Booking Windows.
The selected booking window is saved on the Case and you are redirected to the Case record.