2. If you have not done so already, unprotect the PTC Profile package that contains the profile link type you want to extend.
To unprotect a PTC Profile package, open the PTC Profile package's Property Pages, click the Access Permissions tab, clear the Protected check box, and then click the Copy Protected Flag to Child Packages button.
3. If you have not done so already, create a Profile Diagram in your profile Package.
To create a Profile Diagram, right-click the Package, point to New, point to UML, point to Profiles, and then click Profile Diagram.
4. On the Profile Diagram, add the Stereotype associated with the link type you want to extend to the profile diagram:
a. On the diagram toolbar, click the Stereotype button, and then right-click in free space.
b. Select the Stereotype associated with the link type you want to extend, and then click OK.
5. On the Profile Diagram toolbar, click the Stereotype button, and then click in free space on the diagram.
6. Type the name of the new link type you want to create, and then press the Enter key.
7. On the diagram toolbar, click the Generalization button.
8. Click the new Stereotype you created, and then click the Stereotype you are extending.
9. Right-click the Stereotype you have created, point to Tools, point to Profile Extensions, and then click Copy Super Stereotype Options. This sets up the check boxes on the Options and Directly-Stereotyped Options tabs of the Stereotype's Property Pages.
10. If you require new properties for your new link type, create the required Tag Definitions for the Stereotype.
11. To specify an icon to use for your new link type in the Modeler browsers and on diagram toolbar buttons, and to change the presentation of your new link type on diagrams:
a. Open the Stereotype's Property Pages.
b. Click the Style tab, click the Edit button, and on the Style Modification dialog define the icon to use and the link's presentation.
12. Redefine the link end names for your new link. These names appear when using the link to connect two items, for example in the Quick Links dialog:
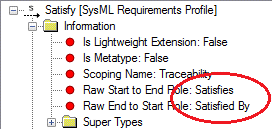
a. If you do not know the inherited link start and link end names of the link type, run the Wrapper Details report: In the Dictionary pane, right-click a link of the type you are extending, point to Tools, point to Profile Extensions, and then click Wrapper Details. On the Meta Model Viewer dialog, the link start and link end names are shown as the 'Raw Start to End Role' and 'Raw End to Start Role' properties in the Information folder. For example:
If you right-click a link on a diagram, the 'Raw Start to End Role' and 'Raw End to Start Role' properties are not shown on the Meta Model Viewer dialog.
b. Create a Comment for the new Stereotype: right-click the Stereotype, point to New, and then click Comment.
c. Open the Comment's Property Pages, and then click the Full Text tab.
d. Type the text that redefines the inherited link end names. The text needs to be as follows:
[FEATURES_RENAMES] <inherited start link name> = <new start link name> <inherited end link name> = <new start end name>
For example, in the Worked Example we change the Satisfy link's 'Satisfies link' name to 'Partially Satisfies' and change the 'Satisfied By' link name to 'Partially Satisfied By' using the following text:
[FEATURES_RENAMES] Satisfies = Partially Satisfies Satisfied By = Partially Satisfied By
13. In the Packages pane, right-click the Model, and then click Reinitialize Profile Helper.
14. If Profile Helper caching is enabled, update the Lightweight Profile Version number to a later version number:
a. In the Packages pane, right-click the Model, point to Tools, point to Profile Extensions, and then click Build Cache/Extensions.
b. Select the check box that is associated with the profile Package that you have changed.
c. Click the command for the version number part you want to increment. Major is the first number, Minor is the second number, Build is the third number, and Revision is the final number.
d. Click OK.
15. Right-click your profile Package, point to Tools, point to Profile Extensions, and then click Create Scripts. This creates the scripts for the commands and toolbar buttons that are required for your new link type in the context of your profile Package.
16. Create the scripts for the commands and toolbar buttons that are required to support your new link type in the other supported profile Packages in the model. For example, if you have extended the Satisfy link, you will need to create scripts for the SysML profile so that your new link type can be created on an Internal Block Diagram.
For each profile Package that requires changing to support your new link type: right-click the profile Package, point to Tools, point to Profile Extensions, and then click Create Scripts.
Tip: If you have created Scripts in a PTC Profile and you do not want the Create Scripts command to delete those Scripts, start the names of those Scripts with [DND].
Creating scripts for the SysML profile does not create scripts for the SysML Requirements profile. After creating scripts for the SysML profile, expand the SysML profile, and then create scripts for the Requirements profile it contains.
 Copy Protected Flag to Child Packages button.
 Stereotype button, and then right-click in free space.
 Generalization button.