Reviewer provides a quick way of reviewing items in a model using PTC provided reviews and optionally your own user defined reviews:
• You can quickly check your models for completeness, correctness and consistency using the provided PTC reviews.
• You can create summary reports that provide statistical analysis of review failures and metrics relating to items in a model.
• You can create your own user defined Reviews to include in Reports.
• The rest of this topic provides a walk through of the basic features of Reviewer, which is useful if this is the first time you have used Reviewer. This walk through covers the following features of Reviewer:
• Running a report.
• Working with a generated report.
• Creating your own report.
Running a report
In this section you will start Reviewer and generate a report.
In Modeler, open the Traffic Lights model that is provided in the Examples database. Reviewer always works with the active model in Modeler.
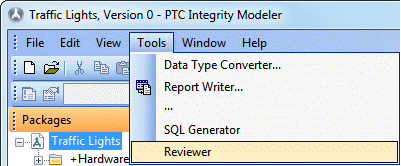
From Modeler, on the Tools menu, click Reviewer.
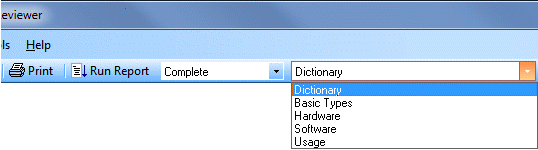
In Reviewer, look at the first drop-down list on the toolbar. These are the provided Reviewer Reports that are available for you to run. Select the Complete report. Later we will show you how to create your own reports.
Now look at the second drop-down list on the toolbar. These are the Packages in the model. You can choose to run a report on the entire model (the Dictionary option), or just a Package (and its sub-Packages) in the model. Select the Dictionary option.
Now generate the report by clicking the Run Report button.
After a short while the progress dialog closes and you will see the generated report displayed in Reviewer.
Working with a generated report
In this section you will see how information is organized in a generated report.
Notice the menu bar at the top of the generated report.
Through the menu bar you can access the different pages of the report. Let's look at each page in turn.
The Overview page provides statistical information about the number of items that are failing reviews. The pie chart reports on the percentage of reviews that are failing, passing and being ignored. After the pie chart, there is a break down of how many items were reviewed by each Review, and the percentage of failures in each case. There are two sections ordering the reviews alphabetically and by the percentage of failures.
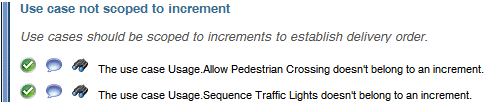
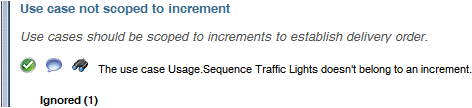
Find the 'Use Case Not Scoped to Increment' review and you can see that two out of two items failed this review.
Click the review to find out which items failed. You are taken to the Summary page, which provides more information about the items that have failed reviews. The first section of the Summary page lists all reviews alphabetically with the number of failures show in each case. The second section lists all reviews and shows the items that have failed each review.
You can see that two Use Cases named 'Allow Pedestrian Crossing' and 'Sequence Traffic Lights' have failed this review.
There are three buttons next to each review failure.
For the 'Allow Pedestrian Crossing' failure, click the Select in Modeler button. Reviewer selects the 'Allow Pedestrian Crossing' use case in Modeler so that you can look at the item in Modeler.
Click the Comment button and in the Comment dialog type 'Need to investigate this further', and then click OK.
Run the report again, and find the 'Use Case Not Scoped to Increment' review in the second section of the Summary page.
The review failure now shows the comment you added after the review failure. This comment will be seen by all users when this item fails this review.
Having investigated this review failure further, you've now decided that this item is not a problem and you do not want it reported as a failure in future. Click the Ignore button and in the Exemption dialog, select Acceptable from the Reason list, type 'This is not a problem' in the Comment box, and then click OK.
Run the report again, and again find the 'Use Case Not Scoped to Increment' review in the second section of the Summary page.
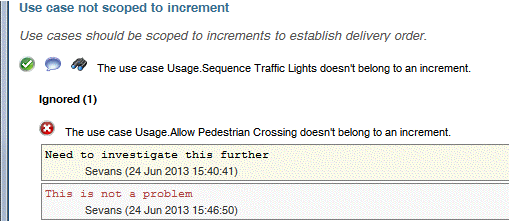
The review no longer reports the 'Allow Pedestrian Crossing' use case as a failure, and an Ignored (1) link appears. This review now ignores the 'Allow Pedestrian Crossing' use case for all users.
Click the Ignored (1) link and it expands to show you which items are being ignored.
In the menu bar, click the Package page. This page is similar to the Summary page, except that only reviews that have failures are listed and the review failures are organized by the Modeler Packages in which the failing items appear.
In the menu bar, click the Category page. This page is similar to the Summary page, except that the reviews are organized by the categories they appear in. There will be more about the review categories later.
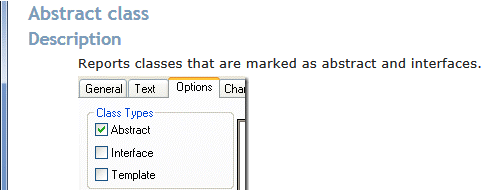
In the menu bar, click the Configuration page. This page lists the Reviews that were included in the report. Each review has a brief description. Click the Abstract Class review. Reviewer opens Help for the Abstract Class review so that you can find out more about what the Review is doing.
In the menu bar, click the Metrics page. This is blank at present because the Metrics reviews are not included in the Complete report.
In the first drop-down list of the Reviewer toolbar, select the Metrics report, and then click the Run Report button.
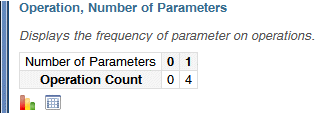
In the menu bar, click the Metrics page. There are now lots of metrics Reviews. In the second section of the page find the 'Operation, Number of Parameters' review.
The summary table shows that there are four Operations in the model and each Operation has one Parameter.
Click the Show Chart button to see the content of the summary table graphically.
Click the Hide Chart button, and then click the Show Breakdown button to see the content of the summary table in more detail, that is, the items that failed.
Creating your own report
In this section you will create a new Report and add Reviews to it.
On the Reviews menu, click Manage Reviewer Reports. The Manage Reviewer Reports dialog lists the PTC Reports that are installed with Reviewer.
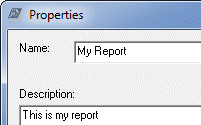
Click the New button and in the Properties dialog type 'My Report' in the Name box, type 'This is my report' in the Description box, and then click OK.
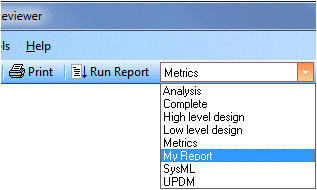
Close the Manage Reviewer Reports dialog and stop and restart Reviewer so that the new My Report report appears on the toolbar drop-down list.
In the first drop-down list select the My Report report so that it is the active report.
By default a new Report does not include any reviews, so you now have to select the Reviews to include in your report. On the Reviews menu, click the Configure My Report command.
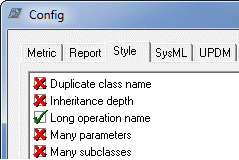
The Config dialog shows which Reviews are included in the Report. There is a tab for each category of review. These are the categories that organize the review on the Category page of a generated report.
Click the Style tab and select the check box associated with the 'Long Operation Name' review, which checks that Operation names are not too long.
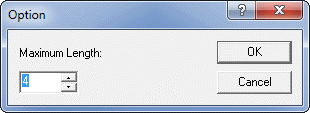
Select the 'Long Operation Name' review, and then click the Config button. The Option dialog shows that this review is checking that the name of each Operation does not exceed 25 characters.
Tip: If you want to select all the reviews on a tab, right-click a review, and then click Select All.
There are four Operations in the model named Amber, Green, Red and Wait, so these four Operations will pass the review.
For the sake of this example only, change the Maximum Length to 4 and click OK. On the Config dialog click OK.
The change you have made to the 'Long Operation Name' review will immediately apply to all Reports that use the Review, and for all users of the model's Database server.
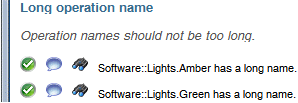
Click the Run Report button and in the generated report you can see that two Operations failed the 'Long Operation Name' review.
Click the 'Long Operation Name' link and you can see that the Amber and Green operations are now reported as failing the review because their names contain more than four characters.
Important: Set the 'Long Operation Name' review option back to 25: On the Review menu, click Configure My Report. Click the Style tab and select the 'Long Operation Name' review. Click the Config button and set the Maximum Length to 25.

 Run Report button.


 Select in Modeler button. Reviewer selects the 'Allow Pedestrian Crossing' use case in Modeler so that you can look at the item in Modeler.
 Comment button and in the Comment dialog type 'Need to investigate this further', and then click OK.
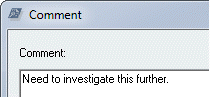

 Ignore button and in the Exemption dialog, select Acceptable from the Reason list, type 'This is not a problem' in the Comment box, and then click OK.
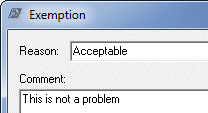
 Show Chart button to see the content of the summary table graphically.
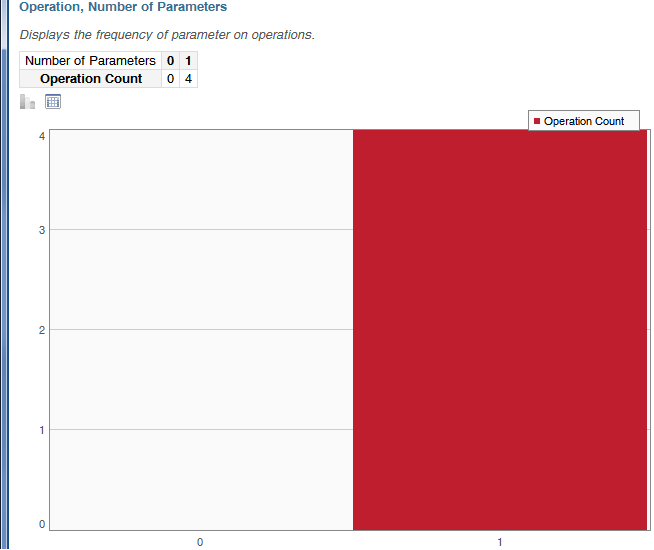
 Hide Chart button, and then click the
  Show Breakdown button to see the content of the summary table in more detail, that is, the items that failed.
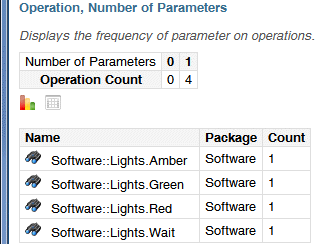
 New button and in the Properties dialog type 'My Report' in the Name box, type 'This is my report' in the Description box, and then click OK.