Populating a diagram
With the Populate function you can add items to a diagram that have been deleted from the diagram canvas but still exist in the dictionary. You can also use the method to add links between these items.
To add items using the Populate function
1. Right-click on the diagram canvas and select > . The Populate Nodes dialog opens.
2. Expand the preferred profile and select the type of items that you want to populate.
3. Click OK. All the items that have been removed or deleted from the diagram canvas and are located in the same package or root item as that of the diagram are now populated in the diagram.
|
|
Items containing other embedded items are not populated on the diagram. You can use the Populate function within the item to populate the embedded items.
|
You can also populate links to the diagram. Right-click on the diagram canvas and select > > . This option populates all links that have been removed from the diagram, but still exist in the dictionary. You can also select the type of link you want to populate on the diagram.
Improvements in the Populate function in PTC Modeler 10.2
The following are some of the enhancements that PTC Modeler has introduced in 10.2:
• In 10.2, Modeler has introduced the new multi-populate function in which you can select multiple items on the diagram and use the Populate function to populate the items. When using multi-populate, Modeler offers the same functions (nodes and links) as is provided while using Populate on the diagram canvas.
• While populating items, the Populate function ensures that the items are arranged according to the grid layout configured in the > dialog. Fore more information on this dialog, see Tool Options dialogs - Grid Populate.
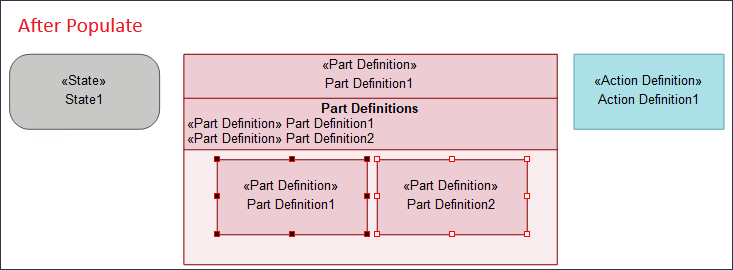
• While populating content, PTC Modeler ensures that the items added to the diagram do not overlap over any existing items on the diagram canvas. Additionally, when you populate an item that has other items embedded in it, PTC Modeler automatically resizes the selected item and moves other items to create space for the item being populated to ensure that surrounding items are not overlapped.
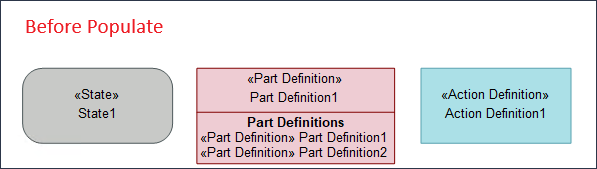
In the above diagram, the Part Definition1 item has two other Part definitions within. After the Populate function is executed on the item, the Action Definition1 item is moved considerably to make space for the expansion of the Part Definition1 item as shown in the diagram below.
After the nodes are populated, Modeler selects the child node items so that they can be populated again through the populate function.
|
|
There may be some delay in executing some of the Populate functions because they are executed in multiple phases to optimize the resulting diagram display. Similarly, when you Undo a populate operation, you may have to use the Undo function more than once to completely undo the effect of the Populate operation.
|