Creating a New Toolbar
Click on the New button in the dialog box. A further dialog box appears:
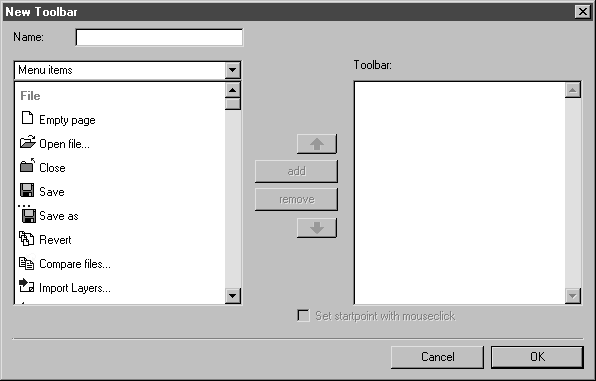
Here you can define which commands, macros or plugins are to be included in the toolbar.
Name
Each toolbar must have an unambiguous name.
Above the field where the commands are displayed, you can choose between menu commands, macros and plugins using the pop-up menu. The menu commands are defaulted.
When Menu items is selected, the display field will show a comprehensive list of menu commands with a preceding tool icon. To adopt a command into the toolbar as a button, click on the command entry. The entry is highlighted. Click on add to adopt the command into the list of buttons on the toolbar.
While compiling a toolbar, you can change between the three command groups menu commands, macros and plugins at any time.
When you set
Macros in the pop-up menu, a list of all the loaded macros appears (see
Macros). No tool icon is displayed in front of macro names. Click on a macro name from the list to select it for the toolbar. A further dialog box appears:
This dialog box asks you to select a tool icon for the macro name. Click on the required tool icon, followed by OK. The name appears with the selected tool icon in the list of buttons on the toolbar.
You can also use your own tool icons. These tool icons must be saved in TIFF or JPEG formats.
If you have a collection of your own tool icons available, click on the check box next to Assign a user defined icon. When you have selected File, the next dialog box asks you to find the file with the tool icon. Select the tool icon and exit the dialog box with Open. A preview of the tool icon appears next to File.
If you close the dialog box with Cancel, the name of the macro will appear without a tool icon in the list of buttons. The tool icon field appears gray in the finished toolbar. When a tool icon button is grayed out, you can only identify which command is assigned to this button via the tooltip. You should therefore assign a tool icon to every macro command.
When you have loaded plug-ins, you can use the Plug-ins option to transfer the menu commands of these plug-ins to the buttons list in the same way as the macros.
For all the entries in the list, you can change the tool icon subsequently or select a new tool icon. Double-clicking on an entry in the list opens the same dialog box as described above. Select a new tool icon and click OK. When you close the dialog box with Cancel, the entry remains entirely unchanged.
Toolbar
All the selected commands are shown in a list. You can add new entries at any time. If you want to remove the entry for a button, select it and click remove. The entry is deleted.
If you want to arrange the buttons in a different way, use the two arrow buttons. Select the entry you want to move. If you click on the arrow pointing upwards, the entry will be moved up one position in the list. With the arrow pointing downwards, the entry is moved down one position. You can click an arrow button several times in succession. This allows you to move an entry e.g. from further down in the list to the top of the list.
The order of the entries in the window from top to bottom corresponds to the order of the buttons on the toolbar from left to right.
The
Set startpoint with mouseclick option is only available for macro entries. If you have created a macro to shorten identical drawing processes, it can be helpful if the macro is started at a particular position on the drawing. Select the macro entry to which you would like to assign this option. Click the box next to the option. A check mark appears. If you click on the button for this entry in the toolbar later on, a tool icon appears next to the arrow cursor. The macro is run as soon as you click with the mouse on the required position on the drawing area (see
More Macros).
If you close the dialog box with Cancel, none of your changes will be applied. Clicking OK adopts all changes. In both cases you are returned to the starting dialog box Customize Toolbars.
When you click on OK here, the new toolbar appears in the drawing area. An existing toolbar is displayed with the changes.