Element Info
The Element info dialog box allows you to change the diameter, value and angle of an ellipse or to convert it into a thread. Select an ellipse, then choose > .
| The > command can only be executed for a single element. |
You can perform changes by making entries in the respective fields or by making selections from the pop-up menus. These changes will be displayed roughly in the preview box at the upper right.
Diameter
You can use this field

to enter the diameter of the ellipse, i.e. the distance between the two vertices 1 and 4 (see
Ellipse).
If you are working with No isometric foreshortening (see
Preferences), element info also gives the diameter between vertices 2 and 5 and vertices 3 and 6 (see
Ellipse). In this case, set the ellipse diameter here

.
Angle
The ellipse value can be defined either by entering a value or by making a selection from the pop-up menu.
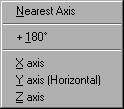
Orientation
The orientation angle can also be defined by entering a value or by making a selection from the pop-up menu.
Nearest axis rotates the ellipse to the nearest axis, while X axis, Y axis and Z axis rotate it to the relevant axis. The angles of these axes depend on the grid which is currently set. The command + 180° rotates the ellipse by 180°. The value obtained from the selection in the pop-up menu is displayed in the entry field.
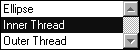
Conversion to a Thread
The pop-up menu at the top of the dialog box allows you to convert the ellipse to either an inner or an outer thread and to edit it without exiting the dialog box. The
Element info dialog box changes accordingly (see
Inner Thread and
Outer Thread).
Note that threads cannot be assigned fills, for example. Assigning contour attributes to threads is also restricted compared with ellipses. Consequently, any attribute you have assigned to an ellipse cannot be applied upon conversion to a thread.
When converting ellipses to threads, any missing segments of the ellipse are added.
Quitting the Dialog Box
You can confirm your entries by clicking OK. Clicking the Cancel button quits the dialog box without applying any changes you have made.