Preferences for Import
In a similar way to the IGES format, Arbortext IsoDraw CADprocess supports additional options designed specifically for importing VRML files. When these options are selected, all the assemblies defaulted by the generating system are recognized when VRML files are imported. Arbortext IsoDraw CADprocess also creates object info for each of these assemblies. A hotspot can also be generated if required.
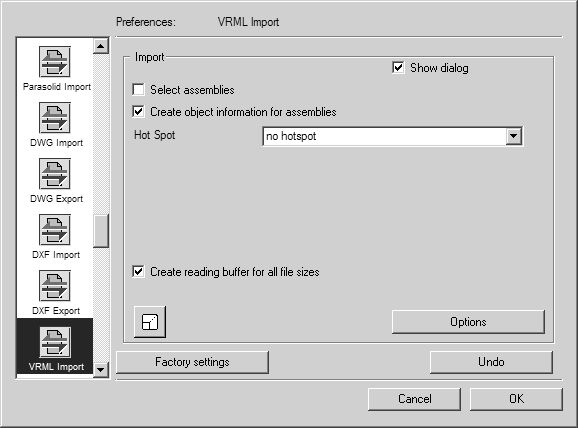
Choose > , then click the VRML Import symbol. The following preferences panel appears for import:
You can set the following preferences for the import process:
Select Assemblies
If you select this option, the Selection of Structures dialog box appears when the file is opened. You can use this to select, which assemblies are to be imported. If you do not select this option, all assemblies in the file will be imported.
Create Object Information for Assemblies
The pop-up menu allows you to select one of the two setting options. If you select No hotspot, object info is created for each assembly. The name in each case corresponds to the designation assigned in the generating system for the particular assembly. If you select Lines of object, a hotspot will be generated in addition to the object info. This allows you to trigger an action later by simply clicking the object. If you do not select the option, the name Group will appear in the object window for each assembly once import has been completed.
Create Reading Buffer for All File Sizes
When you select this check box, the entire file is imported in a single operation. This speeds up the import process. If you do not select this option, the file will be accessed frequently during import. Since considerable memory is needed for importing the file in its entirety, you should only choose this option if your hardware is configured accordingly.
Scale
The bottom left corner of the dialog box contains the Scaling button, which you will already be familiar with from the export command. Clicking this button opens the Scaling dialog. You can use it to enlarge or reduce the drawing during the importing stage.
Clicking OK confirms your entry, clicking Cancel aborts the operation.
Options
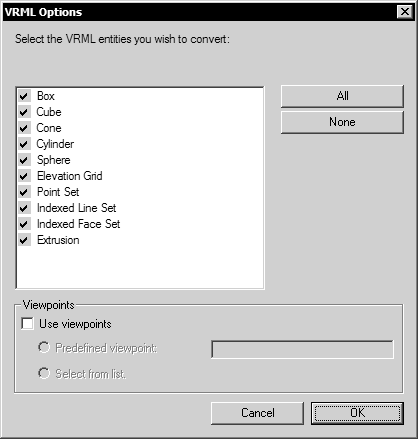
The following dialog box appears if you click Options:
The window allows you to activate or deactivate each VRML element type individually. A check mark at the start of the line indicates that this element type will be imported, while if there is no check mark, all file elements of this type will be ignored when the file is imported.
The setting for each individual type can be reversed by selecting and clicking it. The fields on the right-hand side are provided as an aid in locating the various element types.
Use Viewpoints
This is where you can select a viewpoint to be imported. If you wish to import a specific viewpoint, select Predefined viewpoint and enter its name in the entry field. If your entry does not exactly match the relevant name, this option is ignored during import. If you select Select from list the VRML Viewpoints dialog box appears during import. You can then select the desired viewpoint in this dialog box.
Clicking OK confirms your settings in the dialog box. Clicking Cancel means that all elements are imported and viewpoints are ignored.


