Key Settings and Preferences in a Template File
The following description provides an overview of the settings that can be prepared in a template file.
Drawing Area
The basis for any drawing is the drawing area, i.e. the boundaries within which a drawing is to be created. This setting can carried out on the Drawing preferences panel.
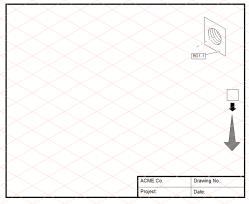
Drawing Frames
Drawings are often bordered with a frame and various details of the drawing are summarized in a drawing head. Apart from the data that must be entered individually for each drawing, you can make all the necessary preparations.
|
|
Assign all elements to the drawing frame and to all other set components of a layer. By also specifying the layer, all elements are protected against activation.
|
Grid Preferences and Set Up
Grid options and the program’s drawing behavior can be set on the
Grid preferences panel (see
Basic Settings). Adapt the settings to fit the requirements of later drawing work.
The default grid setting is Isometric. If you are not working with isometric representation, set up a new grid in the Grid attributes window.
Pens, Styles, Halos
It is best to use the standard pens. You can change all the attributes of the standard pens. The same applies for styles and halos.
|
|
When elements from other files are copied into the template file, standard pens used on the copied elements are changed to the attributes of the standard pens in the template file. All other pen types are adopted in the template file.
|
Fills, Hatchings, Patterns
Create all the necessary fills.
If your own hatchings or patterns are to be used, the files must be saved in the Windows user application data folder at User Profiles\username\Application Data\PTC\IsoDraw\Patterns folder before commencing drawing work.
Layers
Layers are particularly useful when working on extensive drawings. As layers have various characteristics, specific element groups can be controlled more easily. Dimensions, callouts, auxiliary constructions, etc. should therefore be located on separate layers.
Other Preferences
As explained at the beginning of this section, a diverse range of preferences can be set. It would be excessive to list all of these here.
To conclude, here are a few of the more common settings used in technical illustration:
• Settings for text elements (Text menu)
• Specifying distances for thread turns (Threads preferences panel)
• Specifying callout style (in the attributes window)
• Specifying dimension preferences
• Preparing macros (Macros menu)
Import / Export
If foreign data is to be imported on a regular basis, specify the format settings on the appropriate preferences panel.
|
|
When importing files, a new, unnamed window will open. Furthermore, the preferences from the template file are not applied, but rather the standard program settings. If you wish to continue working with the settings of the template file you will have to copy the contents of the imported file into the template file.
|
Also, if the drawings are to be exported into another data format for further use, you must specify the export options for the format on the preferences panel.
Icons and Characters
If certain icons and characters such as arrows or circles for zoom operations are to be used for drawing, arrange these on the borders of the drawing area and create a layer for the elements.
When you have completed your template settings, test them. If you change settings at a later point during production work you will need to adapt existing drawings to the new settings.
We have prepared a template file.
The drawing frame is situated on layer 2. Prepared elements are situated on layer 3.
If you wish to view the contents, open the file template.idr in the Arbortext-IsoDraw-install-path\Tutorial\Tutorial IsoDraw folder.
Use the Save as command to save the file in the Templates folder of the program folder. End the session and restart the program.
| The filename template.idr is now displayed at the New command in the submenu. Selecting the file opens a window with the preferences and contents of the template file. The file has the name no name x. You should save the file before starting any work. |