Configure ThingWorx as a Resource Server
If you are configuring your ThingWorx application to also serve as a Resource Server, complete the procedures in the steps below.
Step 1: Add an Additional Identifier to ThingWorx
1. In the Microsoft Azure portal, navigate to Enterprise applications and select your enterprise application.
2. From the Manage menu, click Single sign-on and in the Basic SAML Configuration section, click Edit.
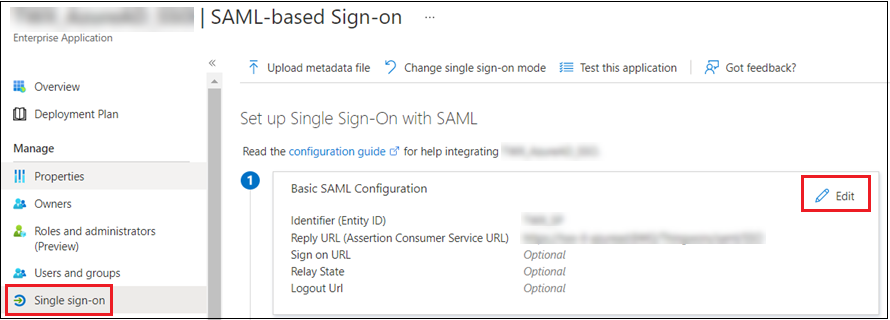
3. In theBasic SAML configuration window, add a new identifier. The identifier must include the prefix api:// and then the Enterprise Application ID of the ThingWorx application that will act as the Resource Server.
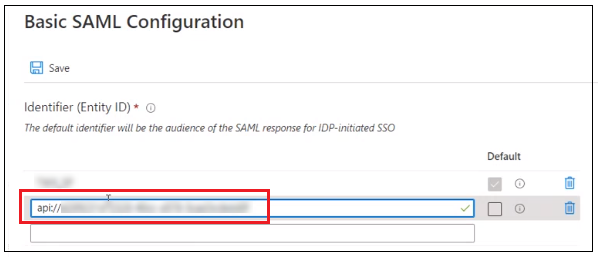
4. Click Save.
Step 2: Create and Expose a Scope in ThingWorx – When ThingWorx is the Resource Server
1. In the Microsoft Azure portal, under the Manage menu, select App registrations.
2. From All applications, select your ThingWorx application.
3. Under the Manage menu, select Expose an API.
4. Click Add a scope.
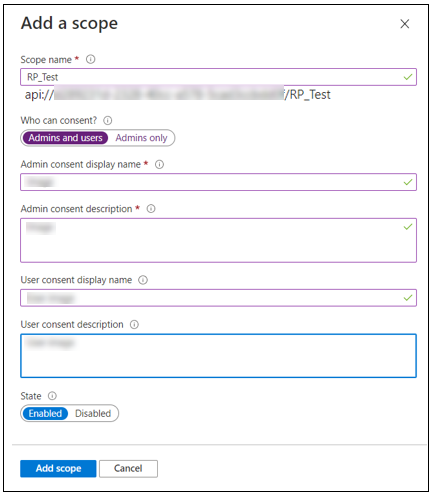
5. In the Add a scope pop-up window, add the scope details and click Add scope.
Step 3: Create and Expose a Role in ThingWorx (optional)
Perform this step only when ThingWorx is the Resource Server and OAuth M2M is required. |
1. In the Microsoft Azure portal, under the Manage menu, select App registrations.
2. From All applications, select your ThingWorx application.
3. Under the Manage menu, select App Roles.
4. Select Create App Role.
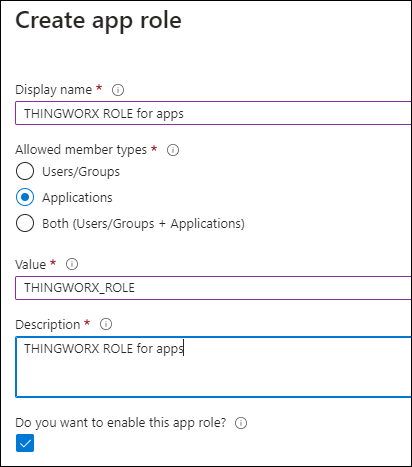
5. In the Create app role pop-up window, add the role details as in the example image below and then select Apply.
a. Value: You cannot reuse the scope name (THINGWORX) set in Step 2 above. Provide a different value, such as THINGWORX_ROLE.
b. Allowed member types: Select Applications.
You also need to update resourceServerSettings.json as follows: "globalScopes": "THINGWORX,THINGWORX_ROLE" For more information, refer to Configure ThingWorx as a Resource Provider. |
Step 4: Add the Exposed ThingWorx Scope and/or Role to the Client Application
1. In the Microsoft Azure portal, under the Manage menu, select App registrations.
2. From All applications, select your client application.
3. Under the Manage menu, select API permissions.
4. Click Add a permission. A popup window opens.
5. Click APIs my organization uses and select your ThingWorx Resource Server application.
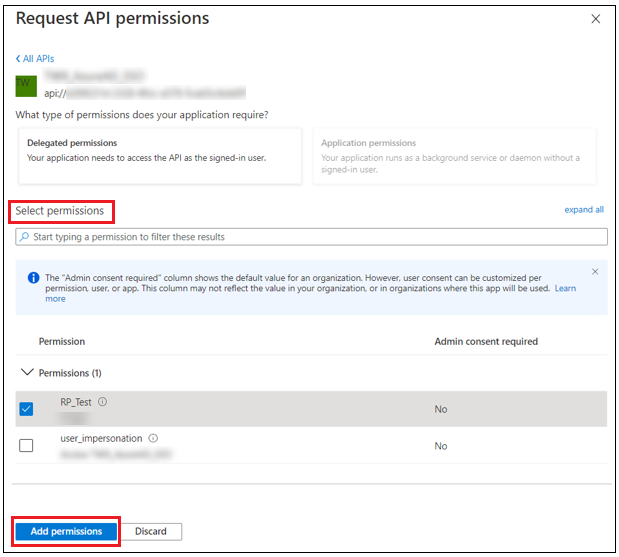
6. In the Request API permissions popup window, under Select permissions, select the exposed scopes and/or roles of your ThingWorx Resource Server.
7. Click Add permission.
The Configured Permissions list is updated to show the added permissions.
Step 5: Grant admin consent for <tenant>
Perform this step only if you completed Step 3 (expose the role) and provided permission for this role in Step 4. |
On the client App registration page (the same as in Step 4), click the Grant admin consent for <tenant> button.
All your permissions were granted for the specified tenant. If if you want to keep some of your delegated permissions ungranted, revoke consent individually by clicking Revoke admin consent. |
Step 6: Configure the resourceServerSetting.json File
Based on your ThingWorx version, refer to either of the topics below for detailed configuration steps.
• ThingWorx 9.7:Configure ThingWorx as a Resource Server
• ThingWorx 9.6: Configure ThingWorx as a Resource Server
• ThingWorx 9.5: Configure ThingWorx as a Resource Server
• ThingWorx 9.0 to ThingWorx 9.4: Configure ThingWorx as a Resource Server