Changing a Pacemaker
Production counts and loss events entered into DPM are logged against the work unit that is designated as the pacemaker for a work center. If the work unit that sets the pace for a work center changes, then the work unit that is designated as the pacemaker for the work center must be changed.
Impacts of Changing a Pacemaker
Changing the pacemaker for a work center has the following impacts:
• For data automation:
◦ If the previous pacemaker was configured for data automation, that configuration is removed. If the new pacemaker will collect data through data automation, you must configure the new pacemaker for data automation. For more information, see Setting Up Data Automation.
◦ If the new pacemaker is configured with a production rollover counter, that counter starts at zero, even if it had been a pacemaker previously. This counter can be manually set to start at a different number. For more information, see the "To Log Production Counts" section of Setting Up Data Automation.
◦ If there are open automated events on the previous pacemaker, these events are ended.
• For production blocks:
◦ If the pacemaker is changed during a scheduled shift, the last production block on the old pacemaker ends when production on the old pacemaker is stopped. Production blocks start being created on the new pacemaker when production starts on the new pacemaker, including a production block for the time gap between the start of the shift and the start of production on the new pacemaker, or the time gap between the end of production on the old pacemaker and the start of production on the new pacemaker, whichever is needed.
◦ If the pacemaker is changed outside of a scheduled shift, production blocks start being created for the new pacemaker when production starts on the new pacemaker. There can be a gap between the production blocks on the old pacemaker and production blocks on the new pacemaker.
For more information, including examples of how production blocks are created during and outside of scheduled shifts, see Production Blocks.
• In Production Dashboard,
◦ The current pacemaker for the work center displays in the Pacemaker field in the Production Dashboard identity pane.
◦ The Production Accounting pane displays production blocks only for the current pacemaker.
◦ The collapsed Event Log view displays loss events only for the current pacemaker.
◦ The expanded Event Log view displays loss events for all work units in the work center for the past 24 hours, and scrap loss events for the past week.
◦ Historical scrap is always logged against the pacemaker that was set when the selected job order was running.
|
|
If a work center does not have a pacemaker, you can set that work center on the Production Dashboard, but you cannot start production or add historical scrap for that work center.
|
• On the Material Settings tab for the work center:
◦ The Best Demonstrated Speed updates to show the best demonstrated speed for each material on the new pacemaker. This value defaults to the ideal cycle time for the material until a job order has completed for this material on this pacemaker. If the new pacemaker has been a pacemaker for this work center in the past, any previously recorded best demonstrated speeds are shown for those materials.
◦ The Ideal Cycle Time for the materials in the Materials List remain unchanged.
◦ The actual cycle times that are recorded for completed job orders are specific to the material and pacemaker pairing. When you are selecting an ideal cycle time from the list of historical cycle times, the list includes the actual cycle times for job orders that completed on the current pacemaker which are faster than the material’s ideal cycle time. If the new pacemaker has been a pacemaker for this work center in the past six months, any existing actual cycle times that meet the criteria are included in the list.
Changing a Pacemaker
To change the pacemaker, complete the following steps. This procedure can also be used to set the pacemaker for a work center that does not have a pacemaker.
1. Complete or cancel all job orders for the work center. Job orders that are assigned to the area to which the work center belongs can be in the Pending or Dispatched state.
2. Navigate to the Material Settings tab for the work center. The name of the current pacemaker for the work center is displayed in the Pacemaker field.
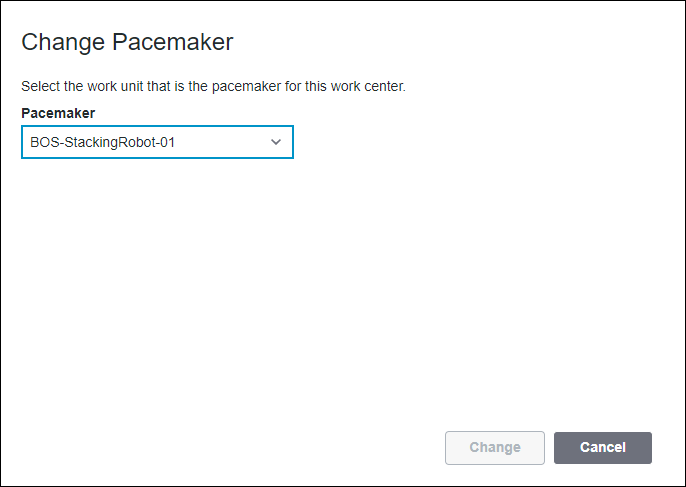
3. Click Change next to the pacemaker name. The Change Pacemaker window opens with the current pacemaker selected.

4. Select the new pacemaker from the Pacemaker drop-down list. All work units in the work center are included in the list.
5. Click Change.
6. On the confirmation window, click Confirm. A success message confirms that the pacemaker has been changed. The new pacemaker is displayed on the Material Settings tab.
7. If the new pacemaker will collect data through data automation, follow the steps in Setting Up Data Automation to configure the new pacemaker for data automation. This is required even if the new pacemaker was configured for data automation in the past.