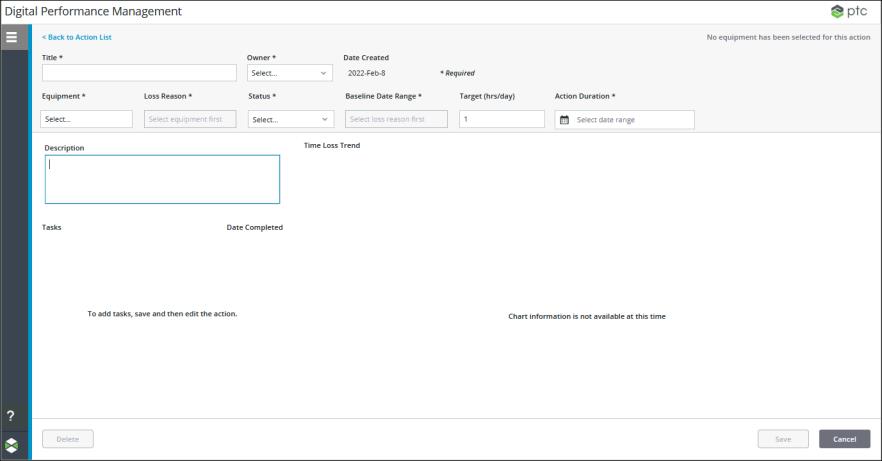
Creating an Action
To create a new action, complete the following steps:
1. On the main Action Tracker page, click Create. An empty action form displays.

2. Enter the information for the action:
◦ Title—Enter a title for the action, up to 100 characters. Required.
◦ Owner—Select the user who is responsible for the action. Required.
◦ Equipment—Select the work center or work unit for the action from the equipment hierarchy. Required.
The work center or work unit selected determines the loss reasons that can be selected for the action. If the loss reason that you want to select for this action is specific to a particular work unit, select that work unit.
◦ Loss Reason—Expand the appropriate loss category and select the loss reason for the action. Equipment must be selected before Loss Reason can be selected. The available loss reasons are determined by the selected work center or work unit. If there are loss reasons that are specific to certain work units, those loss reasons might not be available on the work center. Required.
◦ Status—Select the appropriate status for the action: Not Started, In Progress, At Risk, Overdue, and Complete. Required.
◦ Baseline Date Range—Select the date range that is used to calculate the baseline from which this action seeks to improve. The baseline represents a starting point for the action. It is the average of the daily loss hours for the selected equipment and loss reason over the date range against which you want to compare your improvement results. Ideally, this data matches the filter settings used in Performance Analysis where losses worth targeting can be identified. The selected date range must fall entirely before today’s date.
In the Set Baseline window, select the date range and click Save. The system automatically calculates the Baseline value by looking up loss events for the selected equipment and loss reason during the specified date range, and calculates the average daily loss hours. Once the Baseline value has been calculated and saved from the Set Baseline window, it is not recalculated if additional loss events are added for the selected equipment and loss reason during the specified date range. Equipment and Loss Reason must be selected before Baseline Date Range can be set. The calculated baseline value is shown as a horizontal line in the Time Loss Trend chart once the action is created. Required.
◦ Target (hrs/day)—Enter the target number of loss hours each day that you want to reach. This value can be less than or equal to 24 hours and include decimal points, for example 4.25. You can use the calculated baseline hours per day from the Set Baseline window as a reference point. Optional.
◦ Action Duration—Select the date range during which this action is pursued. Required.
◦ Description—Enter a description of the action, up to 255 characters. Optional.
3. Click Save to create the action.
At any point before clicking Save, you can click Cancel or Back to Action List to return to the action list without creating the action. |
Once the action has been created, the Time Loss Trend chart displays data, and you can edit the action and add tasks. Tasks cannot be added to an action before the action has been created by clicking Save.