Exercise 9 – Migrating Parts with Family Tables
1. In Windows Explorer, browse to <downloaded files location>\IFXTraining\Legacy_Parts and copy family_nut.prt, to the IFX_custom_lib\myfasteners folder.
2. In Windows Explorer browse to IFX_custom_lib\ifx_catalogs and open the Fastener Instance Catalog File myfasteners.txt
3. Edit the myfasteners.txt file to match the file below:
#screws
shcs
legacy_fasteners
#nut
family_nut
4. Save and close myfasteners.txt.
5. In Windows Explorer from the <creo_loadpoint>, click Common Files > afx > configuration > types > nut > nut_01. The nut_01 folder opens.
6. Open nut_01_detail.gif and note the dimensions.
7. From the nut_01 folder copy the file nut_01.dat to IFX_custom_lib\ifx_fastener_data.
8. In Windows Explorer, browse toIFX_custom_lib\ifx_fastener_data folder and rename the file nut_01.dat to family_nut.dat.
9. Open family_nut.dat.
10. In Creo Parametric, open family_nut.prt and select The generic.
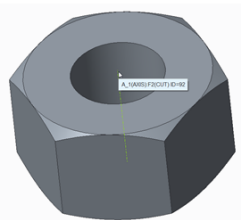
11. Note the axis ID in family_nut.prt.
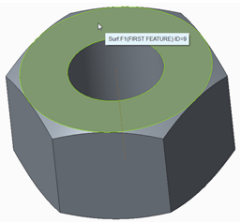
12. Note the mating surface ID in family_nut.prt.
13. Click Tools > Family Table and note the following details:
◦ S=d0
◦ K=d1
◦ DG=d4
◦ DN=d5
14. Edit family_nut.dat to match the file below and note the following:
◦ The number for SURFACE should match the mating surface ID in family_nut.prt
◦ The number for AXIS should match the axis ID in family_nut.prt.
◦ For INFO you may want to replace My with your name.
◦ FAMPRT family_nut is the generic part name.
NUTTYPE 1
UNIT MM
SURFACE 9
AXIS 92
CBNUT DIN974-2 R1
INFO My Nut Family
FAMPRT family_nut
SYMBOL DN S K DG P
INSTANCE DN S K DG P
#FAMTAB d5 d0 d1 d4 P
15. Save and close family_nut.dat.
16. In Windows Explorer, from the <creo loadpoint> click Common Files > afx > text > usascii.
17. In the usascii folder, open the library translation file ifx_translation.txt and add the following help text to the file.
family_nut.HelpText
Migrated Family Table of Nuts
Migrated Family Table of Nuts
|  After updating files that you want read by Creo Parametric, a restart of Creo Parametric is sometimes required. |
18. Save and close ifx_translation.txt .
19. Restart Creo Parametric.
20. Set the working directory to <downloaded files location>\IFXTraining\Migration_Asm.
21. Open ifx_migration.asm.
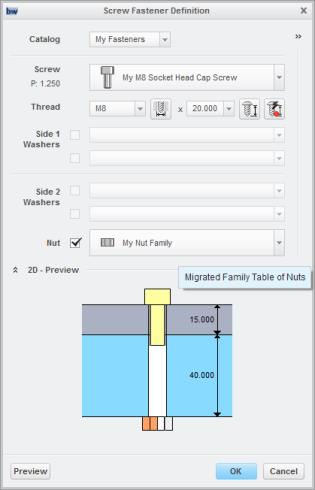
22. Using Creo Intelligent Fastener, select the references to place a new fastener with the nut. When the Screw Fastener Definition dialog box opens, select My Fasteners in the Catalog list, and note the following:
◦ My Nut Family is available in the Nut list.
◦ The tooltip is Migrated Family Table of Nuts.
23. Complete the placement of the fastener, and close the assembly without saving.