Editing a Mapping Shape
The texture you select is projected onto the part using a mapping shape. Select a mapping shape that best matches the shape of the part.
|
Plane
Use for parts that have mainly flat surfaces or when the texture needs to look correct on only one side of the part.
|
 |
|
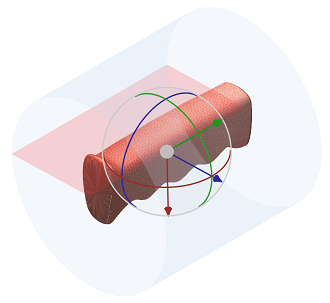
Cylinder
Use for parts that are roughly cylindrical or for surfaces that are curved in one plane.
|
 |
|
Sphere
Use for parts that are roughly spherical or parts that are curved in multiple planes.
|
 |
|
|
The red plane displayed for cylinder & sphere indicates where the texture joins with itself.
|
To Edit a Mapping Shape
1. Click Edit Add Texture dialog, The Mapping Shape dialog box opens and a representation of the mapping shape is shown in-view with a dragger.
2. Select a Mapping Shape from the shape menu that is most appropriate for the selected face.
◦ Plane
◦ Cylinder
◦ Sphere
3. Use the in-view dragger (or dialog controls) to rotate and move the shape to align with the part so that the texture is applied correctly onto the part.
4. Click OK. The Mapping Shape dialog box closes, and the mapping shape dragger is replaced with the texture dragger.