Using ThingWorx Analytics with Creo Parametric
Prerequisites
1. Create an Analysis provider on the ThingWorx server using the PTC.Analysis.CreoConnector connector. Make sure that the name you give the provider is defined correctly in the
config.properties file.
3. Create a source thing in ThingWorx to act as the digital twin of the Creo Parametric model.
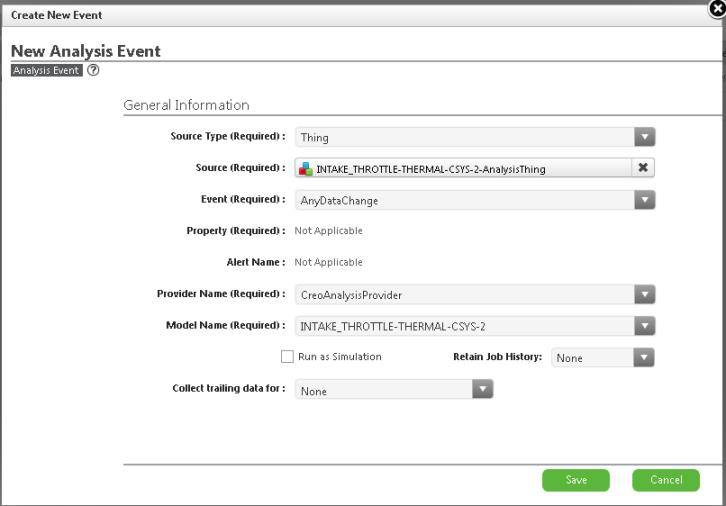
4. Create an analysis event on the ThingWorx server based on the published model and the source thing. Clear the Run as Simulation check box.
5. Map input and output sensors from the model to the correct input and output properties of the source thing.
6. Creo Product Insight for ThingWorx Extension only supports historical analysis. Make sure that the Analysis Event you create is not enabled.
7. Make sure the values for Retain Job History and Collecting trailing data for are set to None.
8. The source thing needs appropriate input property history. You can obtain property history in one of the following ways.
◦ Fetch the property history for input from sensors configured in the real world, when the data is fetched from ThingWorx for analysis in Creo Parametric.
◦ Creo Product Insight for ThingWorx Extension provides a Things Property Simulator mashup you can use as an alternative to real sensors. Use Things Property Simulator mashup to simulate property data for Things that can then be used for testing and validation for Creo Product Insight for ThingWorx Extension.
Automatically Creating an Analysis Event
When you publish a model to
ThingWorx, you can automatically create an analysis event. Steps
3 to
7 above are automated when you set the
CreateEventOnPublish configuration option to
yes in the
config.properties file. When a model with this option enabled is published,
Creo Product Insight for ThingWorx Extension performs the following operations:
1. Creates a ThingTemplate and a Thing with properties based on the model being published to ThingWorx.
2. Creates an Analysis Event to connect the published model to the newly created Thing.
3. Maps the input and output sensors from the model to the corresponding properties on the newly created Thing.
4. Create Anomaly Alerts for numeric properties in the newly created Thing.
5. When the automatically created event is used in an active replay and the model is published again, Creo Product Insight for ThingWorx Extension may delete the replay and recreate the event based on the configuration option AutoDeleteDependentReplays.
Fetching Historical Property Data from ThingWorx to Creo
Using the Creo Product Insight for ThingWorx Extension you can download historical sensor replay data from a ThingWorx server to the Creo Product Insight application.
You can use Creo Product Insight for ThingWorx extension functionality when you click Connect to Server from the design in Creo Parametric.
1. Open a model with sensors in Creo Parametric.
2. Click Tools > Connect to Server. An embedded browser opens with the ReplayManagerAndUploader mashup created by Creo Product Insight for ThingWorx Extension.
3. Type your credentials in the login prompt. The PTC.Creo.ReplayManagerAndUploader mashup created by Creo Product Insight for ThingWorx Extension appears in the dialog box.
Notice that the mashup is pre-populated with some of the required details such as Replay Event (Any Data Change) and Data Source for the model that is active in the current session.
4. You can change the prepopulated data and then select a new time range for historical data.
5. Use the configuration option ReplayExportableCheckInterval in the config.properties file to fetch large amounts of data (more than 500 slices) from ThingWorx. See the examples that follow:
◦ When the ReplayExportableCheckInterval interval is set to 1, Creo Insight waits for a maximum of 5 seconds, with a check after every 1 second, before reporting a failure.
◦ When the ReplayExportableCheckInterval interval is set to 5, Creo Insight waits for a maximum of 25 seconds, with a check every 5 seconds, before reporting a failure.
6. You can use the Graphical Replay Duration Selection widget to select the Replay Duration with greater accuracy. The Graphical Replay Duration Selection displays the property history of the source thing.
a. Click Setup and select the properties to display.
b. Select the date range for the property history you want to display.
c. Click Update Data to populate the graph.
d. To display a date in the widget, click any point in the graph to select a date.
e. When you click Set Start Time and Set End Time, the dates are propagated to the Replay Duration selector.
In the figure below, two properties are selected.
In the figure below, the graph appears.
7. Select the required event and source thing, set the Replay Duration, then click Send to Creo. Mapped property history for the selected time range is downloaded to Creo Parametric.
Uploading Simulation Data
You can use the embedded browser to upload Simulation data to the ThingWorx server.
1. Open a model with sensors in Creo Parametric.
2. Click Tools > Connect to Server. An embedded browser opens with the ReplayManagerAndUploader mashup created by Creo Product Insight for ThingWorx Extension.
3. Type your credentials in the login prompt. The PTC.Creo.ReplayManagerAndUploader mashup created by Creo Product Insight for ThingWorx Extension appears in the dialog box.
The mashup is prepopulated with some of the required details such as Replay Event (Any Data Change) and Data Source for the model active in the current session.
4. Click the Send To Server tab.
5. In the Choose Replay Data File to Import box, click Choose File.
6. Select a CSV file containing the property values you want to upload to ThingWorx.
7. Click Upload.
8. Click Send To Server. The Simulation Data is uploaded to ThingWorx. A success or failure message appears in the Creo message area.
9. To overwrite output property values, select the Overwrite Results check box.
By default, there are checks in place to prevent overwriting property data on ThingWorx. Simulation data is uploaded only when there is no overlap between timestamps in the CSV file and the existing property values on the source thing on the server.