To Create Stochastic Lattice with Varied Density Based on Creo Simulation Live Results
In this procedure, the results of a Creo Simulation Live study are used to construct stochastic lattice with varied density. The resulting lattice has higher density in regions of higher stress, and lower density in regions of lower stress. In stochastic lattice, the density is increased by increasing the number of the lattice cells.
A similar process also applies to beam-based lattice that is not stochastic. In beam-based lattice with a regular cell shape, in the resulting lattice, the density in regions of higher stress is increased by increasing the diameter of lattice beams and balls, and decreasing the diameter in areas of lower stress.
You can use Creo Simulation Live structural study results, of the type von Mises, to create lattice with varied density based on a simulation. You can use any other type of study by mapping the results to a density map (.txt tab delimited).
1. Open a part that contains a Creo Simulation Live structural study.
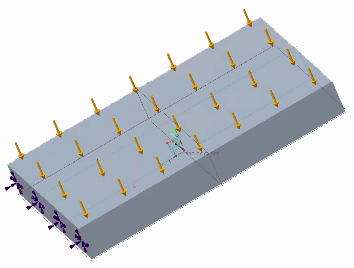
2. Click the Live Simulation tab. The loads and constraints defined in the study appear.
3. To view the study results, click >  Simulate. The study results appear.
Simulate. The study results appear.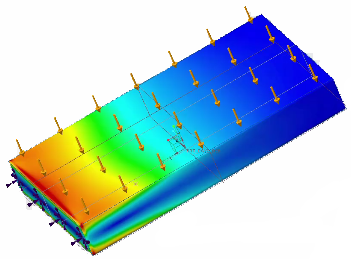
The area near the fixed constraints are colored red, indicating areas of high stress. The blues area indicate areas of low stress.
4. To probe a number of points for von Mises stresses, so the lattice can be constructed with varied density that corresponds to stress:
a. Make sure that the stresses to be exported are displayed on the model in the graphics window.
b. Click >  Export Numerical Results. The Enter number of points to probe box opens.
Export Numerical Results. The Enter number of points to probe box opens.c. Type a value for the number of points to probe. The number of probes controls the resolution and quality of the lattice.
d. Click  . The output of the probe is a comma-delimited, x, y, z, .csv file, that reports the stress value at each probe location. It can take some time for the file to be generated.
. The output of the probe is a comma-delimited, x, y, z, .csv file, that reports the stress value at each probe location. It can take some time for the file to be generated.When the .csv file is generated, the Save a Copy dialog box opens.
e. To save the .csv file, in the Save a Copy dialog box:
a. Type a name for the file, or accept the default name. The format of the default file name is <Result Quanity>_<Model Name>.CSV.
b. Browse to the folder in which to save the file.
c. Click OK.
5. To return to the part environment, click the Model tab.
6. To create the lattice, click >  Lattice.
Lattice.7. To define the general parameters of the lattice:
◦ Click the Lattice Region tab, and select the Replace body with lattice check box.
◦ Click the Cell Type tab, and select  Stochastic.
Stochastic.◦ Click the Cell Fill tab, and type values for the Ball diameter and Cross section size.
◦ Define other parameters as needed.
8. To defined the density parameters of the lattice:
a. Click the Density tab.
b. To use simulation results to define the lattice density, under Variability based on, select  Simulation.
Simulation.c. To select the studies that defines the density:
a. Click  . The Select Simulation Study Location dialog box opens.
. The Select Simulation Study Location dialog box opens.b. To select the data format, next to Type, select Creo Simulation Live Data (*.csv).
c. Navigate to the .csv file, and click OK. The file appears under Case name.
9. If you select more than one study, under Weight, assign a weight for each study’s contribution to the computation.
10. To define the density values for the resulting lattice, under Volume Fraction, define the following parameters:
◦ Min—Limits how sparsely the lattice cells can be constructed. A value of .05 means that in any region, the lattice must contain at least 5% of the mass of the original body.
◦ Average—Overall resulting mass percentage. A value of .4 will result in a lattice with an average of 40% of the mass of the original part.
◦ Max—Limits how densely the lattice can be constructed. A value of .95 means that in any region, the lattice cannot contain more than 95% of the mass of the original body.
11. To refresh the display of the minimum and maximum stress cutoff values, click  Refresh.
Refresh.This option is available for stochastic lattice when the  OK command is available on the Lattice tab, or after clicking
  preview for other beam-based lattice.
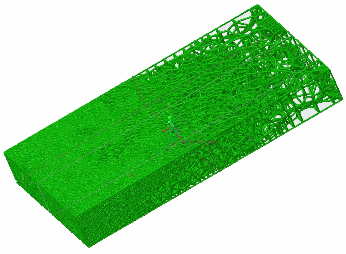
OK command is available on the Lattice tab, or after clicking preview for other beam-based lattice.12. On the Lattice tab, click OK. The lattice is constructed. It is more dense in areas of greater stress, less dense in areas of lower stress, and the density varies gradually between the two.
OK. The lattice is constructed. It is more dense in areas of greater stress, less dense in areas of lower stress, and the density varies gradually between the two.