About the Mill Window User Interface
The Mill Window user interface consists of the following items:
• Tabs
Feature Icon
A Mill Window is represented by  .
.
 .
.Click > > to access the Mill Window user interface.
Feature Tab
The Mill Window feature tab consists of the following elements:
 —Allows you to create the window by projecting the silhouette of the reference part on the Mill Window start plane, in the direction parallel to the z-axis of the Mill Window coordinate system. If the manufacturing assembly contains more than one reference part, you must select the part that you want to use to create the silhouette. Additionally, if a reference part used for creating the silhouette contains through cuts or holes, you can specify whether you want Creo NC to keep or remove these loops by clicking the Keep Inside Loops check box in the Options slide-up panel.
If you want to use a workpiece silhouette to create the Mill Window, use the allow_workpiece_silhouette configuration option. |
 —Allows you to define the Mill Window by sketching a closed contour. Creo NC uses the start plane as the sketching plane and orients the sketch so that the X-axis of the coordinate system points to the right, and the Y-axis points upwards.
 —Define the Mill Window by selecting edges or curves that form a closed contour. This contour is then projected on the start plane to form the window outline.
Tabs
The Mill Window user interface consists of the following tabs:
Placement—Use this tab to select the start plane. You can select any datum plane as the start plane. However, if you want to select a plane while defining an NC sequence, you must select a plane parallel to the XY-plane of the NC sequence coordinate system. When you create an NC sequence, the retract plane is the default start plane.
Depth—Specify the Mill Window depth by doing one of the following:
• Select  To Selected in the Depth Options box to select a plane parallel to the start plane.
 To Selected in the Depth Options box to select a plane parallel to the start plane.
• Select  Blind in the Depth Options box to enter a depth value with respect to the window coordinate system (z-depth).
 Blind in the Depth Options box to enter a depth value with respect to the window coordinate system (z-depth).
If you do not specify a depth option, Creo NC performs milling up to the surfaces visible from the Mill Window; through-all vertical and slanted surfaces are milled up to the bottom of the reference part.
Options—Specify the type of window contour for the Mill Window. The options available for window contours are as follows:
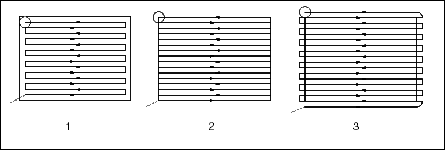
• Inside window contour—The tool is always within the outline of the Mill Window outline (as shown in image 1 in the following illustration).
• On window contour—The tool axis reaches the window outline (as shown in image 2 in the following illustration).
• Outside window contour—The tool goes completely past the window outline (as shown in image 3 in the following illustration).

You can stretch or shrink the Mill Window geometry by clicking the Offset window uniformly check box and specifying an offset value and direction. Additionally, if the reference part used for creating the silhouette contains through cuts or holes, you can specify whether you want Creo NC to keep these loops (cuts or holes) by clicking the Keep Inside Loops check box.
You can also specify the geometry type for the Mill Window by clicking Adjust geometry collection within window. The following are the various geometry types that you can select:
• Solid—Collect only solid geometry inside the window contour.
• Quilt—Collect only quilt geometry inside the window contour.
• Facet—Collect only facet (STL) geometry inside the window contour.
• Solid and Quilt—Collect solid and quilt geometry inside the window contour.
• All—Collect all types of geometry inside the window contour.
• Automatic (default)—Collect solid geometry first, then facet (STL) geometry, and finally quilt geometry.
The geometry types are valid only for the roughing, reroughing, and finishing NC sequences |
Properties—Use this tab to view information about the Mill Window feature in the Creo Parametric browser and enter a user-defined name for the feature.