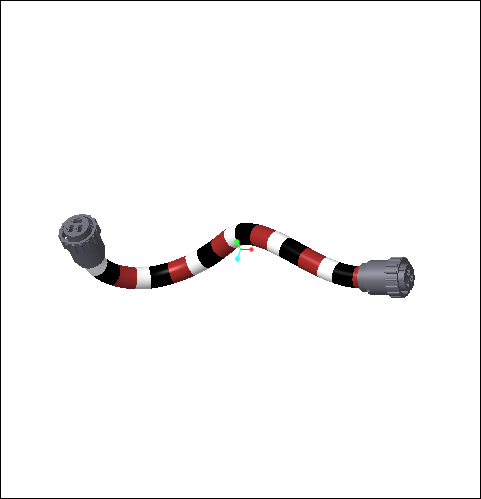
Striped Appearances for Cables
You can use the Striped Cable Appearance dialog box to define a striped appearance for the cables. Click > >  Spools >
  Cable Stripes to access the Striped Cable Appearance dialog box.
Spools > Cable Stripes to access the Striped Cable Appearance dialog box.The appearance can be set to a spool and is displayed on the cable in the thick cables mode. You can view the striped appearance of the cables in Creo View and flattened harness.
You can define and use your own customized striped appearances. You can import a striped appearance from a .csv file. You can save the striped cable appearance to another .csv file.
To Apply Striped Appearance to a Cable
1. Click > Spools. The Menu Manager opens.
Spools. The Menu Manager opens.2. Click Edit. The Select Spools dialog box opens.
3. Select the spool and click OK. The Electric Parameters dialog box opens.
Alternatively, you can select the spool from the Model Tree. In the mini toolbar, select  Edit Spool Parameters. The Electric Parameters dialog box opens
Edit Spool Parameters. The Electric Parameters dialog box opens4. In the Electric Parameters dialog box, for the spool parameter COLOR, type the name of the striped appearance under Value.
Creo Parametric searches for a striped cable appearance that matches the specified value for the spool parameter COLOR. If not found, Creo Parametric searches for the name in Appearances. If found, the color is set.
To Define New Striped Appearances
Set the Edit_cable_stripes_file configuration option to yes to apply, define, edit, and save stripe cable appearances. By default, the value is yes.
If the Edit_cable_stripes_file configuration option is set to no, you cannot:
• Modify the existing striped appearance or create a striped appearance.
• Copy, Rename, or Delete a striped appearance
To define a new stripe appearance:
1. Click > Spools > Cable Stripes. The Striped Cable Appearance dialog box opens.
Spools > Cable Stripes. The Striped Cable Appearance dialog box opens.2. Click  > to create an appearance. In the Striped Appearances box, type the name.
> to create an appearance. In the Striped Appearances box, type the name.You can select an appearance from the Striped Appearances list and modify its values. |
3. Click  and select a base color for the appearance.
and select a base color for the appearance.If you do not select a base color, the default color is set as the base color. |
4. Under stripe section, define a stripe:
◦ From the Orientation list, select the orientation of the stripe.
◦ Click  to select the color of the stripe.
to select the color of the stripe.If you do not select a color, the stripe is set to the default color. |
◦ For horizontal orientation, type or select a value for Width, Angle, and Gap.
◦ For vertical orientation, type or select a value for Width, Position, and Gap.
The values for Width, Position, Angle, and Gap can be in model units, in percentage of the circumference of the cable, or in percentage of the length of the cable. Click  to change the unit to percentage of the circumference or length of the cable. to change the unit to percentage of the circumference or length of the cable. |
◦ You can set the cable stripe to be symmetrical or tile. By default, the cable stripes are tiled. When symmetrical is selected, the defined stripe appears at the beginning and at the end of the cable at a symmetrical position. Click
  to set it to tile. The defined stripe repeats itself until the end of the cable.
is selected, the defined stripe appears at the beginning and at the end of the cable at a symmetrical position. Click to set it to tile. The defined stripe repeats itself until the end of the cable.5. Use the following options to add and modify the stripe sections:
◦ Add Section - Add a new stripe.
◦  - Remove a stripe.
- Remove a stripe.◦  and
and  - Change the position of the stripe sections.
You can see the cable preview in the lower section of the Striped Cable Appearance dialog box.
A striped cable appearance can have maximum six sections. |
6. Click Apply to apply the striped appearance to all the cables routed from the matched spool.
7. Click OK.
You can save the new appearances to a striped cable appearance file defined using configuration option cable_stripes_file otherwise the file is stored in the working directory.
To Use Custom Stripped Appearances
If you want to use your own customized cable stripe appearances, do the following:
1. Modify the appearances using the Striped Cable Appearance dialog box.
2. Click > Save As. The Save As dialog box opens.
> Save As. The Save As dialog box opens.3. Select a new location, if needed.
If you do not change the location, the .csv file is saved in the working directory. |
4. In the New file name box, type a name for the striped cable appearance file.
5. Click OK.
You can also modify the appearances in the .csv file.
6. Set the cable_stripes_pattern_file configuration option to point to the stripe appearances (.csv) file.
If you have made changes to the stripe cable appearances file, click Update in the Striped Cable Appearance dialog box to view the latest changes.
Preset Options
In the Striped Cable Appearance dialog box, click and select one amongst the following preset options:
and select one amongst the following preset options:Option | Description |
|---|---|
New | Creates a new stripe appearance. |
Copy | Copies the current data of an appearance to a new appearance. In the Striped Appearances box, type the name of the new appearance. |
Rename | Renames a stripe cable appearance. |
Delete | Deletes a stripe cable appearance. |
Update | Updates the changes made to the stripe appearances in the .csv file in the Striped Cable Appearance dialog box. |
Units | Changes the units of width, gap, and position parameters for a stripe cable appearance. By default, the unit of the striped cable appearance is inches. You can change the units to millimeter, centimeter, inches and microns. |
Striped Cables .csv file
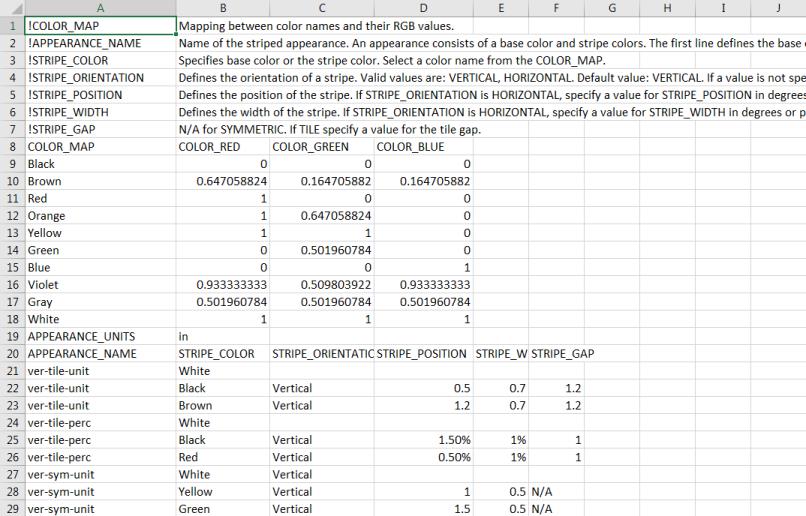
The .csv file for striped cable appearance consists of:
• List of all the colors used for appearances
• Definition of all the parameters included in the .csv file
• Appearances list
You can modify appearance by changing the values in the COLOR_BLUE, COLOR_RED, COLOR_GREEN columns.
Click > to incorporate the changes made in the .csv file. The Striped Cable Appearance dialog box will be updated accordingly. Click Apply in the Striped Cable Appearance dialog box to apply the changes to the session.
> to incorporate the changes made in the .csv file. The Striped Cable Appearance dialog box will be updated accordingly. Click Apply in the Striped Cable Appearance dialog box to apply the changes to the session.