To Reach for a Target
A manikin segment or point on the manikin can reach for a point in the scene.
1. To display datum points, on the Graphics toolbar, click > .
2. Click > . The Manikin Reach dialog box opens.
3. To define the part of the manikin that reaches for an object, with the Manikin location collector active, select a manikin segment or a point on the manikin.
A point appears in the collector. For some manikin segments, you can select a different point on the same segment.
4. To define the target for which the manikin reaches, with the Target point collector active, select a datum point, edge vertex, curve end, or point on surface. A point appears in the collector.
5. To create a constraint between the point on the manikin and the target point in the scene, select the Create constraint check box.
The constraint appears under the  Manikin Constraints node of the manikin in the Manikin Tree after you click OK. The result depends on whether the point on the manikin reaches the target point:
 Manikin Constraints node of the manikin in the Manikin Tree after you click OK. The result depends on whether the point on the manikin reaches the target point:
◦ Point on manikin reaches the target:
▪ An alignment constraint is created between the point on the manikin and the target.
▪ The constraint stays in the model, even after you close the Manikin Reach dialog box.
◦ Point on manikin does not reach the target:
▪ The point on the manikin is positioned as close as possible to the target point.
▪ A distance measurement is created between the two points. The measurement includes a saved analysis of the distance between the point on the manikin and the target point.
▪ After you close the Manikin Reach dialog box, during any drag or reach operations, the measurement updates, trying to automatically convert into an alignment constraint.
The posture, and the distance when the point on the manikin does not reach the target, can slightly vary each time a reach constraint is recreated or redefined, or the model is regenerated.
6. To change the orientation by aligning the selected manikin segment with planar references:
a. Click  to expand the Reach orientation section.
 to expand the Reach orientation section.
b. To align in the first direction:
i. Select the First direction check box.
ii. From the Manikin segment plane list, select the anatomical plane on the manikin segment that will align with a planar reference.
iii. With the Target plane collector active, select a planar reference in the scene with which to align the anatomical plane
iv. To flip the alignment 180º, click Flip.
Result: the selected segment changes its orientation to align with the selected planar reference
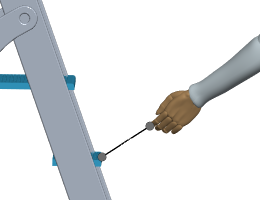
Without reach orientation:

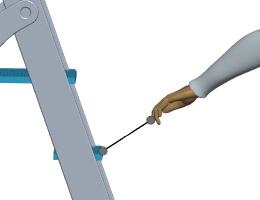
With reach orientation:
The sagittal plane of the distal segment of the left index finger is aligned with a datum plane that divides the ladder into right and left sections. This causes the hand to rotate.

c. To align in the second direction, select the Second direction check box, and repeat the previous step.
7. Click OK. The manikin reaches for the target in the graphics window.
8. Optionally, to save the position of the manikin as a snapshot, right-click  Snapshots in the Manikin Tree, and select New Snapshot.
 Snapshots in the Manikin Tree, and select New Snapshot.
Video
See Reach use cases in a video.
 Datum Display Filters
 Point Display
 Reach
Reach