About the Work Environment
The Creo Layout work environment consists of the following elements:
• Ribbon
• File menu
• Toolbars
• Navigation area
• Model Tree
• Sheet
• Favorite Views
• Zoom Port
• Shortcut menus
◦ Mini toolbar
◦ Shortcut menu
• Creo Layout browser
• Status bar
• Full screen mode
Ribbon
The ribbon contains Creo Layout tabs with organized sets of commands. Commands on each tab are grouped according to their function. You can customize the ribbon tabs, groups, and commands. To customize the ribbon, right-click the ribbon, and then select Customize the Ribbon from the shortcut menu.
The Creo Layout environment contains the following tabs:
• Design
• Annotate
• Organize
• Tools
• View
• Hatching & Fill
• Format
For more information about tabs in
Creo Layout, see
About Using the Tabs.
File Menu
Click the File button in the upper-left corner of the Creo Layout window to open the file menu. You can use the file menu to:
• Create or open layouts.
• Manage files and sessions.
• Share files.
• Set environment and configuration options.
Toolbars
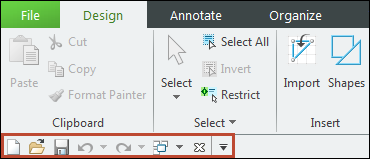
• Quick Access toolbar—The quick access toolbar is available regardless of which tab is selected on the ribbon. By default, it is located below the Creo Layout ribbon. It provides quick access to frequently used commands, such as open, save, undo, redo, regenerate, close window, and switch windows. You can customize the quick access toolbar to include other frequently used commands from the ribbon.
• Graphics toolbar—The graphics toolbar is located at the top of the graphics window. The toolbar includes common commands for the graphics area. Use the shortcut menu to toggle the display of commands, and to change the toolbar location. To open the shortcut menu, right-click the toolbar.
You can toggle the display of the following buttons:
◦  Refit
Refit—Zooms and pans the view to fit all of the elements in the layout.
◦  Refit to Format
—Zooms and pans the view to fit all of the elements within the format defined for the layout.
◦  Zoom In
—Zooms in to display geometry in more detail.
◦  Zoom Out
—Zooms out to display more geometry on the screen.
◦  Pan
Pan—Moves the layout.
◦  Previous
—Returns the model to the previous orientation.
◦  Zoom Port
—Opens or closes the zoom port window.
◦  Repaint
—Redraws the current view in the graphics window.
◦  Constraints
—Shows or hides constraint icons.
◦  Hatching & Fill
—Shows or hides all hatching & fill.
◦  Origin
—Shows or hides the grid origin.
◦  Set Origin
—Repositions the grid origin when you click in the graphics window.
◦  Show center points
—Shows or hides all center points.
◦  Grid
Grid—Shows or hides the grid.
◦  Snap to Grid
—Enables snapping to grid line intersections.
◦  Guides
—Shows or hides guides.
◦  Overlapping Geometry
—Highlights entities that overlap.
◦  Highlight Open Ends
—Highlights vertices or sketched entities that belong to one entity.
◦  Select Untagged
—Selects items that are not assigned to any tags or nodes.
◦  Vertices Display
—Shows or hides vertices.
◦  Coordinate Systems Display
—Shows or hides coordinate systems.
Navigation Area
The navigation area includes the Model Tree, Folder browser, and Favorites. Click

on the status bar to toggle the display of the navigation area.
Model Tree
The Model Tree contains nodes and tags that reflect the design hierarchy. You can use the tags and nodes to filter items that are displayed in the graphics window. The Model Tree panel is docked on the left side of the graphics window. To release the panel, click

>
Undock.
Sheet
The sheet represents the available workspace of a layout. The sheet is infinite in size and can change to accommodate the layout. You can use a standard or a custom color for the sheet background. When you create a layout or during the design process, you can also specify a standard or a custom format, or use a predefined sheet that includes company or manufacturing information. The current format is displayed in the lower-left corner of the graphics window.
Favorite Views
You can save one or more snapshots of a layout in various zoom factors as favorite views. When you click the favorite views arrow, a filmstrip of saved views opens. You can use the favorite views tool to reorder, rename, save, replace, or comment on a view.
Zoom Port
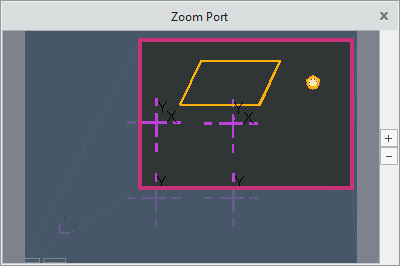
You can use the Zoom Port window to navigate large layouts more easily. When the zoom port is open, the entire design is displayed in a separate window, with the current view enclosed in a box. You can move the box in the zoom port window to change the view in the graphics window.
Creo Layout Browser
The
Creo Layout browser provides access to internal and external Web sites.

on the status bar controls the display of the browser.
Status Bar
Each Creo Layout window has a status bar located at the bottom of the Creo Layout window. When applicable, the status bar displays the following controls and information areas:
• 
—Controls the display of the navigation area.
• 
—Controls the display of the
Creo Layout browser.
• Messages Area—Displays messages related to actions in the graphics window. Right-click in the message area, and then click Message Log to review past messages.
• Server Status Area — Displays Creo Layout server status when connected to a Windchill server.
• 
—Displays warning and error shortcuts for the Event Manager.
• 
—Opens the
Search Tool dialog box.
• Selection Buffer Area—Displays the number of items selected in the current model.
• Selection Filter Area—Displays the available selection filters.
• Graphics Toolbar Area—Displays the Graphics toolbar if the location of the Graphics toolbar is set to status bar.
Full Screen Mode
You can switch to the full screen mode to maximize the graphic space available on your screen. In the full screen mode, all window elements except the Graphics toolbar and Favorite Views are hidden. This increases the graphics window space available to you. Press F11 or click
 Full Screen
 on the status bar to switch between full screen mode and normal mode.
The full screen mode hides the following elements from the Creo Layout window:
• Ribbon
• Quick Access toolbar
• Status bar
• Navigator
The Quick Access toolbar, ribbon, status bar, and navigator display when you place the pointer on their respective locations.


 Refit—Zooms and pans the view to fit all of the elements in the layout.
 Refit to Format—Zooms and pans the view to fit all of the elements within the format defined for the layout.
 Zoom In—Zooms in to display geometry in more detail.
 Zoom Out—Zooms out to display more geometry on the screen.
 Pan—Moves the layout.
 Previous—Returns the model to the previous orientation.
 Zoom Port—Opens or closes the zoom port window.
 Repaint—Redraws the current view in the graphics window.
 Constraints—Shows or hides constraint icons.
 Hatching & Fill—Shows or hides all hatching & fill.
 Origin—Shows or hides the grid origin.
 Set Origin—Repositions the grid origin when you click in the graphics window.
 Show center points—Shows or hides all center points.
 Grid—Shows or hides the grid.
 Snap to Grid—Enables snapping to grid line intersections.
 Guides—Shows or hides guides.
 Overlapping Geometry—Highlights entities that overlap.
 Highlight Open Ends—Highlights vertices or sketched entities that belong to one entity.
 Select Untagged—Selects items that are not assigned to any tags or nodes.
 Vertices Display—Shows or hides vertices.
 Coordinate Systems Display—Shows or hides coordinate systems.
 on the status bar to toggle the display of the navigation area.
 > Undock.

 on the status bar controls the display of the browser.
 —Controls the display of the navigation area.
 —Controls the display of the Creo Layout browser.
 —Displays warning and error shortcuts for the Event Manager.
 —Opens the Search Tool dialog box.
 Full Screen on the status bar to switch between full screen mode and normal mode.