You can directly create DXF or MI files of one or more sheet metal parts in Part Library. The sheet metal parts must be created using either Creo Elements/Direct Sheet Metal or Creo Elements/Direct Basic Sheets. To do this, you can first create and examine torch cut features or flats.
1. Click Part Library and then, in the Torch Cut group, click Create. The Torch Cut Creation dialog box opens.
2. Select one or more parts, or an assembly. If you select an assembly, a flat is created for every sheet metal part in the assembly. After you finish your selection, the Bend Parts dialog box opens.
3. The Bend Parts dialog box lists the following information for all valid parts:
◦ The module in which the part was created. If it is created in a module other than Sheet Metal or Basic Sheets, you can customize to treat parts that have a certain attribute as sheet metal parts.
◦ Availability of a flat for the part, and whether the flat is up to date with the part.
Click Apply.
4. For Basic Sheets parts, specify the K-factor for the flat.
5. Under Stamps, select the Delete check box if you want the stamps to be removed before creating the flat.
6. Under Delete Holes, specify the minimum diameter for drilled holes. All drilled holes that have a lower diameter value are deleted before creating the flat. Counterbored through holes and chamfers are automatically deleted.
7. Under Result, select the following check boxes:
◦ Keep Part—To keep torch cut feature with the raw part in the model.
◦ Keep Part+Workplane—To keep the torch cut feature with the raw part as well as the workplane in the model.
8. Under Update Calculations, click one of the following:
◦ Never—No flats are created.
◦ If Not Exist—If a flat already exists, it is not recalculated even if it is not up to date with the sheet metal part.
◦ If Necessary—If an up-to-date flat exists, it is not recalculated. Otherwise, the flat is created or updated as required. This is the default.
◦ Force—Flats are always created.
9. Under Calculation Results, select the Show check box to show the results of the calculation in an output window.
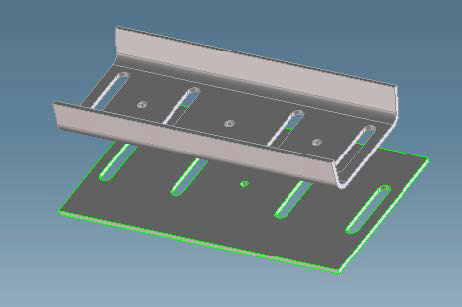
10. Click OK to complete the operation. The flats are created as shown below.
 Create. The Torch Cut Creation dialog box opens.
 to complete the operation. The flats are created as shown below.