Customizing TableColumnModels lab
|
Time Estimates for Completion
|
||
|---|---|---|
|
Using XML commands, you can control the arrangement of columns visible in the Workspace.
In this lesson you'll learn how to change the columns that are visible and their order in the Creo Elements/Direct Model Manager Workspace.
|
Description:
|
2 minutes
|
|
Lab exercise:
|
15 minutes
|
|
Description
In previous versions of Creo Elements/Direct Model Manager, you could customize the Workspace Table Column Model using Java. Now you can customize any Table Column Model using only XML commands. This includes any Table Column Models that you may have created, provided they extend WMTableColumnModel.
Try the lab below to learn how to customize a Table Column Model using XML.
Lab
In this lab you will add two columns to the normally displayed columns in the Load window, and assign custom column headers.
This lab assumes that you know which schema you are using.
The steps in this lab are:
Verify initial behavior
Initialize and bring up the Creo Elements/Direct Model Manager Workspace.
1. Start Creo Elements/Direct Modeling from NetBeans.
2. Start Creo Elements/Direct Model Manager.
3. Choose > and click Reset. Click Yes in the Resetting preferences dialog.
4. Restart Creo Elements/Direct Model Manager, locate a model from one of the previous labs, and Load it.
5. Your Load window should look something like the following.

6. Cancel the load. Reset your preferences and close Creo Elements/Direct Model Manager.
Add new columns and custom titles
Edit your custom xml file.
1. Open the acme.xml file in NetBeans.
2. Add the following code to the acme.xml file between the </ClassDefs> and </WMConfig> tags:
Data Management schema:
<LoadTableColumnModel>
<Column>DESCRIPTION
<DisplayName>My Description</DisplayName>
</Column>
<Column>ELID
<DisplayName>What's This</DisplayName>
</Column>
</LoadTableColumnModel>
<Column>DESCRIPTION
<DisplayName>My Description</DisplayName>
</Column>
<Column>ELID
<DisplayName>What's This</DisplayName>
</Column>
</LoadTableColumnModel>
Desktop schema:
<LoadTableColumnModel>
<Column>Description
<DisplayName>My Description</DisplayName>
</Column>
<Column>ELID
<DisplayName>What's This</DisplayName>
</Column>
</LoadTableColumnModel>
<Column>Description
<DisplayName>My Description</DisplayName>
</Column>
<Column>ELID
<DisplayName>What's This</DisplayName>
</Column>
</LoadTableColumnModel>
Save the file.
3. Restart Creo Elements/Direct Model Manager using acme.xml.
4. Load your model.
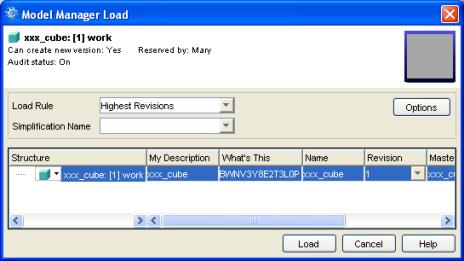
The new columns are added to the beginning of the display.