ColType attributes lab
|
Time Estimates for Completion
|
||
|---|---|---|
|
You can create a tabular pick list for ColType data items.
In this lesson you will create a ColType data dictionary entry, attach it to the model class, and extend a Creo Elements/Direct Model Manager class to use that list of choices during a Save operation.
|
Description:
|
5 minutes
|
|
Lab exercise:
|
15 minutes
|
|
Description
The ColType data dictionary type allows you to define lists of information from your database. You may use these lists to define what values can be entered for a Save field.
Try the lab exercise below to learn how to add a multi-column pick list to Creo Elements/Direct Model Manager.
Lab Exercise
In this lab you will configure a multi-column pick list for a ColType data item.
This lab assumes that you have completed the XML customization lab.
The major steps in this lab are:
Add the DD_FULLNAME data dictionary to the database
Start by adding the full name to the data dictionary.
1. Open the Creo Elements/Direct Manager Server Client. Login as medmgr.
2. Choose > . The Data Dictionary Entries dialog will appear.
3. In the DATA DICTIONARY ENTRIES dialog box, choose > > .
4. In the CREATE DATA DICTIONARY ENTRY dialog, enter:
◦ DD Name: DD_FULLNAME
◦ Table Name: WM_SU (select from pulldown list)
◦ Column Name: FULL_NAME (select from pulldown list)
Click Continue.
5. In the DATA DICTIONARY ENTRY: DD_FULLNAME dialog box, click Confirm.
Add the F_NAME attribute to the model class
Next add a full name attribute to the model class.
1. Choose > .
2. Double-click MODEL_3D or me_model. (You will only see one of these classes, depending on your schema.)
3. In the model dialog, click Add.
4. In the ADD ATTRIBUTE dialog, enter:
◦ Attribute Name: F_NAME
Click Continue. This will bring up the ADD/MODIFY ATTRIBUTE dialog. Notice that the Attribute Name is F_NAME.
5. Select DD_FULLNAME from the pulldown list for DD Name. Click Continue.
6. Click Confirm.
Add the extension to the XML file
The <ColTypeTableAttribute> tag is used to define the attributes that will be displayed for the defined field. For this example, we want to display the USER_NAME and E_MAIL that is defined for each FULL_NAME entry in the WM_SU table.
2. Edit your model class with the following code, being very careful of capitalization (remove the NameFormat and MAJOR_REV/MINOR_REV customizations if you have them):
Data Management schema:
<Class extends="DMModel, DMReleaseProcess">
<Name catalog="awm_stda" msg_num="258">MODEL_3D</Name>
<Attribute>F_NAME
<DisplayName>Full Name</DisplayName>
<Visible>true</Visible>
<Searchable>true</Searchable>
<Protect>false</Protect>
<ColTypeTableAttribute>E_MAIL</ColTypeTableAttribute>
<ColTypeTableAttribute>USER_NAME</ColTypeTableAttribute>
</Attribute>
</Class>
Desktop schema:
<Class extends="DTModel, DTReleaseProcess">
<Name catalog="awm_stda" msg_num="10">me_model</Name>
<Attribute>F_NAME
<DisplayName>Full Name</DisplayName>
<Visible>true</Visible>
<Searchable>true</Searchable>
<Protect>false</Protect>
<ColTypeTableAttribute>E_MAIL</ColTypeTableAttribute>
<ColTypeTableAttribute>USER_NAME</ColTypeTableAttribute>
</Attribute>
</Class>
Verify the tabular pick list
Create a simple model and save it to see the new tabular pick list in the Save dialog.
1. In Creo Elements/Direct Modeling, create a cube.
2. Rename the cube (in this example, "cttest").
3. If Creo Elements/Direct Model Manager is not already running, enable it from Creo Elements/Direct Modeling's > menu. If prompted, choose acme as your configuration.
4. Right-click the cube and choose > . The Save dialog will appear.
5. If you do not see the Full Name field, right-click in the Save dialog and choose > or > . Check the Full Name box and click OK.
6. Notice that the Full Name field contains a pulldown button.
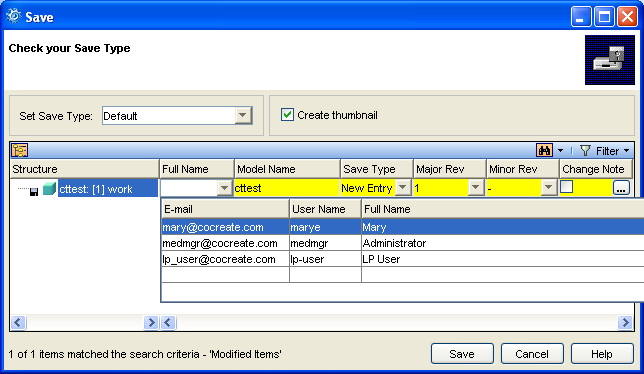
7. Click the pulldown button. You should see a list of Full Names (FULL_NAME) from the database, along with their User Name (USER_NAME) and E-mail (E_MAIL) values.