Customizing the TreeNodeDisplayProperties
You can now customize the color of the treeNode labels displayed in the Creo Elements/Direct Model Manager.
To customize the display,
1. Create a biz directory for the Java file (For example, D:\Users\custom\src\com\acme\biz). For details, see Business logic extension lab.
2. In NetBeans, create the CustomTreeNodeDisplayProperties class to extend the DMModel3D class and implement the TreeNodeDisplayProperties interface. The TreeNodeDisplayProperties interface contains two methods; getForeground() and getBackground(). For details, see Extend an existing class. An example follows:
public class CustomTreeNodeDisplayProperties extends DMModel3D implements TreeNodeDisplayProperties
{
//code implementation
}
{
//code implementation
}
3. Add override methods, getForeground() and getBackground() in the CustomTreeNodeDisplayProperties class. An example follows:
@Override
public Color getForeground(boolean selected, EnumSet<Flags> flags) {
if (flags.contains(Flags.DISABLED) && !selected) {
return WMAttRenderer.TEXT_DISABLED_COLOR;
} else if (flags.contains(Flags.WARNING)) {
if (selected) {
return WMAttRenderer.TEXT_ERROR_SELECTED_COLOR;
} else {
return WMAttRenderer.TEXT_ERROR_COLOR;
}
} else if (flags.contains(Flags.ADDED)) {
if (selected) {
return Color.YELLOW;
} else {
return CompareAddedRenderer.getAddedColor();
}
} else if (flags.contains(Flags.DELETE_REPORT) && !selected) {
return Color.RED;
} else if (selected) {
return (UIManager.getColor("Table.selectionForeground")); //frozen
} else {
return (UIManager.getColor("Table.foreground")); //frozen
}
}
@Override
public Color getBackground(boolean selected, EnumSet<Flags> flags) {
if (flags.contains(Flags.FILTER_MATCH) && !selected) {
return Color.YELLOW;
}
if (flags.contains(Flags.DISABLED) && !selected) {
return (UIManager.getColor("Table.background")); //frozen
} else if (flags.contains(Flags.WARNING)) {
if (selected) {
return (UIManager.getColor("Table.selectionBackground")); //frozen
} else {
return (UIManager.getColor("Table.background")); //frozen
}
} else if (flags.contains(Flags.ADDED)) {
if (selected) {
return (UIManager.getColor("Table.selectionBackground")); //frozen
} else {
return (UIManager.getColor("Table.background")); //frozen
}
} else if (flags.contains(Flags.DELETE_REPORT) && !selected) {
return Color.BLACK;
} else if (selected) {
return (UIManager.getColor("Table.selectionBackground")); //frozen
} else {
return (UIManager.getColor("Table.background")); //frozen
}
}
4. Add the class extension in the <ClassDefs> section of the custom.xml file in <Creo Elements\Direct Manager Server installation location>\config\. An example follows:
<ClassDefs>
<Class extends="DMModel, DMReleaseProcess">
<Name catalog="awm_stda" msg_num="258">MODEL_3D</Name>
<BusinessObjectClass>com.acme.biz.CustomTreeNodeDisplayProperties</BusinessObjectClass>
</Class>
</ClassDefs>
<Class extends="DMModel, DMReleaseProcess">
<Name catalog="awm_stda" msg_num="258">MODEL_3D</Name>
<BusinessObjectClass>com.acme.biz.CustomTreeNodeDisplayProperties</BusinessObjectClass>
</Class>
</ClassDefs>
5. To test the changes,
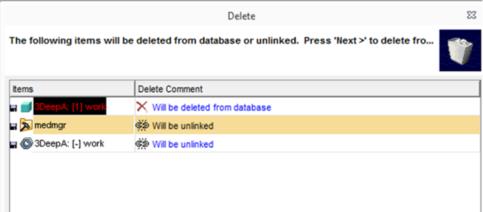
a. In Creo Elements/Direct Model Manager, select a model.
b. Click Structure and then, in the Modify group, click  Delete from database. Alternatively, right-click the model and, in the shortcut menu, click Delete from database. The Delete dialog box opens.
6. Click Next. The Delete dialog box now shows the name of the model in the new color.