Creating a Hatch Pattern
Each layer of the pattern is defined by entering five values. The five values correspond to the hatch parameters set using the SET PATT command.
The five values used to define the hatch pattern are described in Table 7. Hatch Pattern Parameters.
|
Name
|
Allowed Value
|
Description
|
|---|---|---|
|
OFFSET
|
0 to 1
|
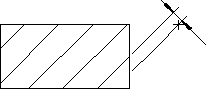
The offset is used to align the hatch lines of the layer to the match point (set using SET Match Point). The perpendicular offset is the entered value multiplied by the SET Distance value. See Figure 167. Hatch Perpendicular Offset
|
|
DISTANCE
|
Any Number
|
The distance between each of the layer's hatch lines will be the entered value multiplied by the SET Distance value.
|
|
ANGLE
|
0 to ± 360
|
The entered angle will be added to the SET Angle value to determine the actual angle at which the layer's hatch lines will be drawn
|
|
COLOR
|
Any of the eight Creo Elements/Direct Drafting standard colors may be entered:
• BLACK
• BLUE
• CYAN
• GREEN
• MAGENTA
• RED
• WHITE
• YELLOW
|
|
|
LINETYPE
|
Any of the eight Creo Elements/Direct Drafting standard linetypes may be entered:
• SOLID
• LONG_DASHED
• DASH_CENTER
• DASHED
• DOTTED
• DOT_CENTER
• PHANTOM
|
Hatch Perpendicular Offset
To set the hatch pattern:
1. Press HATCH.
2. Pick Create in SET PATT.
3. Enter the first layer's values for Offset, Distance, Angle, Color and Linetype.
4. Enter the next layer's values or finish the pattern by pressing CONFIRM.
There is no limit to the number of layers in a pattern. For examples of patterns, refer to the section Setting Up Standard Hatch Patterns. The exact values required for each standard pattern are listed there.