Assign Constraints
Only six constraints are needed to completely constrain this drawing. Assign each one manually:
1. In the Generate Constraints dialog box, click the Assign radio button. Then pull down the Type selection list and select Refelem.
2. Click Apply.
3. Click the construction line to fix it in place.
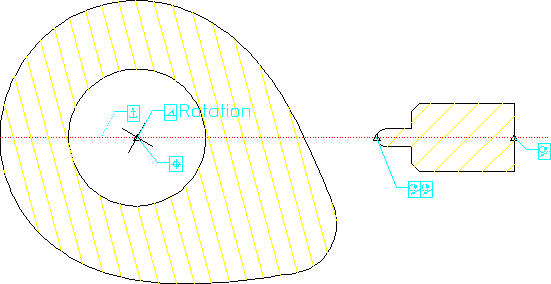
4. Use the same general method to assign a Refpoint constraint to the point element at the centerpoint of the cam. This fixes the cam in place on the construction line while allowing it to rotate.
5. Use the same general method to assign a Slope constraint to one of the small line elements that cross at the centerpoint of the cam. Name this constraint Rotation, but don't assign it a specific value yet.
Note that this constraint and the previous one are all that's needed to completely constrain the "cam" rigid body: The reference point fixes translation while the slope constraint fixes rotation.
6. Constrain the follower: Assign a Point on constraint between the leftmost point element on the follower and the construction line. Fix the rightmost point element to the construction line with a second Point on constraint. These two constraints fix the rotational degree of freedom for the follower, but its motion along the axis of the construction line still needs to be fixed.
7. Assign a final Point on constraint between the leftmost point element on the follower and B-spline profile of the cam. This fixes the translation of the cam.
8. In Parametric, click Inquire and Icon to confirm that you've assigned each of the constraints as described above. The constraints should resemble as shown in the following figure. As you examine the constraints, make sure you understand how each one constrains the motion of the rigid body to which it's applied.
Figure 272. Demopart05 Constraints
Parent topic