XVL is a highly compressed 3D file format that can be viewed in a web browser. To view these files, you must have a browser plug-in from Lattice 3D, the developers of XVL. For more information about XVL and to download the free viewer, please visit
Lattice 3D’s web site.
Creo Elements/Direct 3D Access only exports XVL in the XV3 and XV2 file types. These formats contain part structure and geometry data. Other XVL formats are available from Lattice 3D, but they are not supported by Creo Elements/Direct 3D Access. To view assembly information, you must have a licensed XVL viewer from Lattice 3D. The free viewer displays only geometry and not the assembly information.
When you save an XVL file, the current camera view is saved. To restore that view in the XVL viewer, right-click Select Viewpoint and select the viewport name.
You must have a license to export XVL files from Creo Elements/Direct 3D Access.
To export an XVL file,
1. Activate the XVL module:
◦ Click File > Modules. The Modules dialog box opens.
◦ Click Data Interfaces.
◦ In the Data Interfaces pane, click the XVL check box.
2. Click File > Save. The Save dialog box opens.
3. Select a File Type:
◦ P-XVL (Precise XVL) (*.xv3)
◦ V-XVL (Visual XVL) (*.xv2)
4. Click Options and set the following options:
◦ Set the Tolerance to a value between 0.1 and 0.001. This determines the approximation of freeform surfaces using the Gregory patch interpolation method.
◦ Select Part-Structure if you want your part and assembly information exported.
◦ Select Labels to export 3D notes, dimensions, and tolerances as polylines.
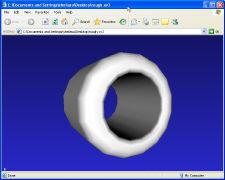
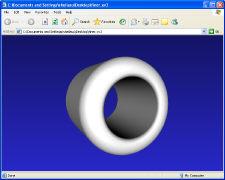
◦ Select a Faceted Data level. (P-XVL only.) If you select None, facets are not calculated and the XVL viewer will do the calculations. The remaining four levels will determine how smooth your facets appear. Rough is the least detailed, while Finer preserves the most detail. This setting also affects the size of the file and its performance in the viewer.
Rough (lowest facet detail)
Finer (highest facet detail)
Example file size: 4.58 KB
Example file size: 79.2 KB
◦ Click Statistics to create an html file that contains an overview and error report of the exported entities.
5. Click Select near the top of the Save dialog box.
6. Select parts and/or assemblies in the viewport or the Structure Browser.
 Save. The Save dialog box opens.