OpenID SSO with PingFederate
The following sections describe how to use OpenID SSO with PingFederate:
Create an OAuth Client in PingFederate
You must create an OAuth client for the Codebeamer connection.
The client provides control for managing connections for applications requesting access to protected resources, through the PingFederate OAuth authorization server.
Use the following steps to create the OAuth client:
1. Log in to PingFederate and go to > > . The following screen appears:

2. Click Add Client.
3. Enter information as shown on the following screen:

◦ CLIENT ID—A value of Codebeamer is displayed.
◦ NAME—Enter a value such as Codebeamer.
◦ DESCRIPTION—Enter an appropriate description for the client.
◦ CLIENT AUTHENTICATION—Select CLIENT SECRET.
◦ CLIENT SECRET—Enter an appropriate value to be shared with the user making the connection.
4. The subsequent fields on the screen are as follows:

5. Under REDIRECT URIS, enter the appropriate URLs pointing to Codebeamer and ThingWorX as shown.

6. For the rest of the client settings, select the checkboxes as shown.

7. Click Save.
Configure OAuth Grant Types and Specify the OAuth Grant Types
You must configure the OAuth grant types and specify the OAuth grant types that you want to support. You must set up Persistent Grant Extended Attributes and extend persistent grants to include additional attributes such as firstname and lastname from your authentication systems (Microsoft Azure).
Use the following steps to specify the OAuth grant types:
1. Go to > > .
2. Under Persistent Grant Extended Attributes add firstname and lastname:

3. Click Save.
4. Click Scope Management in the left pane.
5. Under Scope Value add the value CB_Test and under Scope Description add the value CB_Test_Scope as shown if not added:

6. Click Add and then click Save at the bottom of the page.
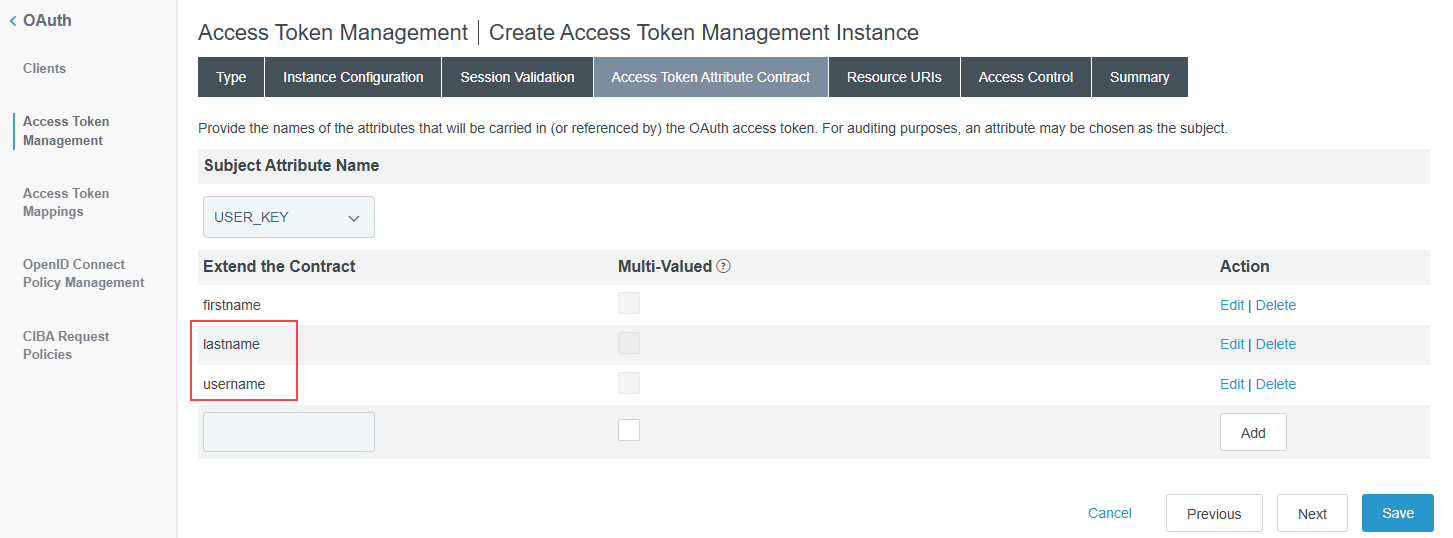
Add Values the in Access Token Management
Use the following steps to define the properties of the access tokens:
1. Go to > . The following screen appears:

2. Click Create New Instance.
3. On the Type tab, enter the values as shown:

4. Click Next.
5. Click Next on the Instance Configuration tab.
6. Click Next on the Session Validation tab.
7. On the Access Token Attribute Contract tab add the new values as shown:
8. Click the Summary tab. A sample appears as follows:

9. Click Save.
10. Go to > > .
11. Under Client ID click the ID link. In this example, it is Codebeamer.
12. Scroll down to DEFAULT ACCESS TOKEN MANAGER and from the list, select DBTcb. The earlier value was Default as shown here.
13. Click Save.
Configure the Access Token Mappings
Use the following steps to configure the access token mappings:
1. Go to > .
2. Add Default under CONTEXT and DPTcb under ACCESS TOKEN MANAGER, and click Add Mapping:

3. Click the Summary tab. A sample is as follows:

Create OpenID Connect Policy
Use the following steps to create an OpenID Connect policy:
1. Go to > and click Add Policy as shown:

2. Enter the necessary information on the relevant tabs based on the following sample information on the Summary tab:

3. Click Save.
Configure the IdP Adapter Mapping
Use the following steps to configure the IdP adapter mapping:
1. Go to > and click Idp Adapter as shown:

2. Click Create New Instance if IdpAdapter is not previously configured. If it is previously configured, ignore the rest of this procedure.
3. On the Type tab, enter information as follows:

4. Enter the necessary information on the other tabs, as shown in the example of the Summary tab:

5. Click Save.
Test the Connection in Codebeamer
Use the following steps to test the connection:
1. Log in to Codebeamer and click System Admin.
2. Select OpenId Configuration as shown:

3. Under Issuer, enter the appropriate URL and click Automatic discovery. The other values are appropriately populated. For more information, see Interactive authentication
at Web GUI.
Under Server Configuration, if the Registration URI field is auto-populated, delete the URI and keep this field blank. |
A sample of the auto-populated URIs and the client configuration that you must manually enter is as follows:

4. On the OpenId Configuration page, click Test login, and then click the here link as shown in the following image:

5. Log in with your Identity Provider (IDP).
6. Verify the result in Codebeamer as shown:

OpenID PingFederate OAuth Client
You can create a Codebeamer PingFederate OAuth client to verify the authenticity of the access tokens received by the Codebeamer server.
To configure a Codebeamer server, you must first enable OpenID on the PingFederate server.
On the PingFed server, go to > and ensure that the following check boxes are selected:
• AUTHORIZATION CODE
• BYPASS AUTHORIZATION FOR PREVIOUSLY APPROVED PERSISTENT GRANTS (under Authorization Consent)
To create the OAuth client, complete the following steps:
• On the OAuth Settings page, locate the Clients section and click Create New.
• Enter a Client ID. Make a note of this value, as it will be required for configuring the Windchill securityContext.properties file.
• Select Client Secret and enter a client secret value. Make a note of this value as it will be needed when configuring the Windchill securityContext.properties file.
• In the Name field, enter a descriptive value. This value is displayed in the PingFederate Clients list.
• Enter a Description.
• In the Allow Grant Types section, select Refresh Token, Authorization Code, Resource Owner Password Credentials, Assertion Grants, and Access Token Validation (Client is a Resource Server).
• In the Persistent Grants Expiration section, select Use Global Setting.
• In the Refresh Token Rolling Policy section, select Don’t roll.
For example, if the Codebeamer Client ID is CB_Client, the openId will appear as:
"openId" : {
        "allowSignUp" : true,
        "audienceWhitelist" : "",
        "cacheFailureTTL" : "15min",
        "cacheSuccessTTL" : "10min",
        "enabled" : true,
        "forceOAuth" : false,
        "reuseDefaultAccount" : false,
        "server" : {
            "authorizationEndpointUri" : "https://<hostname:port>/as/authorization.oauth2",
            "introspectionEndpointUri" : "https://<hostname:port>/as/introspect.oauth2",
            "issuer" : "https://<hostname:port>",
            "jwksUri" : "https://<hostname:port>/pf/JWKS",
            "registrationEndpointUri" : "",
            "requestTokenUri" : "https://<hostname:port>/idp/SSO.saml2",
            "revocationEndpointUri" : "",
            "tokenEndpointUri" : "https://<hostname:port>/as/token.oauth2",
            "userInfoUri" : "https://<hostname:port>/idp/userinfo.openid"
        },
        "client" : {
            "authType" : "ACCESSTOKEN",
            "clientId" : "CB_Client",
            "clientName" : "CB_Client",
            "clientSecret" : "cbTest",
            "domain" : "",
            "introspectUserResolveAttribute" : "ssoid",
            "redirectUri" : "https://ppuwsv-alm15t.ptcnet.ptc.com:9152/login/oauth/authenticate.spr",
            "refreshTokenScope" : "WINDCHILL_READ",
            "scope" : "openid, profile, email, WINDCHILL_READ",
            "tokenEndpointAuthMethod" : "client_secret_basic",
            "userName" : "sub",
            "userResolveResource" : "INTROSPECTION"
        }
	}
Configure M2M with PingFederate and Service Principal
To set up the Machine-to-Machine (M2M) configuration with PingFederate and Service Principal using the M2M configuration with usernameAttribute, refer to the following steps:
1. Prepare Codebeamer:
1. Create the Service Principal user in Codebeamer first. For example, a user with username mUser2.
2. Add the Service Principal user mUser2 to a user group that has the Rest / Remote API - Access permission.
3. Add the Service Principal user mUser2 to all relevant DPT projects with read-only access.
2. Configure the M2M Service Principal in PingFederate:
1. Sign in to PingFederate as an administrator.
2. In the header bar, click APPLICATIONS.
3. In the sidebar, click OAuth.
4. In the Clients content area, click Add Client.
5. In the Manage Client tab, create a new client. The following is an example:
▪ CLIENT ID—Type a value that corresponds to the Codebeamer application configuration. For example, CB_M2M.
▪ NAME—Type a value that corresponds to the Codebeamer application configuration. For example, CB_M2M.
▪ CLIENT AUTHENTICATION—Select CLIENT SECRET.
▪ CLIENT SECRET—Generate a secret to populate this field.
▪ REDIRECT URIS—Enter the Codebeamer redirection URI to populate this field. For example: https://mytestserver.com:8443/login/oauth/authenticate.spr
▪ ALLOWED GRANT TYPES—Select the following:
▪ Authorization Code
▪ Refresh Token
▪ Client Credentials
▪ Resource Owner Password Credentials
▪ Assertion Grants
▪ Access Token Validation (Client is a Resource Server)
▪ VALIDATE AGAINST ALL ELIGIBLE ACCESS TOKEN MANAGERS—Select the checkbox next to this field.
6. In the lower area, click Next.
7. In the Extended Properties tab, enter mUser2 in the Value field next to the name of the client, and then click Add.
3. Create a new instance in PingFederate:
1. In the sidebar, click Access Token Management.
2. In the Access Token Management area, click Create New Instance.
3. In the Create Access Token Management Instance window, create a new instance as follows:
▪ Instance Name—Enter a name. For example, default.
▪ Instance ID—Enter an ID. For example: default.
▪ Type—Select Internally Managed Reference Tokens.
▪ Access Token Attribute Contract tab—In the Extend the Contract section, provide the following attributes:
▪ email
▪ name
▪ serviceprincipal
▪ ssoid
▪ Username
▪ username
▪ Leave all other settings at their default values.
4. Add a new mapping in PingFederate:
1. In the sidebar, click Access Token Mappings.
2. In the Access Token Mappings area, select the following:
▪ CONTEXT—Default.
▪ ACCESS TOKEN MANAGER—The name of the access token management instance that you have just created. For example, default.
3. Click Add Mapping.
4. In the Contract Fulfillment tab, add the following mapping:
Contract | Source | Value |
|---|---|---|
Username | Persistent Grant | USER_KEY |
email | Persistent Grant | USER_KEY |
name | Persistent Grant | USER_KEY |
serviceprincipal | Extended Properties | The name that appears in the Extended Properties tab of your OAuth client. In this example, the name of the mUser2 client. |
ssoid | Persistent Grant | USER_KEY |
username | Persistent Grant | USER_KEY |
5. Leave all other settings at their default values.
5. Configure Codebeamer:
1. Sign in to Codebeamer as a user with the system administrator permissions.
2. In the upper toolbar, click > .
3. Add a suitable "openId" JSON object that supports the configuration of the M2M Service Principal in PingFederate. The following is an example:
"openId": {
    "client": {
        "authType": "ACCESSTOKEN",
        "clientId": "CB_M2M",
        "clientName": "CB_M2M",
        "clientSecret": "<pingFederate_oauth_client_secret>",
        "domain": "",
        "introspectUserResolveAttribute": "ssoid",
        "redirectUri": "<codebeamerServer_URL>/login/oauth/authenticate.spr",
        "tokenEndpointAuthMethod": "client_secret_basic"
    },
    "server": {
        "authorizationEndpointUri": "<pingFederateServer_URL>/as/authorization.oauth2",
        "introspectionEndpointUri": "<pingFederateServer_URL>/as/introspect.oauth2",
        "issuer": "<pingFederateServer_URL>",
        "registrationEndpointUri": "",
        "revocationEndpointUri": "",
        "tokenEndpointUri": "<pingFederateServer_URL>/as/token.oauth2",
        "userInfoUri": "<pingFederateServer_URL>/idp/userinfo.openid"
    },
    "m2m": {
        "usernameAttribute": "serviceprincipal"
    }
},