Authoring DITA Maps
Arbortext Editor provides several features that assist you in authoring DITA maps. You use DITA maps to organize references to DITA topics and other resources for publishing to a specific deliverable, such as online help. DITA maps enable you to define relationships between topics, including hierarchical, an ordered sequence, and peer group relationships. You can use these relationships to define outlines, tables of contents, build manifests, and similar structures. DITA maps also provide a relationship table, where you can you can define relationships between topics and other resources in a tabular format for a related topics section that will be added to your published DITA map.
Authoring a DITA map is very different from authoring a DITA topic. DITA maps primarily contain element and attribute content with relatively little text or other inline content. While the traditional Edit and Document Map views are available, Arbortext Editor provides three new features to assist you in authoring DITA maps.
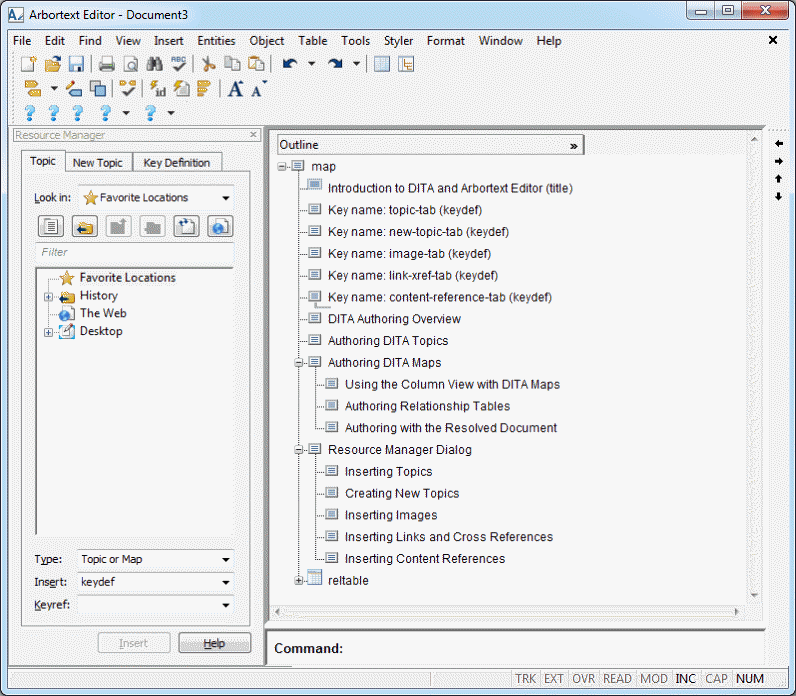
First, the application provides a dialog called the Resource Manager that enables you to insert content and topic references to existing DITA topics and other resources into your DITA map. The Resource Manager also enables you to create a new DITA topic and insert a topic reference to that topic into your DITA map. The Resource Manager is invoked by default when you edit a DITA map, docked to the left side of the Arbortext Editor window.
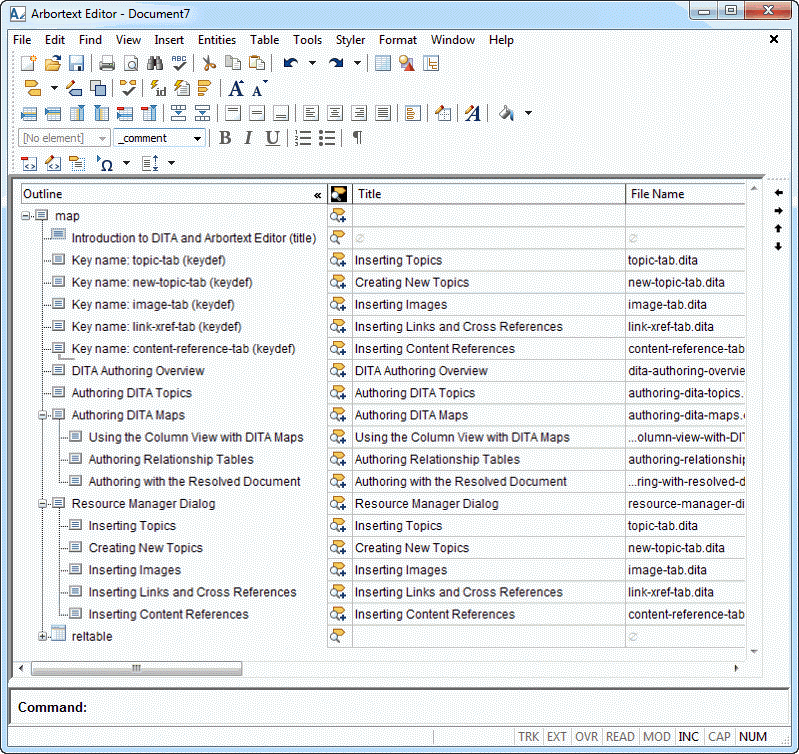
Second, the application provides a Column view of your DITA map. This is an Arbortext Editor view specifically designed to support document types that primarily consist of element and attribute content. Column view combines a hierarchical view of a DITA map with a series of rows and columns, similar to a spreadsheet, where you can view and edit the attributes of the elements in the map. You can use the first or Outline column to arrange the elements in your DITA map. From a map, you can also open and edit referenced documents in separate Arbortext Editor windows. Column view is invoked by default when you edit a DITA map.
Third, the application provides the DITA Map toolbar. The toolbar enables you to rearrange, promote, and demote the elements in your DITA map. The toolbar is invoked by default when you edit a DITA map, docked to the right side of the Arbortext Editor window.
When you first open a DITA map, the default Arbortext Editor configuration for editing DITA maps appears as follows:
You can change the default configuration as desired and save the changes in your user preferences file (arbortext.wcf). You can save different Arbortext Editor configurations for editing DITA topics and DITA maps.
Using the Resource Manager with DITA Maps
When you are authoring a DITA map, the Resource Manager provides the following tabs:
• Topic tab — Enables you to insert topic references into DITA maps.
The Topic tab contains a file browser that enables you to locate files in either a file system or a content management system (CMS). Once you have located the file for which you want to make a reference, you can select that file and insert a topic reference to it in your map. While you will usually be making references to DITA topics, the Resource Manager enables you to make references to other DITA maps, images, PDF documents, HTML documents, and other file types.
You can use the Insert button to insert a reference or drag-and-drop a file from the browser into your map. You can select multiple files and insert references to all of them at the same time. You can also select a folder and insert references to all of the topics in that folder at the same time. If the folder you are inserting has sub-folders, the folder hierarchy is preserved in the DITA map. In this case, folders become topichead elements.
The Topic tab also enables you to invoke a web browser and insert a reference to a web page into your map.
• New Topic tab — Enables you to create a new DITA topic or map and insert a topic reference to that document into a DITA map.
The New Topic tab contains a list of the DITA document types defined in your environment. You can select a document type to create, enter the title and file name for the new topic or map, and indicate where you want the new document to be created. The tab automatically assigns an ID for the topic or map. When you select the Insert button, the new document is created and a reference to the topic or map is inserted into your map.
The DITA standard provides support for key based references as defined in the
Key based (indirect) addressing section of the OASIS
DITA Architectural Specification. The
Key Definition tab enables you to define key definitions in your map that can be referenced with a key reference in other DITA maps and topics. For more information about key references, refer to
Using keys and key references.
The
Content Reference tab is also available for DITA maps, but it appears in a separate, undocked
Resource Manager dialog box.
Using Column View with DITA Maps
Column view provides a hierarchical view of your DITA map. You can use the first or
Outline column to develop your DITA map. Besides adding new topic and content references with the
Resource Manager, you can drag-and-drop topics from
Windows Explorer to add a topic reference. You can also select a folder and insert references to all of the topics in that folder at the same time. If the folder you are inserting has sub-folders, the folder hierarchy is preserved in the DITA map. In this case, folders become
topichead elements by default. For insert operations that are not drag-and-drop, the position of the Column view cursor

determines where the reference is inserted in the
Outline column.
You can use drag-and-drop to move individual elements or parts of the hierarchy around in the outline. Another way to rearrange your map hierarchy is with the DITA Map toolbar. The toolbar enables you to move a selected element up and down and to promote and demote an element within the map hierarchy.
Click on the plus sign (

) next to a level of the map outline to expand that level in the hierarchy. Click on the minus sign (

) to collapse a hierarchy level.
Click on the element icon in the outline to select that element. Double-click on the element icon or click on the icon of a currently selected element to select that element and any child elements. Click inside a selected area to clear the selection.
The position of the Column view cursor also determines which element is selected in the outline. The nearest element above the cursor is affected by DITA Map toolbar and similar operations.
Hold down the CTRL key and click the left mouse button on an element icon to open an Edit view for that part of the DITA map. If an element references another document, you can also double-click on the element title in the outline to open the associated document in a new Arbortext Editor window.
By default, only the Column view
Outline column is displayed. The additional Column view columns provide easy access to the attributes for topic references and other map elements. Select the
Show Multiple Columns button (

) button in the
Outline column to display the columns currently defined in the
Columns category of the
Preferences dialog box. Select the
Show Single Column button (

) button in the
Outline column to only display the
Outline column.
You can also display additional columns through the Column view headings shortcut menu. The following choices are available on the Column view heading shortcut menu for configuring columns:
• Configure Columns — Invokes the
Columns category in the
Preferences dialog box where you can select the columns to display, rearrange the order of the columns, move the column scroll boundary, and indicate what to show in the first column.
• Show Single Column — Displays just the Column view Outline column.
Following is how Column view appears with multiple columns displayed:
You can use the first column after the
Outline column to edit existing attributes on an element by clicking on the icon in that column. You can also edit existing values or add new values to attributes for an element by double-clicking on the Column view cell for that attribute. For attributes that reference another document,
Arbortext Editor provides a button

that invokes an undocked version of the
Resource Manager that you can use to browse for the document you want to reference. If desired, you can also invoke the
Modify Attributes dialog box for a selected element to modify the attributes of map elements. When you are modifying an ID,
Arbortext Editor provides a button

and menu choice ( > ) that automatically generates an ID value for you.
Authoring Relationship Tables
Another component of DITA maps is the relationship table. Relationship tables enable you to identify related topics and resources for your DITA map. You identify the type of related resource in the relationship table columns and add the related resources to the table cells.
Follow these steps to insert a relationship table into your DITA map:
1. Move the Column view cursor to the bottom of your DITA map.
Make sure that the cursor is not attached to any element in the map outline.
2. Select > .
3. Define your relationship table in the Insert Relationship Table dialog box, and select the Insert button.
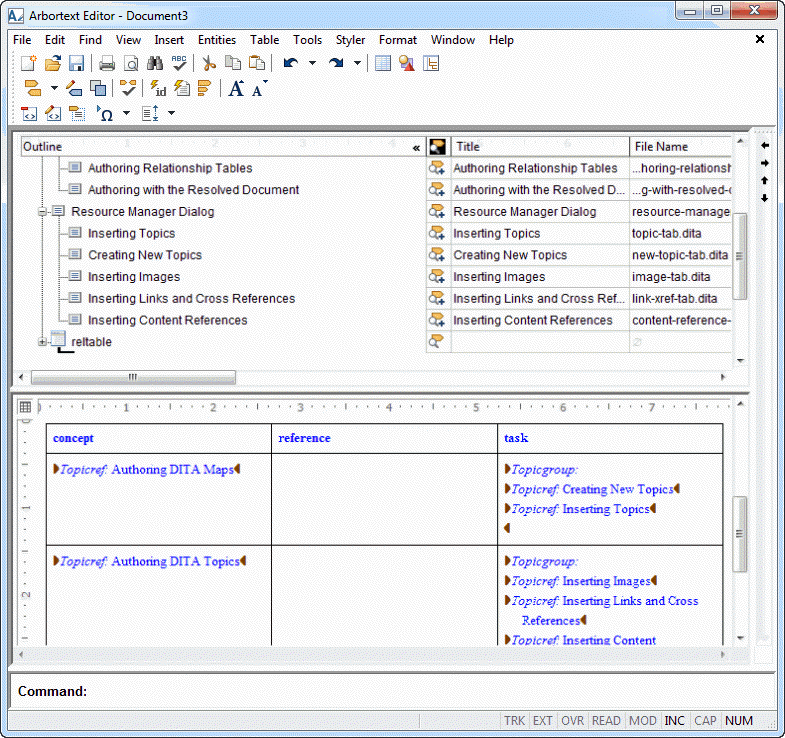
If there is not already a split view with an Edit view displayed, an Edit view for the table appears below the Column view.
4. Add related topics and other resources to the cells in your relationship table.
You can use the Resource Manager to add references to your relationship table. You can also drag-and-drop topic references from your DITA map or topics from Windows Explorer to add a topic reference to the table.
When you drag-and-drop a topic reference into the relationship table, the reference is automatically put into the table column that matches the associated topic type. If there is no matching column, you are asked if you want to put the reference into the “other” column. If there is no “other” column, you are asked whether you want to put the reference into the column in which it was dropped. You can always drop a reference into the “other” column, regardless of the topic type. You can drag and drop references within the relationship table without restriction.
When you have finished authoring your relationship table, you can right-click in the Edit view containing the relationship table and select Close View from the shortcut menu to close the Edit view and return to the full Column view display.
Following is how the Arbortext Editor window appears with the relationship table Edit view displayed:
Authoring with the Resolved Document
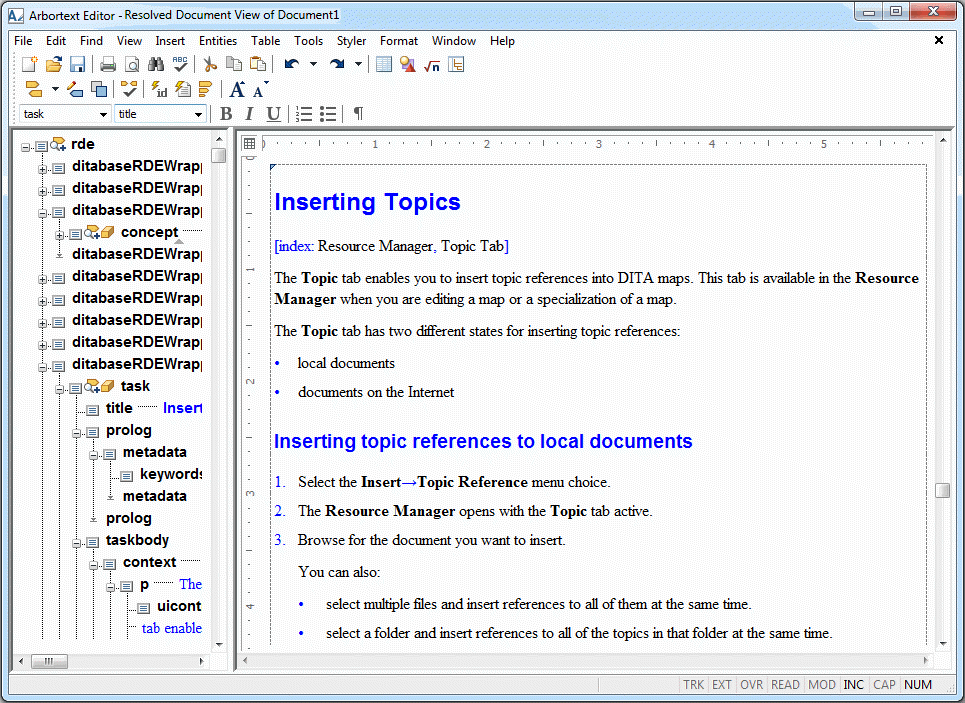
Arbortext Editor enables you to open an assembled version of your DITA map called the resolved document. The resolved document contains all of the content referenced in the map. You can also select part of a map, and a resolved document is generated for just the selected part of the map.
You produce a resolved document for your DITA map through the > > menu choice. When you select this menu choice, Arbortext Editor assembles the content in your DITA map into an intermediary XML document and opens that resolved document in a new Arbortext Editor window.
The resolved document enables you to edit the text and structure of the content included in your DITA map. It also enables you to execute a spell check or find/replace operation for that content. Any changes you make to the resolved document are saved to the relevant source documents referenced in the map. Note that you cannot make changes to the structure of your DITA map in the resolved document.
By default, only DITA topics referenced from the map are included in the resolved document. You can choose to also have the DITA maps referenced from your map included in the resolved document by setting the ditaincludemapsinrde preference to on.
Following is how the Arbortext Editor window appears when you are editing a resolved document:
Using cascade to Process Cascading Attribute Values in DITA Maps
These attributes are defined as cascading and merging in DITA 1.2:
• audience, platform, product, otherprops, rev
• props and any attribute specialized from props
Use cascade as a processing instruction on how to deal with these attributes that are permitted to have multiple values:
• cascade="merge" (default) — normal DITA 1.2 cascading of attributes will occur where attribute values are additive
• cascade="nomerge" — DITA 1.2 cascading will behave as if the attribute values are not additive
The cascade attribute can be specified within maps to have different sections governed by different cascading rules, if required. Set its value on the relevant topic references.
Related information


 determines where the reference is inserted in the Outline column.
 ) next to a level of the map outline to expand that level in the hierarchy. Click on the minus sign (
 ) to collapse a hierarchy level.
 ) button in the Outline column to display the columns currently defined in the Columns category of the Preferences dialog box. Select the Show Single Column button (
 ) button in the Outline column to only display the Outline column.
 that invokes an undocked version of the Resource Manager that you can use to browse for the document you want to reference. If desired, you can also invoke the Modify Attributes dialog box for a selected element to modify the attributes of map elements. When you are modifying an ID, Arbortext Editor provides a button
  and menu choice ( > ) that automatically generates an ID value for you.
