Managing Your Shopping Lists
PTC Arbortext Content Delivery enables you to create shopping lists to store parts you plan to order later. You can use the Add selected items to Cart or List option on the shopping cart, list and order pages to either create a shopping list or add parts to an existing list. You can also create a new list on the Lists page.
|
|
The availability of features like cart, order, and wish list depends on the license agreement. These features would be only available with PARTS license.
|
Follow these steps to view your shopping lists:
1. Click the menu  icon at the upper right corner of the interface to open the menu and select Shopping.
icon at the upper right corner of the interface to open the menu and select Shopping.
The Carts page opens:
2. Click on the Lists tab.
The Lists page opens:

You can also open a list from the Shopping path by clicking on the arrow in the path and selecting a list:

This page lists your shopping lists. If you are logged into PTC Arbortext Content Delivery associated with a service group, the lists you can access are also bound to that group unless they are shared. In this case, any lists from a previous login where you were not associated with a group are not available.
The following options are available for all of the shopping lists:
◦ Create New List icon  – Enables you to create a new list.
– Enables you to create a new list.Click the icon to add a new list:
You have the following options for creating a new list:
▪ Create an empty list
▪ Create a new list from an existing cart, order, or shopping list
In this case, click the arrow next to the source for the new list to open the list of existing choices.
◦ Sort items icon  – Enables you to sort the lists.
– Enables you to sort the lists.Click the icon to select how to sort the lists:
If you sort based on shared status, the lists are sorted into the following groups:
▪ Shared by me – Lists you have shared with your service group
▪ Shared with me – Lists others in your service group have shared with you
▪ Unshared – Lists you have not shared
◦ Add selected items to Cart or List – Enables you to select one or more lists and add the items in those lists to either a new or existing cart or shopping list.
Select the box next to the option to select all existing lists or select the box next to one or more individual lists. Click on the option to open the selection. Click the arrow next to Carts or Lists to open the list of choices:
When you select the cart or list to which you want to add the items, the Confirm window opens asking you to confirm the action. That window contains a Remove selected items option. Check this option if you want to delete the selected lists when the new cart or list is updated.
The following information is available for each list:
◦ List name – Displays the name of the list and enables you to open the list page.
Click on the list name to open that list’s page.
◦ Share – Enables you to share the shopping list with either the service group for which you are currently working or with all service groups with which you are associated.
Click on the option to open the choices:

When you select how to share the list, the name of this option changes to Unshare and the list of service groups with which the list is shared appears after the option. Click Unshare to stop sharing the list.
◦ Last Modified – Indicates the date and time the list was last modified.
◦ Notes – Displays any notes for the list.
Add notes for a list in the Details option on the list page.
◦ Delete list icon  – Deletes the list.
– Deletes the list.Click this icon to delete the list. PTC Arbortext Content Delivery opens a Confirm window asking you to confirm the deletion. Click OK in the window to delete the list.
3. Click on the list name.
The list page opens:
The following list options are available at the top of the page:
◦ Price and availability icon  – Displays price and availability information for the list.
– Displays price and availability information for the list.◦ Download list icon  – Opens the Download window where you can save a copy of the list in Microsoft Excel format.
– Opens the Download window where you can save a copy of the list in Microsoft Excel format.◦ Add items icon  – Enables you to add items to the list from an existing cart, order, or shopping list.
– Enables you to add items to the list from an existing cart, order, or shopping list.Click on the icon to open the selection. Click the arrow next to Cart, List, or Order to open the list of choices:

Click the source from which you want to add items to the list. The Confirm window opens asking you to verify the action.
◦ Share list icon  – Opens the Share By Email window where you can email a copy of the list in Microsoft Excel format.
– Opens the Share By Email window where you can email a copy of the list in Microsoft Excel format.◦ Sort items icon – Enables you to sort the parts in the list in different ways:
– Enables you to sort the parts in the list in different ways:
The following additional options are available at the top of the page:
◦ Details – Click on this control to see additional information about the list.
You can change the name of the list in this option. You can also add any notes you want to remember about the list.
◦ Share – Enables you to share the shopping list with either the service group for which you are currently working or with all service groups with which you are associated.
Click on the option to open the choices. When you select how to share the list, the name of this option changes to Unshare and the list of service groups with which the list is shared appears after the option. Click Unshare to stop sharing the list.
◦ Add Part to List – Enables you to add parts directly to the list.
You can also add a part that is not available in PTC Arbortext Content Delivery to the cart. The following options are available there:
▪ Part Number – Enables you to enter the part number of a part to add to the list.
If you know the number for a part you want to add to the list, you can enter the number in this field. As you type, suggested part numbers are displayed below the field. Click on one of the suggested part numbers to add that value to this field or continue entering the part number.
▪ Quantity – Enables you to specify how many of the specified part to add to the list.
Enter how many of the part you want to order. The default is 1.
▪ Add to list button  – Enables you to add the specified part to the list.
– Enables you to add the specified part to the list.Click this button to add the part in the Part Number field to the list.
▪ Non-Catalog Part check box– Enables you to specify that the part you are adding to the list is a part that is not available in PTC Arbortext Content Delivery.
When you check this option, the Description option becomes available.
▪ Description – Enables you to enter a description for the part.
This option is only available when the Non-Catalog Part box is checked. Enter a description of the part in this field if desired. The description you enter replaces the part name in the list.
The following options are available for a part in the list:
◦ Add selected items to Cart or List – Enables you to select one or more parts and add those parts to either a new or existing cart or shopping list.
Select the box next to the option to select all existing parts or select the box next to one or more individual parts. Click on the option to open the selection. Click the arrow next to Carts or Lists to open the list of choices:

When you select the cart or list to which you want to add the items, the Confirm window opens asking you to confirm the action. That window contains a Remove selected items option. Check this option if you want to delete the selected part when the new cart or list is updated.
◦ Part image– Displays either an image of the part or the default part image:

◦ Part Number – Displays the part number for the part.
◦ Part information icon  – Opens the information page for the part.
– Opens the information page for the part.If the part is contained in PTC Arbortext Content Delivery, you can click this icon to display information about the part. Refer to Viewing Part Information for more information.
◦ Part name – Displays the name for the part.
If this is a non-catalog part, any Description you entered displays instead
◦ Notes – Enables you to view and enter notes for the part.
◦ Requested Part Number – For superseded or cross referenced parts that are replaced with a preferred part, displays the part number that you originally requested with its part information icon if available.
◦ Alternates link – Opens the Alternates option on the part information page.
If the part has alternate parts identified for it, then the Alternates link is available. Click on this link to open the Alternates option and view the alternate parts. You can add parts to the cart from this option.
◦ Supplementaries link – Opens the Recommendations option on the part information page.
If the part has supplementary parts identified for it, then the Supplementaries link is available. Click on this link to open the Recommendations option and view the supplementary parts. You can add parts to the cart from this option.
◦ Quantity or other unit of measure – Displays either the default number of the part that will be added to the shopping cart or some other unit of measure for the part, such as the length in meters.
Enter a number in the field to change the order quantity.
◦ Pricing – Displays how much the part costs.
This option only displays when you have clicked the pricing and availability option for the part.
◦ Availability – Indicates whether the part is available.
This option only displays when you have clicked the pricing and availability option for the part.
◦ Delete part icon – Removes the part from the cart.
– Removes the part from the cart.Click this icon to delete the part. PTC Arbortext Content Delivery opens a Confirm window asking you to confirm the deletion. Click OK in the window to delete the part.
Click on the back icon  at the top left of the page to return to the place from which you opened the page.
at the top left of the page to return to the place from which you opened the page.Custom attribute support and print support in shopping list
The shopping list now supports the custom attributes the same way as it is supported in the cart.

PTC Arbortext Content Delivery supports the print page option with formatting in shopping list along with support for custom attributes and for shopping parameters (when the Enable Shopping Parameters Setting preference is enabled in administration preferences).
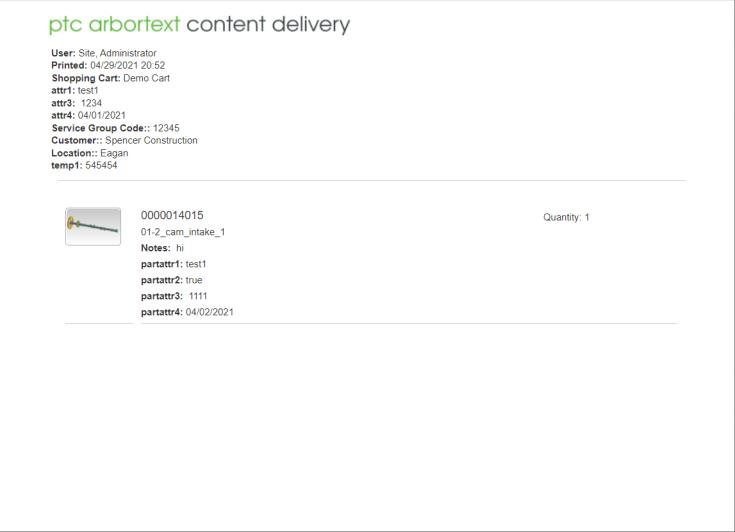
You can save a PDF for this page which looks as shown in the following image.

.
Mobile Touch Interface: For mobile view, list name, status, timestamp, and the delete icon are shown in two rows. If the list name is long, it gets truncated with ellipses (...). On the Details page, the content action icons such as price, download, and so on, are added in a separate row. When you scroll the Details page, the content action icons and Add selected items to Cart or List drop-down list is fixed.  The list items are shown in the following image. Availability, price, and quantity are displayed in one line. Custom parameters like notes are displayed in a separate row. In case of group by, highlighted sections for PH row are displayed in the next row. 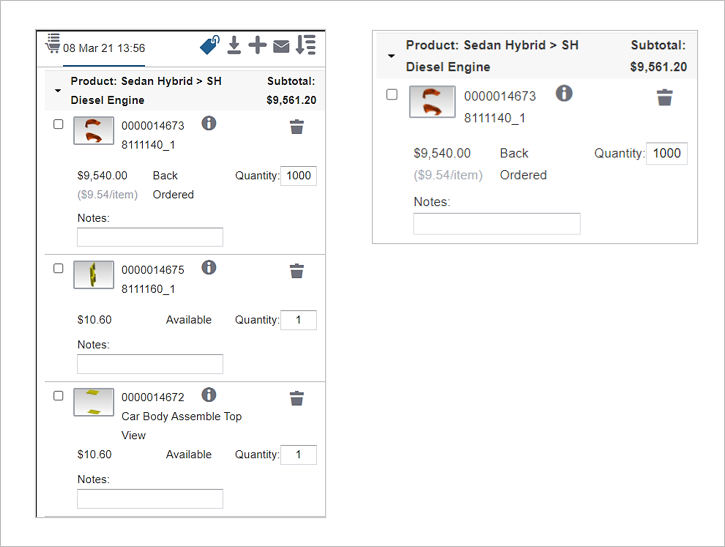 |