Updating PTC Arbortext Content Delivery from 7.x.x.x to 7.2.x.x Release
The procedure for updating PTC Arbortext Content Delivery to the latest maintenance release, or to apply the most current patch, depends on the type of environment you are using—hosted or offline.
Prerequisites
• WildFly is no longer bundled with PTC Arbortext Content Delivery. For WildFly install or update, see the Adding WildFly to the PTC Arbortext Content Delivery Installer section in the Assumptions and Prerequisites topic.
• Delete the Shortcuts folder from the older version of PTC Arbortext Content Delivery, if present inside the <Home>/InS-SW/SW directory.
• If you are using an Oracle service installed from PTC Arbortext Content Delivery installer on the same machine (DB files present in <InS_SW>/SW/System/OCU/{Oracle_Instance_Name}), then during the update process, you must stop the following Oracle service:
◦ OracleService{Oracle_Instance_Name}
◦ OracleVssWriter{Oracle_Instance_Name}
◦ Oracle TNSListener
Updating or applying a patch to a hosted environment
To install a PTC Arbortext Content Delivery update on a hosted environment, or to apply a patch to that environment, perform the following steps:
|
|
For Split or Multisite or Cluster environment, you must follow the steps from 1 to 11 on publisher and on every Viewer.
|
1. Back up your current PTC Arbortext Content Delivery installation directory.For example, if your installed location is C:\ptc\ACD, then create a zip of that directory with a name similar to InService_<timestamp>.zip.
2. Download the installation package from the PTC eSupport Portal.
|
|
If the machine reboots at any point during the installation, perform following steps:
a. Navigate to <InS_HOME>\SCI\installer\instreg\<id>
b. Delete the psi_iir.xml file.
c. Rename the psi_iir.<latestNumber>.xml file to psi_iir.xml
|
3. Before running the installer, ensure the following:
◦ Jboss, coreServer, and coreCMIServer are not running.
4. From within the release package, launch the ACD installer by entering the following command:
◦ Windows: setup.bat
◦ UNIX: setup
5. In the Installation type, select the Update Existing Installation, and then click Next.

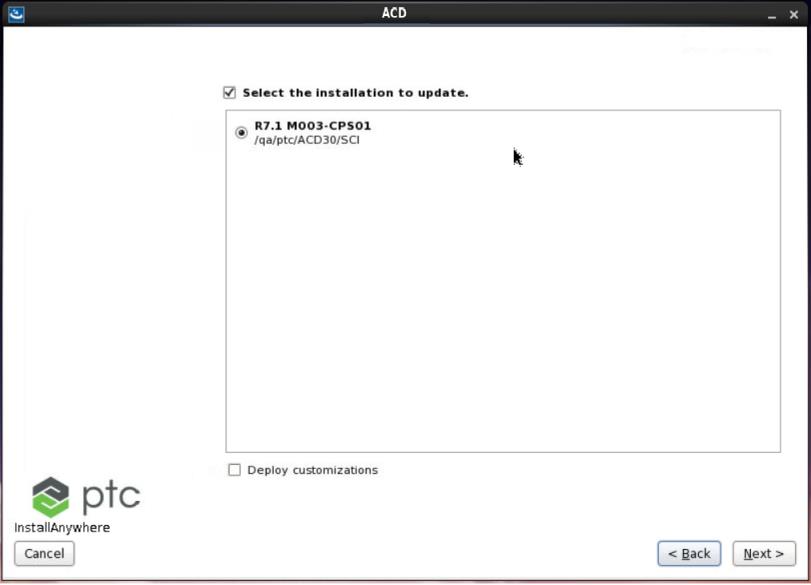
6. Select the installation to update, and then click Next.
7. Select Complete as your update type, and then click Next.
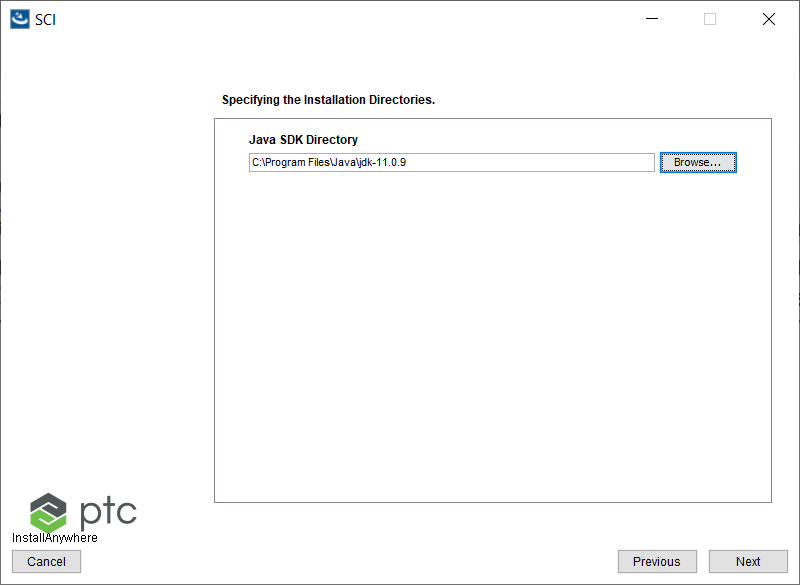
8. Installer has a panel that takes the Java 11 JDK path. For convenience, it takes the old JDK path that was used in the earlier installation. If it is not JDK 11, update the path using the following panel.
9. Review the installation summary information, and click Next to begin the installation.
10. If the installation completes successfully, launch PTC Arbortext Content Delivery and ensure that the system is working as expected.
11. If the installation fails, complete the following steps:
a. Review the log files for the installation to find cause of the update failure. The log files are found in the installer\installer\logs directory of the installation and also on your desktop under logCollector directory.For example, C:\ptc\InService\SCI\installer\logs and <Desktop>/logCollector.The specific log files to review are the installer_ PtcInstall.log.
b. Fix the cause of the update failure.
c. Retry the installation, starting with step 3.
In case of update failure, the installer will revert back the install to the state before the update started. Fix the cause of update failure and retry the update using the installer. In rare cases, if the installer fails to revert back your install to the state before the update started, you will have to restore your install from the backup you created in step 1 and retry the update. |
12. After completing above steps, go to the Task Manager and run the Update Assets in Publication Manager task by modifying the following properties:
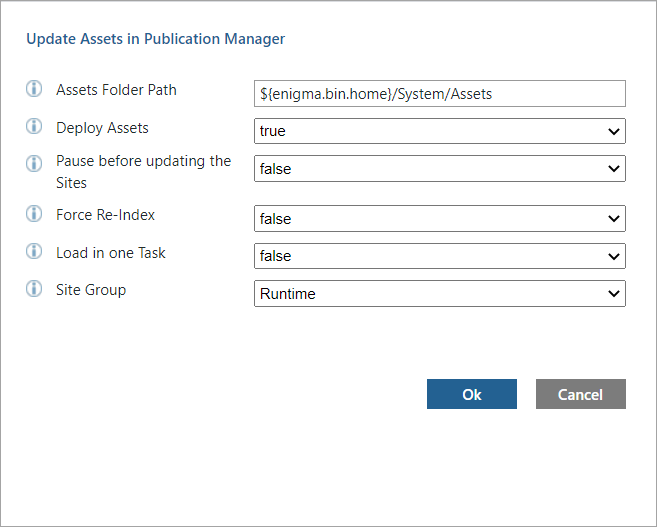
a. Set Force Re-Index to false.
b. Deploy Assets —this task requires two input parameters:
▪ Site_groups set to the name of the site to which your data has already been loaded during transform and load.
▪ Reset_Index This setting is false by default. There is no need to set this flag to true. The framework is optimized to do re-indexing of only changed types.
This task triggers the DeployCollection tasks one per segment with the segment level profile. The DeployCollection task deploys new assets to the Sites and Re-Index changed types.
Post-Update Steps
1. After you complete the update, PTC Arbortext Content Delivery 7.2.x.x will be pointing to the older LDAP—WindchillDS. You must migrate the data from the WindchillDS to OpenDJ by using steps provided in Migrating from WindchillDS to OpenDJ or Other v3-compliant Directory Server
2. Perform upgrade utility for all environments, that is, Monolithic, Split, Cluster and Multi-site. For split server, the utility must be performed only on the Viewer machine. For cluster server, the loader steps must be performed only on the master Viewer. For Multi-site server, the utility must be performed on all Viewer machines. Run the following command from windchill shell:
◦ You can run the following command until 7.2.0.3 release:
▪ Windows: java com.ptc.upgrade.UpgradeUtility -s <source_release> -t <target_release> -u <username> -p <password>
For example, java com.ptc.upgrade.UpgradeUtility -s 7.1.5.0 -t 7.2.0.3 -u <username> -p <password>
▪ Linux: windchill com.ptc.upgrade.UpgradeUtility -s <source_release> -t <target_release> -u <username> -p <password>
For example, windchill com.ptc.upgrade.UpgradeUtility -s 7.1.5.0 -t 7.2.0.3 -u <username> -p <password>
You can run the following command from 7.2.0.4 release onwards:
▪ Windows: java com.ptc.upgrade.UpgradeUtility -s <source_release> -t <target_release> -u <username> -p <password>
For example, java com.ptc.upgrade.UpgradeUtility -s 7.1.5.00 -t 7.2.0.04 -u <username> -p <password>
▪ Linux: windchill com.ptc.upgrade.UpgradeUtility -s <source_release> -t <target_release> -u <username> -p <password>
For example, windchill com.ptc.upgrade.UpgradeUtility -s 7.1.5.00 -t 7.2.0.04 -u <username> -p <password>
3. If you are updating from 7.1.5.6 or prior release to 7.2.0.2 release to fix Book print issue for a specific model, complete the following steps:
◦ Column type of TN_SCE_PS_ACTIVE_BULK_PRINTS has been changed to support more width.
◦ Primary Key constraint has been changed.
◦ Execute the following commands on E3C schema. The commands below are compatible for oracle database, use syntax according to your database. After updating, run the database commands post installation:
ALTER TABLE TN_SCE_PS_ACTIVE_BULK_PRINTS DROP CONSTRAINT TN_SCE_PS_ACTIVE_BULK_PRINT_PK;ALTER TABLE TN_SCE_PS_ACTIVE_BULK_PRINTS MODIFY (CONTEXT_ID NVARCHAR2(1024), USER_FILTER NVARCHAR2 (1024));ALTER TABLE TN_SCE_PS_ACTIVE_BULK_PRINTS ADD CONSTRAINT TN_SCE_PS_ACTIVE_BULK_PRINT_PK PRIMARY KEY (PRINT_ID,ID);
4. If you are updating from xxxx or prior release to 7.2.0.4 release, complete the following below step:
◦ Execute the following commands on E3C schema. The commands below is compatible for oracle database, use syntax according to your database. After updating, run the database command post installation:CREATE INDEX SOURCE_INDEX ON SC_RELATIONS (SOURCE);
• Make sure all the services of the target machine are up and running. • ReTAL is required when PI data is already loaded and logical expression is already present before the upgrade from PTC Arbortext Content Delivery 7.1.x.x to 7.2.x.x. Therefore PH must be loaded again on the 7.2.x.x system. |