Upgrading PTC Arbortext Content Delivery to 7.1.4.0 Release
This section describes the steps that you must follow to upgrade PTC Arbortext Content Delivery from 6.4, 6.5, or 7.1 to 7.1.4.0 release.
|
|
• If you are upgrading PTC Arbortext Content Delivery without reloading the data, the content sharing mode for 7.1.4.0 must exactly be the same as it is in the source server (6.4, 6.5, or 7.1). That is, if the content sharing is enabled for 6.4 (or 6.5 or 7.1), it must also be enabled in 7.1.4.0 when upgrading without reloading the data. However, in case of upgrading CSV data from 6.4, the mode is always non-shared in 7.1.4.0, because in 6.4 release, the shared mode was not supported for CSV.
• If you are upgrading from PTC Arbortext Content Delivery 6.4 server with only CSV data to PTC Arbortext Content Delivery 7.1.4.0, do not trigger the UpgradeIMANRecords task.
• As the IS title update change is in the transform area, the IS root node title update (based on the TOC code) will only take effect after ReTAL.
• For all the features to work properly, you must generate a new license file when upgrading to PTC Arbortext Content Delivery 7.1.4.0.
• If both the standalone license server and the viewer are installed on the same machine, then before starting to upgrade, rename the psi_iir_license.xml in standalone license server location at ptc\ArbortextContentDelivery\SCI\installer\instreg
|
Pre-requisites
• Ensure that PTC Arbortext Content Delivery 6.4 or 6.5 is installed. It is assumed that the bundles are loaded and all dynamic data is created.
• Servers are down before starting the upgrade process.
• If you have any previous customizations that you want to migrate to the upgraded release, see the Analyzing 7.1 Customization section.
Upgrade Steps
A. Publisher
Perform the following steps while publisher installation
E3C Data Migration
1. Bring down the 6.4 (or 6.5) server. Stop all the services and Windchill Directory Server.
2. Rename the old installation folder so that the new installation can be installed in the same location. Do not delete the old installation folder if the Windchill Directory Server is installed in it.
3. Bring up the Windchill Directory Server from the old installation path. Install PTC Arbortext Content Delivery 7.1.4.0 in the same directory pointing to the old installation folder. keep the Windchill Directory Server and database user the same.

Clear the Load data into existing Database check box for Oracle/SQL/Postgres database.
4. Select the Load base data check box for MongoDB.
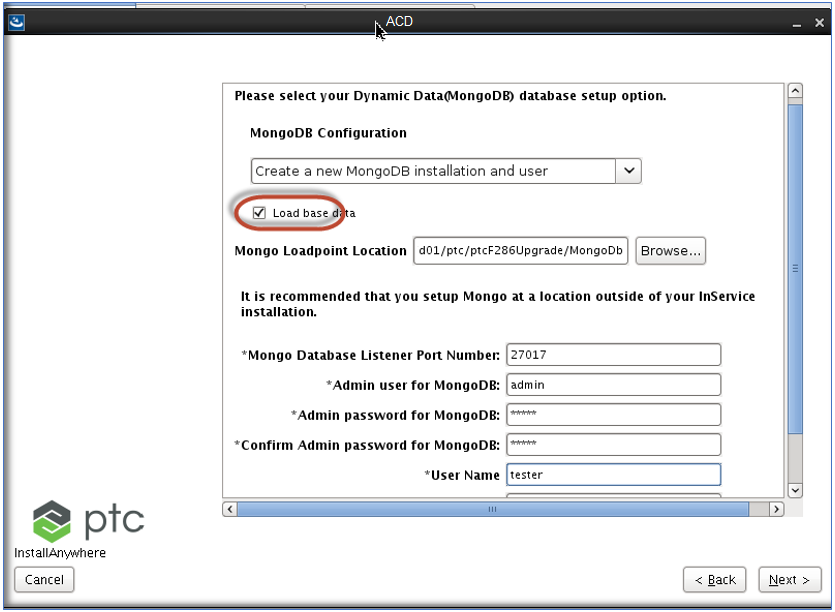
5. The Windchill Directory Server must be configured to the existing installation. Also, provide the correct port of the previous Windchill Directory Server. To verify whether the port is configured correctly, open the summary file of the old installation from <InService_6.x>\SCI\installer\summary. Example of the summary file:


6. Ensure that the installation location points to the same installation path of the old environment with the same shared Data and the Use Existing Data Storage check box is selected.

7. Copy titles from the location <HOME>/SW/Config/Titles to the same location for the new installation.
8. Copy the following files from <HOME>/SW/config/system/config of old installation to the new installation location:
◦ Datasources.conf.xml
◦ Namespaces.conf.xml
◦ publicationsList.xml
◦ titles.conf.xml
◦ ProfileDefinitions.xml
9. Copy coreCMIPublication.xml and corePublication.xml from the <HOME>/SW/config/system/config/core folder of the old installation to the Data/Data/ folder of the new installation.
10. Run the \SW\SW\correctPrintServerPath.bat/sh script. Ensure that all core servers are down while running this script.
11. Bring up the servers.
Split Server
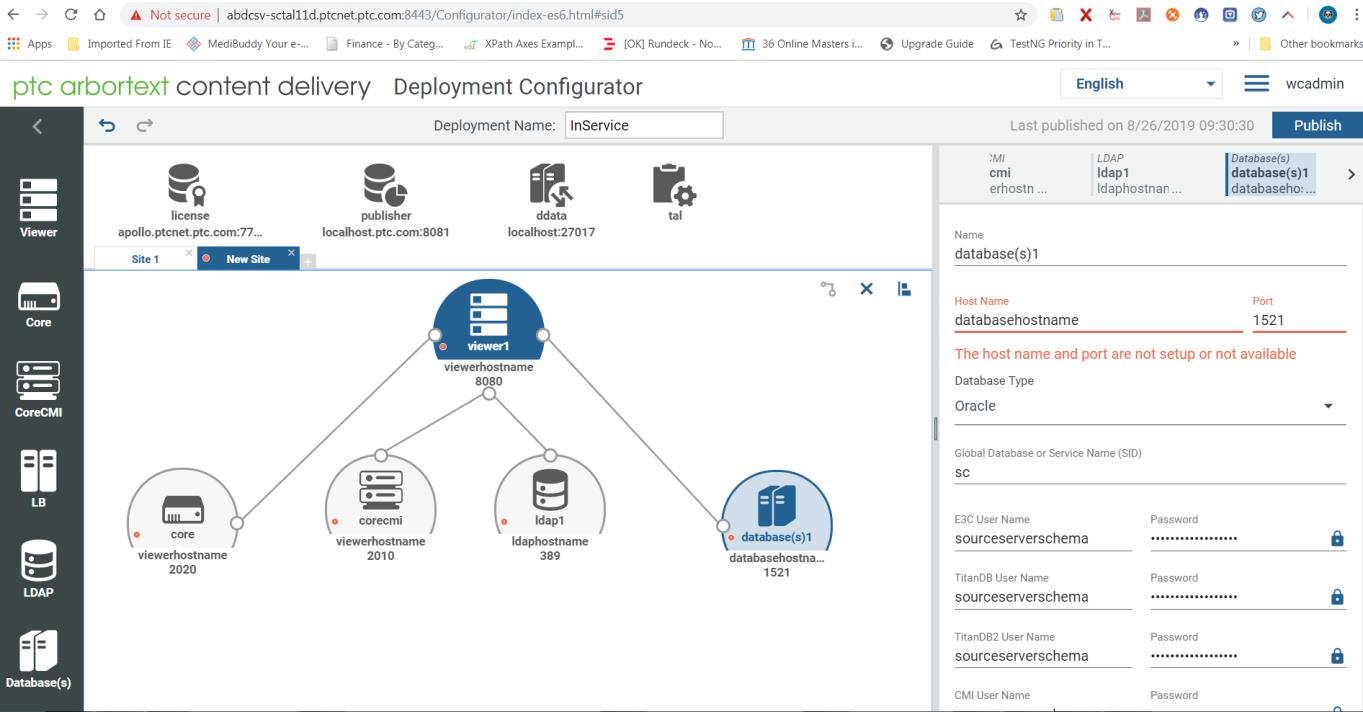
Go to the Configurator and configure Split Server using Configurator UI as follows:
URL: <hostname>/<port>:/Configurator
1. Add a new runtime site and fill all the details for viewer entities as that of 6.x source server, such as Upload Packets path, WindchillDS/ldap details, db details, ddata details, TAL configuration info, license details, core, corecmi, viewer/jboss.
Do not remove or edit Site1 (preview site). |
2. Click Publish.
B. Viewer
Perform following steps while viewer installation.
Step 1: Extracting Dynamic Data from the Servers
This step extracts the dynamic data from the existing servers, such as users, profiles, carts, orders, notes, feedback, into files in the specified folder. These files are later loaded into 7.1.4.0 after installation. This Step 1 must be performed only on the viewer.
• The following steps must be performed only on respective PTC Arbortext Content Delivery (6.4 or 6.5) installation and the server must be up and running. • While upgrading to 7.1, if you want to go back and access the current system, revert all the data extraction changes mentioned in this section, that is Step 1: Extracting Dynamic Data from the Servers. |
1. Unzip DataExtractUtility.zip, and copy xconf/dataExtraction.service.properties.xconf to /<HOME>/SW/SW/Applications/Windchill.ear/codebase.war/com/ptc/sc/xconf folder.
The DataExtractUtility.zip file is not included in the release package, and must be downloaded from the PTC download center.  |
2. Copy DataExtractUtility.jar and gson-2.3.1.jar to the codebase.war/WEB_INF/lib folder.
3. Open a Windchill shell.
4. Add or uncomment the following entry in <WT_HOME>/declarations.xconf at the end of the file.
<ConfigurationRef
xlink:href="codebase.war/com/ptc/sc/xconf/dataExtraction.service.properties.xconf" />
xlink:href="codebase.war/com/ptc/sc/xconf/dataExtraction.service.properties.xconf" />
5. Run the following commands:
xconfmanager -s
com.ptc.sc.WncInSDataExtractor.fileChunkSize=50 -t codebase.war/wt.properties
xconfmanager -s
com.ptc.sc.WncInSDataExtractor.fileWriterPoolSize=250 -t codebase.war/wt.properties
com.ptc.sc.WncInSDataExtractor.fileChunkSize=50 -t codebase.war/wt.properties
xconfmanager -s
com.ptc.sc.WncInSDataExtractor.fileWriterPoolSize=250 -t codebase.war/wt.properties
6. Run xconfmanager -Fp.
7. Update <HOME>\SW\SW\Applications\Windchill.ear\codebase.war\log4j.properties file and perform the following steps:
a. Add "file" to the rootLogger:
log4j.rootLogger=ERROR, stdout, file
b. Add the following entries:
log4j.appender.file=org.apache.log4j.RollingFileAppender
log4j.appender.file.File=
{Provide Path here}<export_path_location>/<output_logFileName>.log
log4j.appender.file.layout=org.apache.log4j.PatternLayout
log4j.appender.file.layout.ConversionPattern=%d{ISO8601} %-5p [%t] %c - %m%n
log4j.appender.file.File=
{Provide Path here}<export_path_location>/<output_logFileName>.log
log4j.appender.file.layout=org.apache.log4j.PatternLayout
log4j.appender.file.layout.ConversionPattern=%d{ISO8601} %-5p [%t] %c - %m%n
• It is not required to restart the server when performing the above steps. • This utility is developed for JAVA 1.8, hence before performing step 6 ensure that you have JAVA version 1.8 installed. |
8. To extract the data, run the following command:
java com.ptc.sc.extract.WncInSDataExtractor -path=<export_path_location>
Ensure that the server is up and running, and this command is run in the Windchill Shell.


• The system IDs of Options and Choices data are updated to support data from multiple authoring systems. This requires re-TAL of the product hierarchy bundle with Options and Choices data after the upgrade from 6.4 (or 6.5) to 7.1.4.0 is complete. This is required only in case you have loaded Options and Choices data from multiple authoring systems. • Extraction and Loader utility tasks can be run only on master Viewer in case of Cluster setup. Copying of files (such as titles) must be done on both Publishers and Viewers. • The error messages seen in the above image are expected and should be ignored. |
Step 2: E3C Data Migration
For CSV bundles, the upgrade is supported only for the non-shared mode. |
1. Bring down the 6.4 (or 6.5) server. Stop all the services and Windchill Directory Server.
2. Rename the old installation folder so that the new installation can be installed in the same location. Do not delete the old installation folder if the Windchill Directory Server is installed in it.
3. Bring up the Windchill Directory Server from the old installation path. Install PTC Arbortext Content Delivery 7.1.4.0 in the same directory pointing to the old installation folder. keep the Windchill Directory Server and database user the same.
Clear the Load data into existing Database check box for Oracle/SQL/Postgres database.
4. The Windchill Directory Server must be configured to the existing installation. Also, provide the correct port of the previous Windchill Directory Server. To verify whether the port is configured correctly, open the summary file of the old installation from <InService_6.x>\SCI\installer\summary. Following image shows an example summary file:

5. Ensure that the installation location points to the same installation path of the old environment with the same shared Data and the Use Existing Data Storage check box is selected.

6. Copy titles from the location <HOME>/SW/Config/Titles to the same location for the new installation.
7. Copy the following files from <HOME>/SW/config/system/config of old installation to the new installation location:
◦ Datasources.conf.xml
◦ Namespaces.conf.xml
◦ publicationsList.xml
◦ titles.conf.xml
◦ ProfileDefinitions.xml
8. Copy coreCMIPublication.xml and corePublication.xml from the <HOME>/SW/config/system/config/core folder of the old installation to the Data/Data/ folder of the new installation.
9. Run the <HOME>\SW\SW\correctPrintServerPath.bat/sh script from the new installation./coreS.
10. Bring up the servers.
In case of Self-Signed certificates, certificates recreation and import is required. To do that, perform the following steps on both publisher and viewer. 1. Navigate to <Home>\SW\SW\System\Java\jre\lib\security 2. Delete cacert from this location 3. Navigate to <Home>\SW\SW\System\WildFly\standalone\configuration 4. Delete existing certificate and ins.keystore 5. Navigate to SW folder and run createKeystore.sh <hostname of running machine> 6. Do it for Publisher machine and Viewer/viewers machine. 7. Copy Pub certificate to Viewer machine and Viewer certificates to Pub Machine. Certificate location: <Home>\SW\SW\System\WildFly\standalone\configuration 8. Navigate to SW folder for both publisher and viewer machine. 9. Run importCertificate.sh <hostname of opposite machine>. It should be done on both Publisher and Viewer machines. • The Force Re-Index option should be set to true while performing step 14. |
C. Publisher Task Manager
Log in to the Task Manager and perform the following steps.
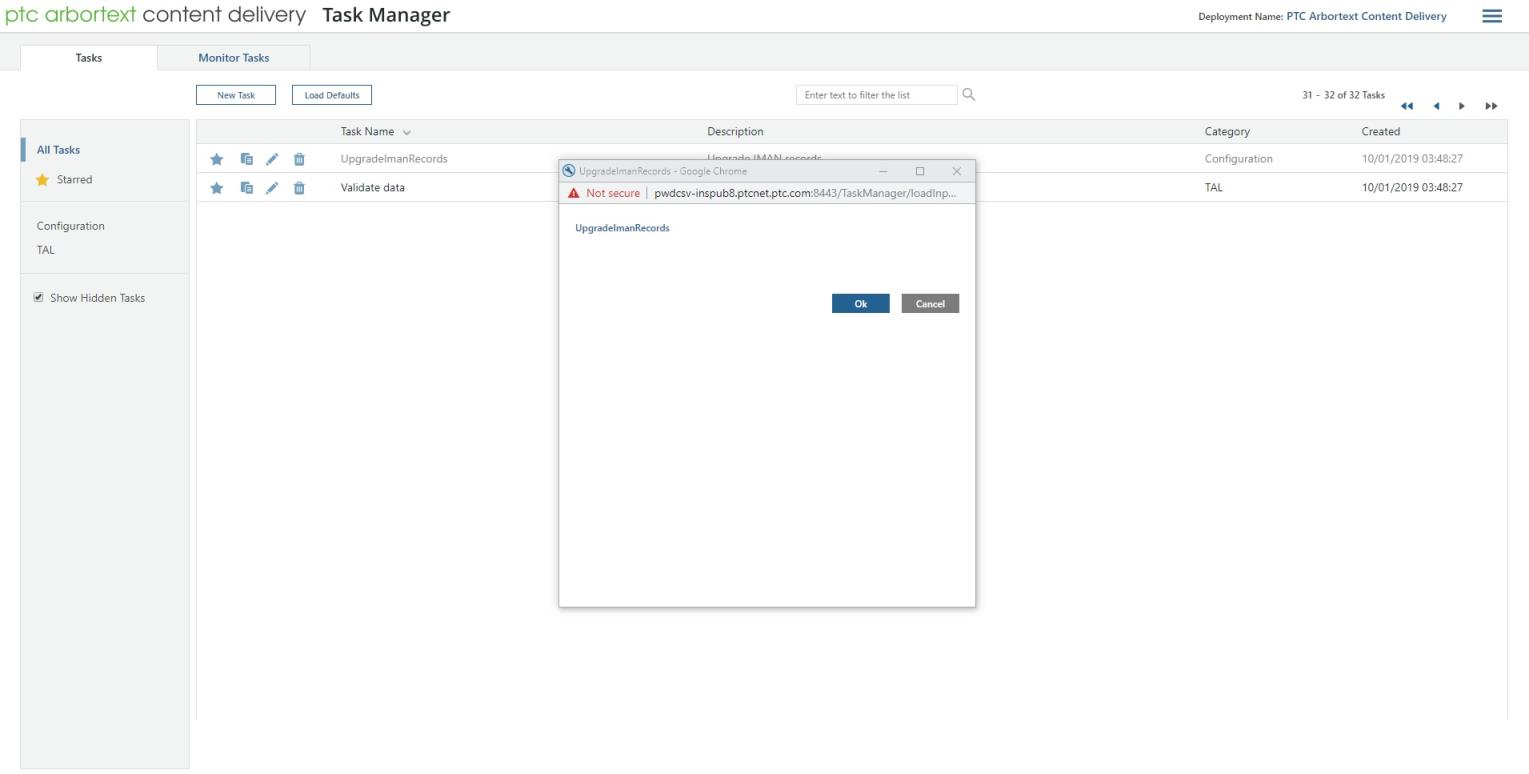
1. Log in to the Task Manager and click Load Defaults.
2. Click Show Hidden task from left-hand side pane.
3. Log in to the Publisher machine and run the Migrator task:

4. Run the Update Assets in Publication Manager task with Deploy Assets set to True. Confirm that the automatically triggered deploy jobs are successful.

5. Run the UpgradeImanRecords task.

6. Run the Add Datatype task and add Symptoms data on parts. This is applicable only for PTC Arbortext Content Delivery 6.x releases.
D. Viewer Dynamic Data Import
From viewer machine, perform the following steps.
Loader Commands
1. Log in to the PTC Arbortext Content Delivery user interface and ensure that the bundle data is visible.
2. On the viewer machine, go to <HOME>/SW/SW/Applications/Windchill.ear/bin/ and open a terminal.
3. To open the Windchill shell, type ./windchill shell
4. Run the following command specifying the path where the extracted files are stored:
java com.ptc.sc.loader.WncInsLoader -u wcadmin -p wcadmin -d <Extracted_Data_Path>
or
windchill com.ptc.sc.loader.WncInsLoader -u wcadmin -p wcadmin -d <Extracted_Data_Path>
The message All Objects were imported successfully is displayed.

The <Extracted_Data_Path> must use forward slashes (/), otherwise the command fails; even on the Windows systems. |
5. Restart the Core Server, CoreCMI, JBOSS services on master Viewer.
If you are upgrading from PTC Arbortext Content Delivery 6.4 with only CSV data to PTC Arbortext Content Delivery 7.1.4.0, do not trigger the UpgradeIMANRecords task.
• For split server, the loader steps must be performed only on the Viewer machine. For cluster server, the loader steps must be performed only on the master Viewer. • After upgrade, run the following command from windchill shell.windchill com.ptc.upgrade.UpgradeUtility -s 7.1.4.0 -t 7.1.4.0 -u <username> -p <password>Make sure all the services of the target machine are running. |
Cluster Server
Go to the Configurator and configure Cluster Server using Configurator UI as follows: URL: hostname>/<port>:/Configurator
1. Add a new runtime site and fill all the details for viewer entities as that of 6.x source server, such as Upload Packets path, WindchillDS/ldap details, db details, ddata details, TAL configuration info, license details, core, corecmi, viewer/jboss.
Do not remove or edit Site1 (preview site). |
2. Click Pubish.

• Install 7.1.4.0 using Configurator for a split or cluster setup. For monolithic, install 7.1.4.0 and modify to the desired Content Sharing Mode using Configurator. • For CSV bundles, the upgrade is supported only for the non-shared mode. |
B. Viewer
Perform following steps while viewers installation.
Step 1: Extracting Dynamic Data from the Servers
This step extracts the dynamic data from the existing servers, such as users, profiles, carts, orders, notes, feedback, into files in the specified folder. These files are later loaded into 7.1.4.0 after installation. This Step 1 must be performed only on the master viewer.
• The following steps must be performed only on respective PTC Arbortext Content Delivery (6.4 or 6.5) installation and the server must be up and running. • While upgrading to 7.1, if you want to go back and access the current system, revert all the data extraction changes mentioned in this section, that is Step 1: Extracting Dynamic Data from the Servers. |
1. Unzip DataExtractUtility.zip, and copy xconf/dataExtraction.service.properties.xconf to /<HOME>/SW/SW/Applications/Windchill.ear/codebase.war/com/ptc/sc/xconf folder.
The DataExtractUtility.zip file is not included in the release package, and must be downloaded from the PTC download center. |
2. Copy DataExtractUtility.jar and gson-2.3.1.jar to the codebase.war/WEB_INF/lib folder.
3. Open a Windchill shell.
4. Add or uncomment the following entry in <WT_HOME>/declarations.xconf at the end of the file.
<ConfigurationRef
xlink:href="codebase.war/com/ptc/sc/xconf/dataExtraction.service.properties.xconf" />
xlink:href="codebase.war/com/ptc/sc/xconf/dataExtraction.service.properties.xconf" />
5. Run the following commands:
xconfmanager -s
com.ptc.sc.WncInSDataExtractor.fileChunkSize=50 -t codebase.war/wt.properties
xconfmanager -s
com.ptc.sc.WncInSDataExtractor.fileWriterPoolSize=250 -t codebase.war/wt.properties
com.ptc.sc.WncInSDataExtractor.fileChunkSize=50 -t codebase.war/wt.properties
xconfmanager -s
com.ptc.sc.WncInSDataExtractor.fileWriterPoolSize=250 -t codebase.war/wt.properties
6. Run xconfmanager -Fp.
7. Update <HOME>\SW\SW\Applications\Windchill.ear\codebase.war\log4j.properties file and perform the following steps:
a. Add "file" to the rootLogger:
log4j.rootLogger=ERROR, stdout, file
b. Add the following entries:
log4j.appender.file=org.apache.log4j.RollingFileAppender
log4j.appender.file.File=
{Provide Path here}<export_path_location>/<output_logFileName>.log
log4j.appender.file.layout=org.apache.log4j.PatternLayout
log4j.appender.file.layout.ConversionPattern=%d{ISO8601} %-5p [%t] %c - %m%n
log4j.appender.file.File=
{Provide Path here}<export_path_location>/<output_logFileName>.log
log4j.appender.file.layout=org.apache.log4j.PatternLayout
log4j.appender.file.layout.ConversionPattern=%d{ISO8601} %-5p [%t] %c - %m%n
• It is not required to restart the server when performing the above steps. • This utility is developed for JAVA 1.8, hence before performing step 6 ensure that you have JAVA version 1.8 installed. |
8. To extract the data, run the following command:
java com.ptc.sc.extract.WncInSDataExtractor -path=<export_path_location>
Ensure that the server is up and running, and this command is run in the Windchill Shell.
• The system IDs of Options and Choices data are updated to support data from multiple authoring systems. This requires re-TAL of the product hierarchy bundle with Options and Choices data after the upgrade from 6.4 (or 6.5) to 7.1.4.0 is complete. This is required only in case you have loaded Options and Choices data from multiple authoring systems. • Extraction and Loader utility tasks can be run only on master viewer in case of Cluster setup. Copying of files (such as titles) must be done on both Publishers and Viewers. |
Step 2: E3C Data Migration
• For CSV bundles, the upgrade is supported only for the non-shared mode. • In case of Cluster, perform the following steps on both the viewers. |
1. Bring down the 6.4 (or 6.5) server. Stop all the services and Windchill Directory Server.
2. Rename the old installation folder so that the new installation can be installed in the same location. Do not delete the old installation folder if the Windchill Directory Server is installed in it.
3. Bring up the Windchill Directory Server from the old installation path. Install PTC Arbortext Content Delivery 7.1.4.0 in the same directory pointing to the old installation folder. keep the Windchill Directory Server and database user the same.
Clear the Load data into existing Database check box for Oracle/SQL/Postgres database.
4. The Windchill Directory Server must be configured to the existing installation. Also, provide the correct port of the previous Windchill Directory Server. To verify whether the port is configured correctly, open the summary file of the old installation from <InService_6.x>\SCI\installer\summary. Following image shows an example summary file:
5. Ensure that the installation location points to the same installation path of the old environment with the same shared Data and the Use Existing Data Storage check box is selected.

6. Copy titles from the location <HOME>/SW/Config/Titles to the same location for the new installation.
7. Copy the following files from <HOME>/SW/config/system/config of old installation to the new installation location:
◦ Datasources.conf.xml
◦ Namespaces.conf.xml
◦ publicationsList.xml
◦ titles.conf.xml
◦ ProfileDefinitions.xml
8. Copy coreCMIPublication.xml and corePublication.xml from the <HOME>/SW/config/system/config/core folder of the old installation to the Data/Data/ folder of the new installation.
9. Run the <HOME>\SW\SW\correctPrintServerPath.bat/sh script from the new installation./coreS.
10. Bring up the servers.
In case of Self-Signed certificates, certificates recreation and import is required. To do that, perform the following steps on both publisher and viewer. 1. Navigate to <Home>\SW\SW\System\Java\jre\lib\security 2. Delete cacert from this location 3. Navigate to <Home>\SW\SW\System\WildFly\standalone\configuration 4. Delete existing certificate and ins.keystore 5. Navigate to SW folder and run createKeystore.sh <hostname of running machine> 6. Do it for Publisher machine and Viewer/viewers machine. 7. Copy Pub certificate to Viewer machine and Viewer certificates to Pub Machine. Certificate location: <Home>\SW\SW\System\WildFly\standalone\configuration 8. Navigate to SW folder for both publisher and viewer machine. 9. Run importCertificate.sh <hostname of opposite machine>. It should be done on both Publisher and Viewer machines. • The Force Re-Index option should be set to true while performing step 14. |
C. Publisher Task Manager
Log in to the Task Manager and perform the following steps.
1. Log in to the Task Manager and click Load Defaults.
2. Click Show Hidden task from left-hand side pane.
3. Log in to the Publisher machine and run the Migrator task:

4. Run the Update Assets in Publication Manager task with Deploy Assets set to True. Confirm that the automatically triggered deploy jobs are successful.

5. Run the UpgradeImanRecords task.
6. Run the Add Datatype task and add Symptoms data on parts. This is applicable only for PTC Arbortext Content Delivery 6.x releases.
D. Viewer Dynamic Data Import
From master viewer machine, perform the following steps.
Loader Commands
1. Log in to the PTC Arbortext Content Delivery user interface and ensure that the bundle data is visible.
2. On the viewer machine, go to <HOME>/SW/SW/Applications/Windchill.ear/bin/ and open a terminal.
3. To open the Windchill shell, type ./windchill shell
4. Run the following command specifying the path where the extracted files are stored:
java com.ptc.sc.loader.WncInsLoader -u wcadmin -p wcadmin -d <Extracted_Data_Path>
or
windchill com.ptc.sc.loader.WncInsLoader -u wcadmin -p wcadmin -d <Extracted_Data_Path>
The message All Objects were imported successfully is displayed.
5. Restart the Core Server, CoreCMI, JBOSS services on master Viewer.
If you are upgrading from PTC Arbortext Content Delivery 6.4 with only CSV data to PTC Arbortext Content Delivery 7.1.4.0, do not trigger the UpgradeIMANRecords task.
• For split server, the loader steps must be performed only on the Viewer machine. For cluster server, the loader steps must be performed only on the master Viewer. • After upgrade, run the following command from windchill shell.windchill com.ptc.upgrade.UpgradeUtility -s 7.1.x.x -t 7.1.4.0 -u <username> -p <password>Make sure all the services of the target machine are running. |