Updating PTC Arbortext Content Delivery from 7.x Release
The procedure for updating PTC Arbortext Content Delivery to the latest maintenance release, or to apply the most current patch, depends on the type of environment you are using—hosted or offline.
Prerequisites
• The Windchill Directory Server should be running.
• Delete the Shortcuts folder from the older version of PTC Arbortext Content Delivery, if present inside the <Home>/InS-SW/SW directory.
Updating or applying a patch to a hosted environment
To install a PTC PTC Arbortext Content Delivery update on a hosted environment, or to apply a patch to that environment, perform the following steps:
1. Back up your current ACD installation directory.For example, if your installed location is C:\ptc\ACD, then create a zip of that directory with a name similar to InService_<timestamp>.zip.
2. Download the installation package from the PTC eSupport Portal.
3. Before running the installer, ensure the following:
◦ LDAP is running
◦ Jboss, coreServer, and coreCMIServer are not running.
4. From within the release package, launch the ACD installer by entering the following command:
◦ Windows: setup.bat
◦ UNIX: setup
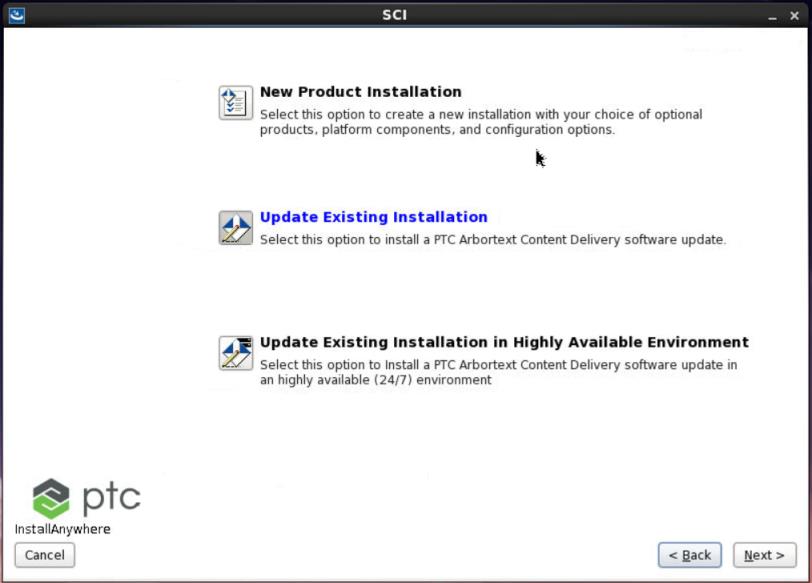
5. In the Installation type, select the Update Existing Installation, and then click Next.
6. Select the installation to update, and then click Next.

7. Select Complete as your update type, and then click Next.
8. Review the installation summary information, and click Next to begin the installation.
9. If the installation completes successfully, launch ACD and ensure that the system is working as expected.
10. If the installation fails, complete the following steps:
a. Review the log files for the installation to find cause of the update failure. The log files are found in the installer\installer\logs directory of the installation and also on your desktop under logCollector directory.For example, C:\ptc\InService\SCI\installer\logs and <Desktop>/logCollector.The specific log files to review are the installer_ PtcInstall.log.
b. Fix the cause of the update failure.
c. Retry the installation, starting with step 3.
In case of update failure, the installer will revert back the install to the state before the update started. Fix the cause of update failure and retry the update using the installer. In rare cases, if the installer fails to revert back your install to the state before the update started, you will have to restore your install from the backup you created in step 1 and retry the update. |
11. After completing above steps, go to the Task Manager and run the Update Assets in Publication Manager task by modifying the following properties:

a. Set Force Re-Index to true.
b. Deploy Assets —this task requires two input parameters:
▪ Site_groups set to the name of the site to which your data has already been loaded during transform and load.
▪ Reset_Index This setting is false by default. There is no need to set this flag to true. The framework is optimized to do re-indexing of only changed types.
This task triggers the DeployCollection tasks one per segment with the segment level profile. The DeployCollection task deploys new assets to the Sites and Re-Index changed types.
12. Go to the ACD Administration (scadmin) page and click Preferences. Expand the What’s New section and update the Information Types from MEDIA,KIT,INFORMATION,PARTSLIST,PARTS to MEDIA,KIT,INFORMATION,PARTSLIST,PART,TROUBLESHOOTING.
Post-Update Steps
For split server, the utility must be performed only on the Viewer machine. For cluster server, the loader steps must be performed only on the master Viewer.
Run the following command from windchill shell: windchill com.ptc.upgrade.UpgradeUtility -s <source_release> -t <target_release> -u <username> -p <password>
For example, windchill com.ptc.upgrade.UpgradeUtility -s 7.1.3.0 -t 7.1.4.0 -u <username> -p <password>
Make sure all the services of the target machine are up and running. |