Using a CloudFront Distribution with an Amazon S3 Bucket
A method to push files to Amazon S3 can be used which allows you to distribute the files using CloudFront from there. This
method involves more setup, but has added benefits. CloudFront talks directly to the S3 bucket, and there is only a one-time
cost for uploading the file to S3 for the ThingWorx server even if the CDN cache misses.
Create an Amazon S3 Bucket
Complete the following steps to create the S3 bucket you want to use in your AWS console.
- Navigate to the S3 control panel and click Create Bucket.
- Enter a unique name for your bucket and a region appropriate to where your ThingWorx server resides

Create an IAM User for the S3 Bucket
ThingWorx requires credentials to talk to the AWS APIs and interact with the S3 bucket. Rather than using your top-level AWS
credentials, or another existing user, it is recommended that you create a new IAM user within your account that has read
and write access to the S3 bucket you created.
- Navigate to the IAM control panel within the AWS console.
- Create a new user. Be sure to generate and save the access keys, as you will need them when setting up the S3 repository thing in ThingWorx.
- In the Permissions tab, expand the Inline Policies section and click the link to create a new in-line policy.
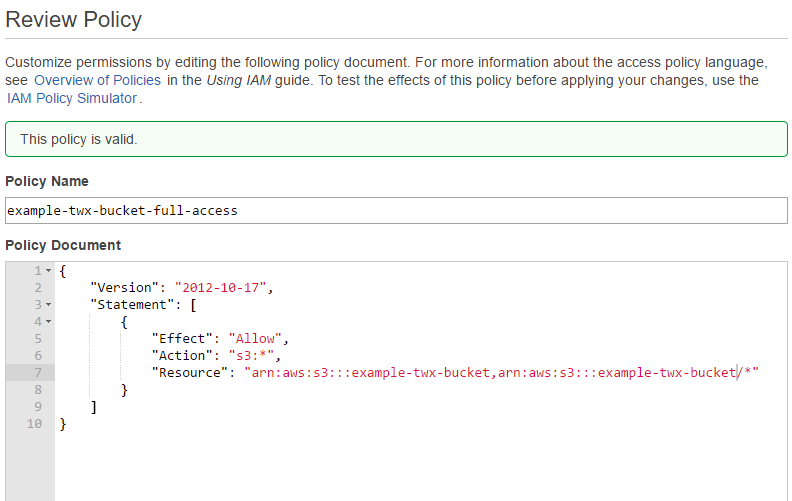
- Since the policy you are creating is simple, directly create it using the Custom Policy editor.
- Allow all S3 actions scoped to your bucket in the following format: arn:aws:s3:::example-twx-bucket,arn:aws:s3:::example-twx-bucket/*, substituting your bucket name in place of example-twx-bucket.

Create an S3 File Repository Thing in ThingWorx
- From ThingWorx Composer, import the S3 File Repository extension. This provides the TWX.UTL.S3FileRepository thing template.
- Create a new thing with a unique name, and apply the TWX.UTL.S3FileRepository thing template.

- Under Entity Information, click Configuration.
- Enter the appropriate information for the region, bucket name, and credentials. This information is based on the bucket and
user that were created earlier.

- Click Save. The S3 thing can now write and read from your configured S3 bucket. Later, you will use this as the cache repository when you configure CDN in Software Content Management.
Create a CloudFront Distribution with an S3 Bucket as an Origin
Create a web distribution similar to the one in Configuring CDN with Amazon CloudFront. However, with this distribution, the S3 bucket will be the origin, and CloudFront only has read access to bucket.
- Log in to your AWS console and navigate to the CloudFront control panel. For more information, see https://aws.amazon.com/documentation/.
- Create a new CloudFront Web Distribution.
- Enter the S3 bucket URL in the Origin Domain Name field. For example, bucketname.s3.amazonaws.com.

- Select Yes forRestrict Bucket Access. This prompts you to create a new user with read only permissions or use an existing user. For this example the Create a New Identity option is used and CloudFront will create a new user.
- The remaining settings can be left as the defaults.
- Click Create Distribution.
- Your CDN URL Prefix for Software Content Management should look like the following example: https://d335myeqaba1rh.cloudfront.net/{0}.
- Select the S3 repository thing as the Cache Repository.
- Click Save.

 Note
Note