 |
|
|
Hole Depth Options
Additional depth options can be found in the appropriate dashboard tab. For holes, select the Shape tab to configure the Side 1 and Side 2 depths. |
|
| Task 2-23. Complete the hole feature, and select a color appearance for the model. |
- Complete the hole as shown in the following figure:
- Select on the background, and then press CTRL + D to orient to the standard orientation.
- Click the Shape tab in the dashboard.
- Change the existing depth option from Blind to Through All.
- Change the depth option for Side 2 from None to Through All.
- Enter a diameter of 5 in the dashboard, and click Complete Feature
 . .
 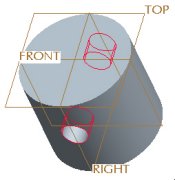
Hole Created |
|
|
|
You can also middle-click as a shortcut to Complete Feature . |
|
- Click View > Color and Appearance from the main menu.
- Select the Blue_Dark appearance and click Apply.
- Click Close from the Appearance Editor dialog box.
- Click Save
 from the main toolbar, and click OK. from the main toolbar, and click OK.
- Click File > Close Window
 . . |


