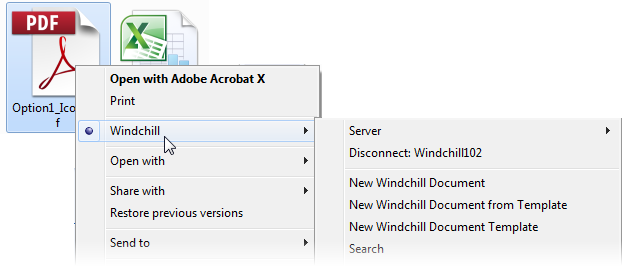


A right-click Windchill menu appears in two additional locations. Each menu includes different actions, depending on the context. • A Windchill menu appears when you right-click objects under the Windchill Documents node in Windows Explorer. For more information about working with this menu, see Right-Click Actions. • A Windchill menu appears when you right-click two or more locally saved documents that have an embedded connection to a Windchill server. For more information about working with this menu, see Remove Windchill Information from Documents. |
Windchill Action Availability | |
Server connection | Until you connect to a server, only the Connection actions are visible. |
Preference settings | Administrators can enable or disable actions using the Preference Management utility in Windchill. Additionally, some files might not be recognized as Windchill documents unless the File Download Mechanism preference is set to Use Windchill Desktop Integration functionality to download files. For more information, see Desktop Integration Preferences. |
Location | Most actions are only available if the document has been opened from Windchill. For more information, see Opening Documents with Desktop Integration. |
Version and status | Some actions are only available when viewing the most recent iteration. Other actions depend on whether the document is checked out. Check the document information to verify that it has not been updated in Windchill since you downloaded it and that it is not checked out by another user. |
User permission | Any security or access rules set in Windchill are applied to desktop integration actions. |
Context | Revise and Promote are only available for documents located in a Product |
For actions that open into a menu, the first action listed within the menu is the default action for that group. For example, if you click Export, you will initiate the Remove Windchill Info action:  |
New | Click New to select one of the following options:
• New Document from Template—Create a new document in the Windchill database from an existing Windchill document template. A new file opens to display a standard format for you to use when authoring the document. • New Template—Create a new template in Windchill using the file you are authoring as its primary content.
| ||||
Open | Click Open to select one of the following options: • Open—Browse for documents under the Windchill node in Windows Explorer. | ||||
Enter a new name or number for all versions and iterations of the document. This action is available only when the document is checked in. | |||||
Update | Click Update to select one of the following options: • Update to Latest—Download and then open the most recent iteration of the document checked in to Windchill. Any local changes you have made are discarded.
• Revert to Server Copy—Open the version of the document that you initially downloaded from Windchill. Any local changes you have made are discarded. |
Check Out | Click Check Out to select one of the following options: • Check Out—Reserve the document. Other users are unable to make changes until the document is checked in. • Check Out and Edit—Reserve the document and open the Edit window, where you can edit certain Windchill attributes. For information on editing attributes in Microsoft Office, see Editing the Windchill Attributes. | ||
Check In | Click Check In to select one of the following options: • Check In—Check the document back into Windchill. This action is available only to the user to whom the document is currently checked out. • Undo Checkout—Undo a checkout without saving any changes or creating a new iteration. This releases your hold on the document and makes it available for others to check out. | ||
Set the life cycle state of the document. | |||
Create a new revision of the document. For example, a new revision of A.4 becomes version B.1.
| |||
Create a new promotion request to formally change the state of the document as well as related objects. |
Properties | Click Properties to select one of the following options: • View Information—Open a new window that displays detailed Windchill attribute information and a link to the document in Windchill. |
Edit document attributes. | |
Select a Windchill attribute field to display in the document content. |
Compare two versions of the same document
| |||
Export | Click Export to select one of the following options: • Remove Windchill Info—Save a local copy of the document and remove its connection to Windchill. As a result, desktop integration no longer recognizes the file as a Windchill document. • Remove Windchill Info and Attributes—Save a local copy of the document that has no connection to Windchill and remove all custom attributes. For example, this would remove any information about the Windchill version and context, the original author, and the life cycle state. |
Server | Establish a Windchill server connection from a list of established server connections. |
Open the Windchill Desktop Integration Configuration window, from which you can add and remove servers, manage your preference settings, and view system information. | |
Disconnect | End your current Windchill server connection. |
Help | Open the Windchill Help Center. |
About Windchill | Open a window that displays information about your Windchill version. |
About Desktop Integration | Open the About tab in the Windchill Desktop Integration Configuration window. |
You can use your keyboard to navigate the ribbon commands. 1. Press and release the ALT key to view the KeyTip for each command:  2. Press the letter shown to initiate that command. If the letter is shown over an action group, it opens that action menu. 3. To cancel an action and hide the KeyTips, click anywhere in the window or press and release the ALT key again. For more information, see the following Microsoft Office support center topic: Use the keyboard to work with the ribbon |