Publishing Creo Elements/Direct Modeling Parts or Assemblies to PVZ Format Using Creo View Adapter and CAD Workers
You can automate the conversion of 2D drawings and 3D models to a variety of standard and native geometry formats and additional viewing formats using the following applications:
• Windchill Visualization Service (WVS)
• Creo View adapter
• Creo Elements/Direct Modeling worker (CAD worker)
You can configure the Creo Elements/Direct Modeling worker to generate additional file formats. Controlled by publishing rules, the Windchill Visualization Service (WVS) can automatically publish additional file formats, which can then be accessed from the Representations view in Windchill.
For information on how to view representations, see
Viewing Representations. For information on how to generate additional file formats, in the
Creo View MCAD Adapters 3.1 Installation and Configuration Guide, see
Generating Additional File Formats for Creo Elements/Direct Modeling with Windchill.
Prerequisites
To automate the format conversion of 2D drawings and 3D models, you must have the following applications installed and configured:
• Creo Elements/Direct Modeling registered and connected with Windchill Workgroup Manager.
• Creo View Adapter. For information on how to install Creo View Adapter, see PTC Creo View MCAD Adapters 3.1 Installation and Configuration Guide.
|
|
The GS Worker Daemon is installed with the Creo View Adapter. The GS Worker Daemon is required to run the ccmodelworker.bat file.
|
• Creo Elements/Direct Modeling Worker
For information on how to generate the Creo Elements/Direct Modeling Worker scripts, in the PTC Creo View MCAD Adapters 3.1 Installation and Configuration Guide, see Using ccmodel2pv_config.
In Creo Elements/Direct Modeling, add the Windchill WGM module to the startup list. For information on how to add modules to the startup list, in the Creo Elements/Direct Modeling help, see Using Modules.
Ensure that your computer-specific log-on details are available on the GS Daemon Services properties. To verify these details,
1. On the Windows start menu, click
 Services
. The
Services window opens.
2. On the Services (local) pane, double-click the GS Worker Daemon. The GS Worker Daemon Properties window opens.
3. On the Log On tab, verify that This account option displays your username and password details.
4. If you change the log-on details, click Restart the service and restart the GS Daemon services.
Publishing the 2D drawings or 3D models to the Creo View format from Creo Elements/Direct Modeling
To publish an assembly to the Creo View format, perform the following steps:
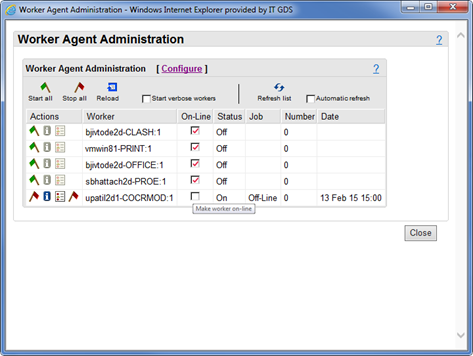
1. Ensure that the Creo Elements/Direct Modeling worker is offline. To do this, in the Worker Agent Administration window, in the On-Line column, clear the check box for your Creo Elements/Direct Modeling worker.
2. In
Creo Elements/Direct Modeling, custom check in an assembly to
Windchill Workgroup Manager using the auto associate option. For more information on custom check in, see
Custom Check In.
3. On the Worker Agent Administration window, in the On-Line column, select the check box for your Creo Elements/Direct Modeling worker.
4. Click Reload to bring your worker online.
5. Close the Creo Elements/Direct Modeling and Windchill Workgroup Manager applications.
6. To open the WVS Job Monitor,
a. At site level, click Utilities.
b. On the Preference Management window, under Business Administration, click WVS Job Monitor.
7. On the WVS Job Monitor window, refresh the list and log in to Windchill.
8. Under Job Summary for demo, select the assemblies or parts that you need to publish.
9. Right-click the selected parts and click Resubmit. The Job Status column displays the status and under Job Detail, the Job log displays the successful or failed jobs and the reasons for failure, if any.