Customizing PSE to Handle Modeled Subclasses
Objective
You have created a custom modeled business object; you want to customize the PSE so that it will fully support your modeled subclass.
Scope/Applicability/Assumptions
You have separately created your modeled subclass.
Intended Outcome
Instances of your modeled subclass will be detected and presented by PSE in the same manner as out-of-the-box modeled objects.
Solution
Make changes in the following three areas:
• LogicalAttributes.xml
• PSE Tables and Panels
• Customized command delegates
Prerequisite knowledge
To achieve this objective, you need to have an understanding of the following:
• The management of XML file customizations
• The management of RBINFO file customizations
Solution Elements
|
Element
|
Type
|
Description
|
|
LogicalAttributes.xml
|
XML file
|
Used to configure modeled attribute mappings from a "logical form" to its "external form".
|
Procedure – Customizing PSE to Handle Modeled Subclasses
This section contains the following topics:
• LogicalAttributes.xml
• PSE Tables and Panels
• Customized command delegates
LogicalAttributes.xml
A LogicalAttributes.xml file, located in <Windchill>/codebase/LogicalAttributes.xml, is used to configure modeled attribute mappings from a "logical form" to its "external form". A mapping is required for all modeled attributes that represent an association from one object to another. For example some of the entries defined for the WTPart to WTPartMaster reference are:
<Class name="wt.part.WTPart">
<Property>
<LogicalForm>defaultUnit</LogicalForm>
<ExternalForm>MBA|masterReference^WCTYPE|
wt.part.WTPartMaster~MBA|defaultUnit</ExternalForm>
</Property>
<Property>
<LogicalForm>masterReference</LogicalForm>
<ExternalForm>MBA|masterReference^WCTYPE|
wt.part.WTPartMaster</ExternalForm>
</Property>
<Property>
<LogicalForm>name</LogicalForm>
<ExternalForm>MBA|masterReference^WCTYPE|
wt.part.WTPartMaster~MBA|name</ExternalForm>
</Property>
<Property>
<LogicalForm>number</LogicalForm>
<ExternalForm>MBA|masterReference^WCTYPE|
wt.part.WTPartMaster~MBA|number</ExternalForm>
</Property>
<Property>
<LogicalForm>organizationReference</LogicalForm>
<ExternalForm>MBA|masterReference^WCTYPE|
wt.part.WTPartMaster~MBA|organizationReference^WCTYPE|
wt.org.WTOrganization</ExternalForm>
</Property>
<Property>
<LogicalForm>organizationName</LogicalForm>
<ExternalForm>MBA|masterReference^WCTYPE|
wt.part.WTPartMaster~MBA|organizationReference^WCTYPE|
wt.org.WTOrganization~MBA|name</ExternalForm>
</Property>
<Property>
<LogicalForm>usedLineNumber</LogicalForm>
<ExternalForm>MBA|masterReference^WCTYPE|
wt.part.WTPartMaster~MBA|uses@WCTYPE|
wt.part.WTPartUsageLink~MBA|
lineNumber.value</ExternalForm>
</Property>
<Property>
<LogicalForm>usedLink</LogicalForm>
<ExternalForm>MBA|masterReference^WCTYPE|
wt.part.WTPartMaster~MBA|uses@WCTYPE|
wt.part.WTPartUsageLink</ExternalForm>
</Property>
</Class>
Using the example that "ext.cust.CustPart" extends wt.part.WTPart, and "ext.cust.SubPartMaster" extends wt.part.WTPartMaster, the following should be added to the site-specific file called <Windchill>/codebase/LogicalAttributesSite.xml:
<Class name="ext.cust.CustPart">
<Property>
<LogicalForm>defaultUnit</LogicalForm>
<ExternalForm>MBA|masterReference^WCTYPE|
ext.cust.SubPartMaster~MBA|defaultUnit</ExternalForm>
</Property>
<Property>
<LogicalForm>masterReference</LogicalForm>
<ExternalForm>MBA|masterReference^WCTYPE|
ext.cust.SubPartMaster</ExternalForm>
</Property>
<Property>
<LogicalForm>name</LogicalForm>
<ExternalForm>MBA|masterReference^WCTYPE|
ext.cust.SubPartMaster~MBA|name</ExternalForm>
</Property>
<Property>
<LogicalForm>number</LogicalForm>
<ExternalForm>MBA|masterReference^WCTYPE|
ext.cust.SubPartMaster~MBA|number</ExternalForm>
</Property>
<Property>
<LogicalForm>organizationReference</LogicalForm>
<ExternalForm>MBA|masterReference^WCTYPE|
ext.cust.SubPartMaster~MBA|organizationReference^WCTYPE|
wt.org.WTOrganization</ExternalForm>
</Property>
<Property>
<LogicalForm>organizationName</LogicalForm>
<ExternalForm>MBA|masterReference^WCTYPE|
ext.cust.SubPartMaster~MBA|organizationReference^WCTYPE|
wt.org.WTOrganization~MBA|name</ExternalForm>
</Property>
<LogicalForm>usedLineNumber</LogicalForm>
<ExternalForm>MBA|masterReference^WCTYPE|
ext.cust.SubPartMaster~MBA|uses@WCTYPE|
wt.part.WTPartUsageLink~MBA|
lineNumber.value</ExternalForm>
</Property>
<Property>
<LogicalForm>usedLink</LogicalForm>
<ExternalForm>MBA|masterReference^WCTYPE|
ext.cust.SubPartMaster~MBA|uses@WCTYPE|
wt.part.WTPartUsageLink</ExternalForm>
</Property>
</Class>
PSE Tables and Panels
You do not need to add new modeled attributes to the LogicalAttributes.xml file, but you must add them to the appropriate PSE configuration XML files. Refer to
Customizing PSE for subtype for additional information.
|
|
When specifying new modeled attributes that are defined only for subclass objects, the corresponding "AttributeGroup" or “AttributeTable” or "Table” defined in a "wt.part.WTPart" context should be copied to the appropriate subclass context.
|
Only new modeled attributes need to be listed. Existing attributes will be inherited. For example, name and number will be inherited from WTPart.
To remove attributes from a sub-classed panel that are inherited, use "<Placement remove="true"/>", For example:
<AttributeDefinition id="contextName”>
<Placement remove="true"/>"
</AttributeDefinition>
A good practice when adding element groups for customized objects is to put all customized changes in a separate file, rather than edit existing files. Name them consistently, e.g. CustomExplorerForTablesAndPanels.xml.
Using the previous example of "ext.cust.CustPart" extends "wt.part.WTPart", the following AttributeGroup
<ExplorerElementGroup>
<LogicContext application="ptc.wnc.StructureExplorer"
dataType="wt.part.WTPart"/>
<AttributeGroup id="ptc.wnc.exp.ViewPropertiesPanel" displayMode="view">
<CellDefinition id="number">
<AttributeDefinition attributeId="number"/>
</CellDefinition>
<CellDefinition id="organizationIdentifier">
<AttributeDefinition attributeId="organizationIdentifier"/>
</CellDefinition>
<CellDefinition id="name">
<AttributeDefinition attributeId="name"/>
</CellDefinition>
<CellDefinition id="versionIterationView">
<AttributeDefinition attributeId="versionIterationView"/>
</CellDefinition>
...
</AttributeGroup>
</ElementGroup>
should be copied under the LogicContext for “ext.cust.CustPart” like this:
<ExplorerElementGroup>
<LogicContext application="ptc.wnc.StructureExplorer"
dataType=" ext.cust.CustPart "/>
<AttributeGroup id="ptc.wnc.exp.ViewPropertiesPanel" displayMode="view">
<!-- name and number will inherit from WTPart -->
<!-- adding new modeled attributes here -->
<CellDefinition id="intMBA">
<AttributeDefinition attributeId="intMBA"/>
</CellDefinition>
...
</AttributeGroup>
</ElementGroup>
Customized command delegates
PSE uses a Command/CommandDelegate mapping to control some of its operations. The most notable example is the "Duplicate Action". To "duplicate" a customized class, you need to subclass the appropriate copy delegate. In the case of "CustPart", you need to create a class that is a subclass of wt.enterprise.CopyWTPartDelegate and handle the copying of your customized modeled attributes.
Writing a Copy Delegate for a Custom Class
When an out of the box business object (such as part) is customized to create a modeled sub-class, it is necessary to create and configure a custom copy delegate class so that when the part is copied (or saved as), additional modeled attributes are handled properly.
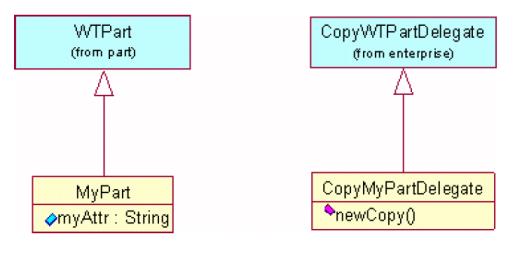
This document illustrates the steps with a simple example: a custom part class “MyPart” that extends wt.part.WTPart with a single string attribute “myAttr”.
Creating a Copy Delegate
As illustrated in the figure, you can simply extend wt.enterprise.CopyWTPartDelegate and override its newCopy() method. The purpose is to handle any custom attributes, in this particular case, myAttr. Here’s how this method is implemented:
public final RevisionControlled newCopy( RevisionControlled object
)throws WTException {
//##begin newCopy%461E645C0050f.body preserve=yes
if (object == null) return null;
MyPart new_copy = (MyPart) super.newCopy(object);
MyPart original = (MyPart) object;
String my_attr = original.getMyAttr();
if (my_attr != null) {
try {
new_copy.setMyAttr(original.getMyAttr());
}
catch (WTPropertyVetoException e) {
throw new WTException(e);
}
return new_copy;
//##end newCopy%461E645C0050f.body
}
Creating a Copy Delegate
Configuring a Copy Delegate
To instruct Windchill to use the custom copy delegate CopyMyPartDelegate as the copy delegate class for MyPart, the following line needs to be inserted into configuration file <windchill-install-directory>/codebase/wt/enterprise/EnterpriseServerDelegate.properties.
wt.services/svc/default/wt.enterprise.CopyDelegate/null/<my-
package>.MyPart/0=<mypackage>.
CopyMyPartDelegate/singleton
Customization Points
Customizing Localizable Labels and Enumerations
Each modeled object has an associated RBINFO file, created during generation, that contains localized strings that are used as the labels for attributes and columns in PSE. If the label needs to be changed, the corresponding RBIFNO file should be edited. For example, in the file CustPartModelRB.rbInfo, to change the label for the attribute "booleanMBA", edit the following line:
CustPart.booleanMBA.value=New Label for booleanMBA
Modeled enumerations will display the internal values of the enumerations, when rendered as a drop-down menu in PSE. To change the labels displayed in a drop-down menu, the corresponding RBINFO file for the enumeration should be edited. For example, if you generate a class, "public final class MyEnum extends EnumeratedType" with values "apple", "dog", "cat" and you wish to change the display value in the drop-down menu, edit the file MyEnumRB.rbInfo like this:
# Entry Contents
apple.value=Apples
dog.value=Dogs
cat.value=Cats
Other Resources