The WVS Job Monitor
Use the
WVS Job Monitor to view and manage the status of different types of WVS jobs. Select the
WVS Job Monitor icon

in
Quick Links or from the
Representations/Annotations table to access the Job Monitor, or select
WVS Job Monitor in the
Business Administration section of the
Utilities page.
The information in the WVS Job Monitor is read-only.
| The list of jobs displayed is sensitive to the context level of the user or administrator. For example, a user can see the details for only the jobs that he has submitted, whereas a product administrator sees only those jobs for the current product when the WVS Job Monitor is launched from the Utilities page of that product. |
Job Summary
The top section of the WVS Job Monitor window is the Job Summary, which displays a sortable list of jobs. The Job Detail below displays the details of the highlighted job. The information in the list is read-only.
There are several options on the Job Summary pane.
• You can use the drop-down list at the top of the WVS Job Monitor to manage what kind of jobs you want to be displayed in the Job Summary. The - Pick a View - drop-down list provides several display options:
◦ All
◦ Executing Jobs
◦ Failed Jobs
◦ Interference Detection Jobs
◦ My Jobs
◦ Print Jobs
◦ Publish Jobs
◦ Ready Jobs
◦ Successful Jobs
• You can click
Turn Auto Refresh On to keep the list up-to-date, or click the
Refresh All Jobs
icon to update it once.
• You can delete jobs by selecting the check box next to a job and clicking the
Delete
icon. This deletes only the record of the publishing job; it does not affect the representation created by the job.
• The Actions drop-down list provides access to other WVS Job Monitor functions.
◦ Refresh All Jobs, Turn Auto Refresh On, and Delete are discussed above.
◦ Resubmit allows you to resubmit completed jobs to be republished. To perform this function, select the check box next to the jobs you want to republish and click Resubmit.
| Resubmit can only be run on Successful or Failed jobs. Jobs in the Running or Ready state cannot be resubmitted. |
◦ The Prohibit Publishing function allows you to “block” job(s) you specify from being published. To perform this function, select the check box next to the jobs you want to prohibit from publishing and click Prohibit Publishing. There are several parameters to keep in mind when using this function.
▪ Administrators can prohibit publishing of jobs of types User and Demo.
▪ The job to be prohibited must be a Publish job.
▪ Failed and Successful jobs can be prohibited from publishing. You cannot Prohibit Publishing of jobs in the Ready and Running state.
▪ Interference Detection jobs cannot be prohibited.
▪ The job to be prohibited must be an EPM document or a WTPart, or must be associated to an EPM document or WTPart.
| The administrative functions on the Actions menu – Prohibit Publishing, Job Statistics, and Publish and Thumbnail Control – are only available when the WVS Job Monitor is accessed using > > . When the WVS Job Monitor is accessed through Quick Links, these features are not visible. |
◦ You can access the
Job Statistics function by clicking this menu entry. See
WVS Job Statistics for a complete description of this feature.
◦ Similarly, you can access the
Publish and Thumbnail Control function by clicking this menu entry. See
Publish and Thumbnail Control for a complete description of this feature.
| The Prohibit Publishing, Job Statistics, and Publish and Thumbnail Control options on the Actions menu are only visible when the WVS Job Monitor is accessed from the Utilities page. |
• The
Search job logs function allows you to search the contents of the job logs for those jobs currently displayed in the
Job Summary. You can search for statistics, text strings, and similar content in the job logs. Type your search details in the field alongside the

icon and press
Enter. The
Job Summary refreshes, and display a list of only those jobs whose logs meet the criteria you specified.
• In the
Search in table field, you can search the list of jobs for specific details such as job name, the user who originated the job, and so on. Click in the search field alongside the
icon, enter the text you want to search for, and press
Enter.
• You can set the
Table display options
to
View Selected Objects Only to display only those jobs you have selected by enabling the check boxes alongside those jobs.
The following table describes the fields displayed on the Job Summary table.
Job Summary Field Descriptions |
Field | Description |
Position | The position of the job in the queue of waiting jobs. When the job starts executing, the column is blank. | More than one job can be executing at the same time if you have multiple publisher queues configured. |
|
Queue | This field provides the priority of the job and the queue that is being used. The priority is indicated as H (high), M (medium), or L (low), followed by the user-assigned queue name. Note the following regarding the priority of the job: • For a waiting job, only the priority is displayed. • For an executing job, both the priority and the publishing queue number in which it is executing are displayed. • For a completed job, the priority and queue that was used for the job are both displayed. |
Job | The number of the publish job, assigned by the system. |
Job Status | The status of the job. • JOB READY—In waiting queue • JOB EXECUTING—Being processed • JOB SUCCESSFUL • JOB FAILED |
Number | The number of the CAD document, part, Dynamic Document, or document. |
Name | The name of the CAD document, part, Dynamic Document, or document. |
Version | The version of the CAD document, part, Dynamic Document, or document. |
Context | The context where the CAD document, part, Dynamic Document, or document is being stored. |
User | The name of the user who submitted the job. |
Post Job | Indicates that a job is executed when the job in a particular row finishes. In Interference Detection, when you tell the system to republish before Interference Detection, a publish job is submitted, and then the Interference Detection job is a “Post Job” of the publish job. |
Job Times (optional) | Displays Job Submitted Time, Job Start Time, and Job End Time columns. To display, change the following wvs.properties entry to true, and then reactivate the Method Server. wvs.showjobtimecolumns.jobmonitor |
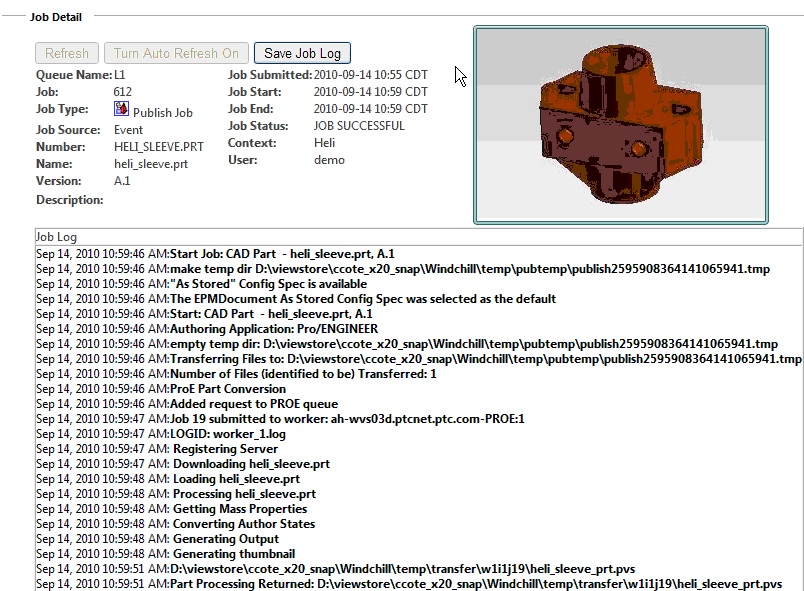
Job Details
The bottom section of the WVS Job Monitor window is the Job Detail pane, which displays the details of the job selected in the Job Summary pane.
To view the details of a job, click anywhere in the row of the desired job in the Job Summary pane.
Once a job is selected, the Job Detail pane is populated with data (and a representation, if applicable) about the selected job.
There are three buttons on the Job Detail pane.
• Click Refresh to reload and redisplay the data in the Job Detail pane.
• Click Turn Auto Refresh On keep the Job Detail pane up-to-date.
• Click Save Job Log to save the details of the current job. This data is saved as an HTML file. You can either open the file to view its contents, or save it to your computer’s default Save location.
The following table describes the fields displayed on the Job Detail pane:
Job Detail Field Descriptions |
Field | Description |
Queue Name | This field provides the priority of the job and the queue that is being used. The priority is indicated as H (high), M (medium), or L (low), followed by the user-assigned queue name. Note the following regarding the priority of the job: • For a waiting job, only the priority is displayed. • For an executing job, both the priority and the publishing queue number in which it is executing are displayed. • For a completed job, the priority and queue that was used for the job are both displayed. |
Job | The publish job number, assigned by the system. |
Job Type | The type of job. Types include Print Job, Publish Job, and Interference Detection Job. |
Job Source | How the job originated. Options are Manual, Checkin, Schedule, and Unknown. |
Number | The number of the part or document. |
Name | The name of the part or document. |
User | The name of the user who submitted the job. |
Version | The version of the part or document (e.g., A.1). |
Job Submitted | Date and time the job was submitted. |
Job Start | Date and time the job started. |
Job End | Date and time the job completed. |
Job Status | The status of the job, such as JOB EXECUTING or JOB SUCCESSFUL. |
Context | The context where the part or document is being stored. |
Description | A job log is provided, listing all system activity in chronological order. |
Change will not take place until the next time the Method Server is started.