Security Assertion Markup Language (SAML) Authentication
SAML 2.0 authentication can be integrated into
Windchill to enable participation in a federated single sign-on solution. This topic presumes you have prerequisite knowledge of the SAML 2.0 specification. For more information, refer to the SAML v2.0 documentation published by the OASIS Security Services Technical Committee, available at
https://www.oasis-open.org/standards#samlv2.0.
The Windchill authentication strategy relies on the web server to enforce authentication. The following procedure describes an integration that PTC tested using Shibboleth Service Provider 2.6.0 with PTC HTTP Server to confirm Windchill compatibility with SAML. This was tested under specific conditions and is provided as an example configuration. Each site will have unique methods of implementing SAML. The selection of a SAML service provider is up to each customer. PTC has only tested and verified the suitability of Shibboleth Service Provider and does not make any warranty about the suitability of other SAML service providers. PTC does not directly support the setup or configuration of a SAML service provider. For assistance configuring the SAML service provider that you select, refer to that product’s documentation or customer support. This procedure does not address how to establish or configure an identity provider within your federation. Refer to OASIS or Shibboleth documentation for information about establishing an identity provider, or consult with your identity provider administrator.
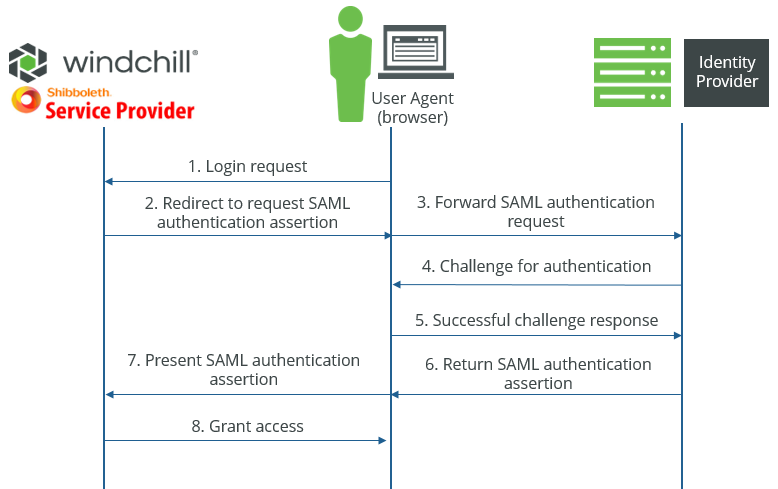
Most single sign-on solutions use the SAML Web Browser SSO Profile. In this scenario, there are a minimum of three roles.
|
Role
|
Description
|
|
User Agent
|
The browser client acting on behalf of a natural user to make a request from a service provider.
|
|
Service Provider
|
An entity that provides services to other entities within a federation. A user agent makes a request to the service provider on behalf of a principal.
|
|
Identity Provider
|
The Identity Provider (IdP) creates, maintains, and manages identity information for principals and authenticates principals to services within a federation.
|
These roles, and others, are described in more detail in the OASIS SAML v2.0 documentation. The following graphic depicts the authentication process between these roles.
It is possible to configure an identity provider as a service provider to other identity providers. When this procedure refers to an identity provider, it is only referring to the identity provider that the service provider must communicate with directly, not any additional federated identity providers.
The following steps are required to enable SAML capabilities for Windchill using Shibboleth Service Provider 2.6.0.
1. Install Shibboleth Service Provider
Shibboleth is available for download from the Shibboleth Consortium. Use the following resources to download and install Shibboleth on the same system as the PTC HTTP Server.
Shibboleth install files | |
Shibboleth install documentation | |
For Linux, the Shibboleth Service Provider can be installed through a yum repository. Consult the Shibboleth install documentation for details.
After installation, Shibboleth must be configured for your site.
2. Configure Shibboleth Service Provider
Two XML files must be edited to configure the Shibboleth Service Provider.
a. Edit shibboleth2.xml located at shibboleth_install_directory/etc/shibboleth/shibboleth2.xml. On Linux, the shibboleth_install_directory directory is the / directory.
The following are the minimum configuration changes necessary.
▪ Configure the unique entityID of your Service Provider. This is configured by the entityID attribute of the <ApplicationDefaults> tag. The default value is "https://sp.example.org/shibboleth". The entityID needs to be a unique string identifying the Service Provider. A URL may be sufficiently unique. For example: <ApplicationDefaults entityID="https://windchillserver.company.com".
▪ The REMOTE_USER attribute must be configured to allow it to be passed to the Windchill Server.
Configure the REMOTE_USER attribute of the <ApplicationDefaults> element, which defines the SAML attributes that are passed to the web application. The format of this attribute is a space-delimited string of child attributes where each child attribute is an ID that is mapped in the attribute-map.xml file. The attribute string is exposed to the Shibboleth Service Provider by the attribute-map.xml configuration described later in this procedure. The first attribute name to return a non-null value is used. For example, if you have configured an attribute map to use the attribute name ‘uid’ to return the value for REMOTE_USER, then the REMOTE_USER configuration must be REMOTE_USER="uid".
▪ Configure the SSO entityID to match the entityID of the Identity Provider. This is configured by the entityID attribute of the <SSO> tag. The default value is: https://idp.example.org/idp/shibboleth The entityID must be replaced with the value provided by your Identity Provider. Consult your Identity Provider administrator for this value. If value is "MyIDP" the configuration will be: <SSO entityID="MyIDP">.
▪ Configure the metadata for the Identity Provider
The Shibboleth Service Provider must have access to the Identity Provider's metadata in XML format. Some Identity Provider's require exporting the metadata as an XML file, and others allow accessing the metadata using a URL. Consult your Identity Provider's administrator or vendor documentation to determine the appropriate method of providing the metadata to the Shibboleth Service Provider.
▪ If the metadata is provided as an XML file, add the following tag within the main document of the shibboleth2.xml file: <MetadataProvider type="XML" validate="true" file="location to metadata xml file>"/> and replace “location to metadata xml file” with the location of your metadata file. If the metadata file is located in the same directory as the shibboleth2.xml file, then only the filename is necessary.
▪ If the metadata can be accessed via a URL, then the following tag will load it: <MetadataProvider type="XML" validate="true" uri="<url to the IDP metadata>" backingFilePath="federation-metadata.xml"/>. The backingFilePath allows you to use a locally saved copy of the metadata in case the URL is not reachable.
The Shibboleth Service Provider documentation provides additional attributes for configuration that may be useful in production environments.
b. Edit the attribute-map.xml file located at shibboleth_install_directory/opt/shibboleth/sp/etc/shibboleth/attribute-map.xml.
This attribute mapping file must be configured to handle attribute assertions. Attributes are exposed to a SAML Service Provider by name and format. The name may refer to an actual attribute name, or be a namespace. The attribute assertion format is part of the SAML specification. For more information on attribute naming management, refer to the following Shibboleth documents:
NativeSPAttributeExtractor | |
NativeSPAddAttribute | |
A common scenario is for the IdP to assert the attribute under the name format "urn:oasis:names:tc:SAML:2.0:attrname-format:unspecified" identified by a named string. For example, “uid”. In this example, the following configuration will map the uid value from the IdP to the uid string that is used for REMOTE_USER:
<Attribute name="uid" id="uid"/>
For a more complicated scenario where a specific namespace or name format is used, refer to the Shibboleth documentation. Consult with your IdP administrator for specifics on the attribute assertion from the identity provider.
3. Restart the Shibboleth 2 Daemon service in the server manager.
4. Configure PTC HTTP Server.
The PTC HTTP Server must be configured with the Shibboleth Service Provider module.
a. Enable the mod_shib module and configure initial options
a. Copy the file <shibboleth_install_directory>/etc/shibboleth/apache24.config to <http server directory>/conf/conf.d/00-1mod_shib.conf. The file must be named 00-1mod_shib.conf to ensure it is one of the first modules loaded.
b. After copying the file, edit it and set the ShibCompatValidUser directive to On. The default value for this is Off.
b. Disable the default authentication rules for the Windchill directories and retain the anonymous and alternative authentication prefix rules.
a. In a windchill shell in <http server directory> run the command:
ant -DprotocolAuthOnly=true -f webAppConfig.xml regenAllWebApps
This will disable the default authentication rules in Windchill.
c. Enable SAML SSO authentication in the apache configuration.
Create a new file <http server directory>/conf/conf.d/30-app-[WindchillWebAppName]-1Auth.conf with the following contents:
<LocationMatch ^/+Windchill/+(;.*)?>
AuthType shibboleth
ShibRequestSetting requireSession 1
require shib-session
</LocationMatch>
SAML SSO authentication also needs to be enabled for the Windchill Help Center and Windchill Business Reporting (Cognos), as well as any other web app installed on the PTC HTTP Server.
For the Windchill Help Center, create a new file <http server directory>/conf/conf.d/30-app-[WindchillWHCWebAppName]-WHC-1Auth.conf with the following contents:
<LocationMatch ^/+Windchill-WHC/+(;.*)?>
AuthType shibboleth
ShibRequestSetting requireSession 1
require shib-session
</LocationMatch>
For Windchill Business Reporting (Cognos), create a new file <http server directory>/conf/conf.d/30-app-[CognosWebAppName]-1Auth.conf with the following contents:
<LocationMatch ^/+Cognos/+(;.*)?>
AuthType shibboleth
ShibRequestSetting requireSession 1
require shib-session
</LocationMatch>
Follow similar steps for any additional web apps installed on the PTC HTTP Server.
5. Configure Java Web Start Applets.
Java Web Start applets must download jar files from the Windchill server. This mechanism is unable to support SAML SSO, however there are two configuration workarounds.
a. Enable anonymous download of *.jar files from Windchill.
b. Enable the use of protocol authentication.
Setting the property wt.auth.legacySupport.enabled=true to enable the Java Web Start application launcher to download the jar files using an HTTP Basic authentication download. This will result in the user being prompted for additional authentication. The Java Web Start application runs as a standalone application separate from the browser and must be able to access the single sign-on and servlet engine session cookies. In order to allow this, the following properties are used:
▪ wt.servlet.sessionCookie=JSESSIONID
This is the default value for this cookie and only needs to be changed if the servlet session cookie name is different.
▪ wt.servlet.sessionCookiePattern=<regular expression to match a session cookie>
This property is not set by default.
The value for the regular expression to match a session cookie for the Shibboleth Service Provider is _shibsession_.*. The default cookie name for the Shibboleth Service Provider is _shibsession_<unique ID for the Shibboleth Service Provider based on the entityID>. Because the unique ID portion of the cookie name can be difficult to predict, the regular expression value of _shibsession_.* is used. Therefore, the above property should be set to wt.servlet.sessionCookiePattern=_shibsession_.*. If you are using a different service provider, then the cookie name will be different.
6. Provide the Shibboleth Service Provider Metadata to an Identity Provider.
The Shibboleth SP metadata is accessible via a URL that must be provided to the Identity Provider in order to register the Shibboleth Service Provider with that provider. The URL constructed according to the following: PTC_HTTP_Server_URL/Shibboleth.sso/Metadata. For example, if the PTC HTTP server URL is https://windchill.company.com, then the Shibboleth metadata URL is https:windchill.company.com/Shibboleth.sso/Metadata.
Troubleshooting and Debugging the Shibboleth Service Provider
The Shibboleth Daemon log files are located in <shibboleth_install>/var/log/shibboleth. These log files require root access to read on Linux. If you want to switch to a different location: the HTTP server, Shibboleth module log files are in <install_directory>/var/log/shibboleth-www. On Linux, this directory is not writable by a non-root user. PTC HTTP Server usually runs as a non-root user if you are not attempting to run the web server on port 80. When this happens, the log files will not be created. The log file location can be changed by modifying /etc/shibboleth/native.log. Change the following two properties to a writable location:
log4j.appender.native_log.fileName=/var/log/shibboleth-www/native.log
log4j.appender.warn_log.fileName=/var/log/shibboleth-www/native_warn.log
For example, you could create the following directory /opt/ptc/logs. and set the properties to use log files in that directory.
To enable debug logging:
Edit /etc/shibboleth/native.loggger and change the rootCategory loglevel to DEBUG. (log4j.rootCategory=INFO, native_log, warn_log becomes log4j.rootCategory=DEBUG, native_log, warn_log). This will greatly increase the verbosity of both the Shibboleth Daemon and shibboleth module and the native files from /var/log/shibboleth-www or wherever you place them.
Restarting the Shibboleth Service Provider and PTC HTTP Servers
The Shibboleth Service Provider contains two components: a Shibboleth Daemon and the module in PTC HTTP Server. When restarting either, both services need to be restarted. On Windows, the Shibboleth Daemon is configured as a Windows service and can be restarted via the services control panel. On Linux it is a shibd.service systemd unit and can be stopped and started using systemctl. See
Starting the HTTP Server and the Windchill Method Servers for details on starting and stopping PTC HTTP Server.
Client Compatibility
The embedded browsers for Creo Parametric and Windchill Workgroup Manager are unable to use the login cache from the Windchill session in the primary browser. Because of this, a single sign-on experience cannot be fully created as users may see an additional login request from embedded browsers for Creo Parametric and Windchill Workgroup Manager. The embedded browsers will authenticate the users with the identity provider designated in your SAML configuration.
If
Servigistics Arbortext Editor is part of your PTC solution, there are additional considerations for configuring SAML at your site. For more information, see
https://support.ptc.com/appserver/cs/view/solution.jsp?n=CS250036.
Configuring some clients for SAML authentication is unsupported. Before you implement SAML authentication at your site, you should examine the extent to which these clients are used at your site and whether these client exclusions are an impediment to using SAML authentication. PTC does not support SAML authentication configurations for the following clients:
• Windchill Archive
• Windchill Gateway for Cadence Allegro Design Workbench
• Windchill Gateway for Creo Elements/Direct Model Manager
• Windchill Gateway for FORAN
For up-to-date information about client compatibility with SAML authentication, refer to the following article:
https://support.ptc.com/appserver/cs/view/solution.jsp?n=CS250038.
Configuring PingFederate as Identity Provider
The following steps provide guidance on configuring a connection between PingFederate and the Shibboleth SP installation on your
Windchill server. This is an optional configuration and is not required to enable SAML authentication in Windchill. You may choose to use a different IdP in your SAML deployment, depending on the requirements of your enterprise SSO federation. For more information about downloading a supported version PingFederate and obtaining a license, see
Single Sign-on Authentication.
These steps supplement the instructions found in the preceding SAML configuration topic and assumes that PingFederate and Shibboleth Service Provider are already installed. The configuration steps for PingFederate as IdP and Shibboleth Service Provider are interdependent, and so you’ll need to update the configuration for each client to import the metadata XML file that is exported from the other client.
1. Generate a certificate that will be used to establish trust between the Shibboleth Service Provider client installed on your Windchill server and PingFederate. You’ll need this certificate when creating the SP Connection in PingFederate.
From your Windchill server, run the following command (if on a Windows machine) to generate the p12 certificate from the HTTPServer\bin location.
set OPENSSL=<ApacheHome>\ssl\openssl.cnf
openssl pkcs12 -export -in <Location>\server.crt -inkey <Location>\server.key -out PingFederate_<WindchillHost>.p12
Enter Password: password
2. In PingFederate, create a Service Provider Connection.
a. Refer to PingFederate product documentation for instructions for creating service provider connections. From the PingFederate administrative console, navigate to > and click Create New.
b. When setting up this SP connection, use the PK12 certificate that you generated in step one.
c. Import the metadata.xml file you exported when you installed the Shibboleth Service Provider client on your
Windchill server. For instructions for retrieving this file, see step six in the
SAML Authentication configuration topic.
3. Confirm that PingFederate has been configured to redirect user authentication to your enterprise directory server (LDAP or ADFS). Refer to product documentation from PingFederate and your directory server, and coordinate with your directory server administrator to configure PingFederate.
4. In PingFederate, export a metadata XML file for the SP Connection that you created and, if necessary, rename it idp-metadata.xml.
5. In the Shibboleth Service Provider installation on the Windchill server, perform the following configurations.
a. Import the idp-metadata.xml file you exported from the PingFederate SP Connection by saving it to the Shibboleth SP install directory. Add the following tag to the shibboleth2.xml file, modifying it to reflect the location where you saved the idp-metadata.xml file.
<MetadataProvider type="XML" validate="true" file="location to metadata xml file>"/>
b. Configure the SSO entityID to match the entityID of the SP Connection you created in PingFederate. This is retrieved from the idp-metadata.xml file you export from PingFederate.
6. Restart Apache Tomcat, Shibboleth SP, and the Windchill Server. Login to Windchill and confirm that the login URL redirects to the PingFederate login page and that your login succeeds.
| When you configure SSO authentication, the number of login attempts is determined by your identity provider. Check with your IdP administrator to understand what the login attempt policy is in place for your directory server. If you have previously configured user account lockout settings for invalid login attempts in Windchill Directory Server or another LDAP IdP, then you should review the policies set in the new IdP to ensure they comply with your security requirements. |