|
|
Available only in 3D Eyewear projects.
|
|
|
Available only in 3D Eyewear projects.
|
|
|
Currently, QR codes with a black background do not perform well and are difficult to scan. We recommend using a light-colored background for QR codes until this issue is resolved.
|
|
|
The following barcodes are not supported on HoloLens devices:
• Code 93
• Codabar
• MSI
• Aztec
• Data Matrix
• PDF 417
|
|
Property
|
JavaScript
|
Type
|
Description
|
|
Hide 3D Augmentations
|
isAugmentationsHidden
|
boolean
|
When selected, 3D augmentations in the experience are hidden.
|
|
Scanned Value
|
scannedValue
|
string
|
When bound to a widget that includes text, this property displays the value of the barcode or QR code. For example, if a barcode on a computer is scanned, the serial number is displayed.
|
|
Service
|
JavaScript
|
Description
|
|
Start Scan
|
startScan
|
Invoking this service will start the camera to scan for a code.
|
|
Stop Scan
|
stopScan
|
Invoking this service will stop the camera.
|
|
Event
|
JavaScript
|
Description
|
|
Value Acquired
|
valueacquired
|
Triggered when the scan value is acquired.
|
|
User Canceled
|
usercanceled
|
Triggered when a user cancels the scan.
|
|
Application Event
|
Description
|
|
stopscan
|
Once you include a Scan widget in your experience, you’ll see a new stopscan Application Event is created. By default, this application event is bound to the Stop Scan event.
The Voice Alias is Stop Scan.
|
|
Minimum Steps Required for Use
|
What It Looks Like
|
|
1. From the 3D canvas of a 3D eyewear project, drag and drop a Scan widget onto the canvas.
2. Enter the text you want displayed when in scan view. For example, Scan the barcode on the bottom of the computer.
3. Drag and drop a 3D Button widget onto the canvas.
4. Enter the text you want displayed on the button. For example, Scan Code. 5. Drag and drop the  icon next to Click event of the Button onto scan-1 in the project tree. icon next to Click event of the Button onto scan-1 in the project tree.6. Select Start Scan on the Select Binding Target window and click Bind. 7. Drag and drop a 3D Label widget onto the canvas. 8. Enter the text you want displayed for the label of the value display in the Label field. For example, Serial #. 9. Next, click on the Scan widget to display the property details. 10. Drag and drop the icon next to Scanned Value onto the Value Display widget.11. Select Text on the Select Binding Target window and click Bind. |
Initial view: 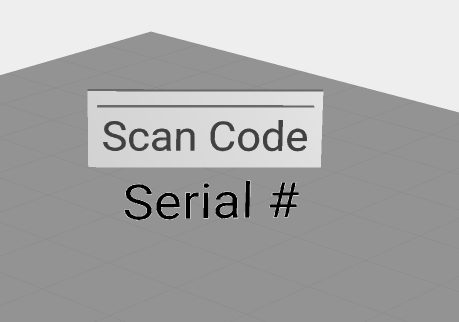 |