|
|
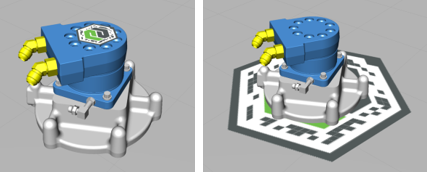
Only one ThingMark should be added to a 3D container.
|
|
|
Only one ThingMark should be added to a 3D container.
|
|
Property
|
JavaScript
|
Type
|
Description
|
|
ThingMark
|
markerId
|
string
|
ID of the ThingMark being used.
When the ID is specified, tracking will only begin when this exact ID is recognized.
|
|
Marker Width
|
width
|
number
|
The width of the ThingMark.
The value of this field is set in meters. For example, if your printed ThingMark is 5 centimeters, set this to 0.05.
|
|
X Coordinate
|
x
|
number
|
Location of the ThingMark on the x-axis.
|
|
Y Coordinate
|
y
|
number
|
Location of the ThingMark on the y-axis.
|
|
Z Coordinate
|
z
|
number
|
Location of the ThingMark on the z-axis.
|
|
X Rotation
|
rx
|
number
|
Rotation of the ThingMark about the x-axis.
|
|
Y Rotation
|
ry
|
number
|
Rotation of the ThingMark about the y-axis.
|
|
Z Rotation
|
rz
|
number
|
Rotation of the ThingMark about the z-axis.
|
|
Tracked
|
istracked
|
boolean
|
Is enabled when the camera recognizes the target.
|
|
Display Tracking Indicator
|
trackingIndicator
|
boolean
|
If this checkbox is selected, a green tracking outline of the target is displayed indicating that tracking is in progress.
|
|
Always on top
|
decal
|
boolean
|
Changes the rendering of the ThingMark so that it is always on top.
|
|
Stationary (Eyewear projects only)
|
stationary
|
boolean
|
Select this checkbox if the target will be in a stable environment and won't be moved by the user. Selecting this checkbox may improve tracking performance.
|
|
Event
|
JavaScript
|
Description
|
|
Tracking Acquired
|
trackingacquired
|
Triggered when tracking is established. The parameter passed is the ThingMark ID.
|
|
Tracking Lost
|
trackinglost
|
Triggered when tracking is lost. The parameter passed is the ThingMark ID.
|
|
Minimum Steps Required for Use
|
What It Looks Like
|
|
1. Drag and drop a ThingMark widget either onto the canvas, or onto a model. For example, if you want the printed ThingMark to act as a tabletop for your AR experience, place the ThingMark underneath the model on the canvas. If you want the printed ThingMark to be applied to the surface of a physical object, place the ThingMark accordingly on the model.
2. In the PROJECT pane, under > , select ThingMarks from the ThingMark Association drop-down, and enter the ThingMark ID in the ThingMark field.
|
 |