|
|
You do not need to download Vuforia Engine to create Area Targets.
|
|
|
You do not need to download Vuforia Engine to create Area Targets.
|
|
If you’re using...
|
Download this...
|
||
|
iOS devices with inbuilt LiDAR sensors
|
|
||
|
Supported Matterport, Leica, and NavVis Cameras
|
Vuforia Studio supports the latest Area Target Generator which can be downloaded from the Vuforia Engine Tools page.
|
|
|
As a Vuforia Studio user, you have unlimited Area Targets, but your initial Vuforia Engine Developer account is equipped with 20 to start. You will need to open a Technical Support case to generate more than 20 Area Targets.
|
|
Create an Area Target Using the Vuforia Creator App on an iOS Device
|
||||
1. Open the Vuforia Creator app.
2. Tap the green + icon on the My Assets. Tap Capture Area.  3. Once you’re finished scanning the area, tap the Stop icon to finish the scan. 4. Save the capture as an Area Target. If it’s your first capture, you’ll need to log in to your Vuforia Developer Credentials.  5. Enter a name for your new Area Target and tap Generate. 6. Once the Area Target has been generated, return to the My Assets page to ensure that your new Area Target appears.
For more information, see the Vuforia Creator App documentation in the Vuforia Developer Library. |
|
Create an Area Target from a Matterport Scan Using the Vuforia Area Target Generator 10.13 or Later
|
||
1. Log in to the Vuforia Area Target Generator with your Vuforia Developer Credentials.
2. Click Settings at the top of the Area Target Generator window.
3. Select Developer Option.
4. Configure the Area Target Generator to generate Vuforia Studio Packages by selecting the Vuforia Studio Developer (package assets for Vuforia Studio import as *.ZIP archive) Developer Option. Note that this step is required for Area Targets that will be used with Vuforia Studio.  5. From the main screen, click Matterport to start the generation of a new Area Target. 6. Use your Matterport username and password to log in to your Matterport account and click SIGN IN. Then, select your organization and click Authorize to authorize access of the Area Target Generator data stored in your account. 7. On the configuration window, click Browse and select a space and then select the folder that you want to generate the assets to. Click Import.  8. After the import is successful, you can use the Spatial Editor to crop your space if needed. For more information, see the Area Target Generator User Guide. 9. Once you’re finished editing, select Generate to generate an Area Target of your scan. |
|
Create an Area Target from an E57 Input (Leica or NavVis scanners) Using the Vuforia Area Target Generator 10.13 or Later
|
||||
1. Log in to the Vuforia Area Target Generator with your Vuforia Developer Credentials.
2. Click Settings at the top of the Area Target Generator window.
3. Select Developer Option.
4. Configure the Area Target Generator to generate Vuforia Studio Packages by selecting the Vuforia Studio Developer (package assets for Vuforia Studio import as *.ZIP archive) Developer Option. Note that this step is required for Area Targets that will be used with Vuforia Studio.  5. From the main screen, click E57 Data to start the generation of a new Area Target and specify your input file, Area Target name, and output folder. 
6. After the import is successful, you can use the Spatial Editor to crop your space if needed. For more information, see the Area Target Generator User Guide. 7. Once you’re finished editing, select Generate to generate an Area Target of your scan. For more information, see Area Targets from Leica Scans or Area Targets from NavVis Scans. |
|
|
All filenames are case sensitive.
|
|
Application
|
Instructions
|
||
|
Vuforia Creator App (iOS)
|
1. Share your files to your machine with Vuforia Studio by going to the My Assets page and tapping and holding the tile your Area Target and selecting the Share option. 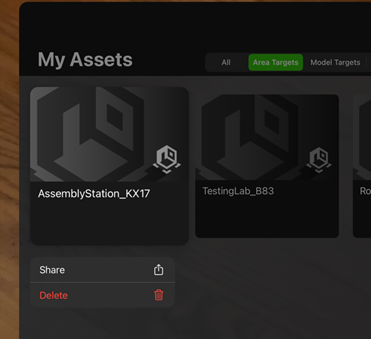 2. Then, select how you want to share your Area Target (Airdrop, OneDrive, Dropbox, etc.).
|
||
|
Area Target Generator (desktop)
|
1. Navigate to the location you entered when creating your Area Target.
The location defaults to: C:/Users/<username>/Documents/Vuforia/AreaTargets.
2. Use the <target_name>.zip for the Area Target files.
|