操作の作成
操作は、ワークフローで実行するタスクを指定します。ThingWorx Flow CLI を使用して、プロジェクトに新規操作を作成できます。
例として、Gmail での操作を次の図に示します。

新しい操作または新しいバージョンの操作をコネクタに追加するには、次の操作を実行します。
1. コマンドプロンプトから、次のコマンドを実行します。
a. cd <project root directory>
b. flow add action <name>
|
|
操作名にハイフン (-) 以外の特殊文字を含めてはなりません。たとえば、servicename-action は操作名です。
|
上記のコマンドを実行すると、<プロジェクトディレクトリ>\action\<操作名> フォルダにフォルダが作成されます。
◦ このフォルダには v1 (version1) という名前のサブフォルダがあります。
◦ v1 フォルダには次のファイルが格納されます。
▪ action.json ファイル - 操作の入力や出力などのメタデータが含まれています。操作フォームに表示される情報はこのファイルで定義します。
▪ index.js ファイル - 操作コードのロジックと実装が含まれています。
add action コマンドでは次のオプションを使用できます。
|
オプション
|
説明
|
データ型
|
|---|---|---|
|
--version
|
バージョン番号を表示します。
|
[ブール]
|
|
--help
|
ヘルプを表示します。
|
[ブール]
|
|
--parentDir, -d
|
プロジェクトの親ディレクトリ。
|
[デフォルト: "."]
|
|
--logLevel, -1
|
ログレベルを設定します。
|
[デフォルト: "info"]
|
|
-- artifactVersion, -v
|
テストする成果物のバージョン。
|
[デフォルト: "v1"]
|
2. action.json ファイルで入力と出力のプロパティを設定してから、JavaScript コードを index.js ファイルに追加します。
設定が完了した action.json ファイルとその説明を以下に示します。
{
"_id": "56b838816f724b0e259dae20",
"created_at": "2017-04-07T14:48:36.129Z",
"updated_at": "2017-04-07T14:48:36.129Z",
"uid": "actd47559da24fb85fae90b29099558e201cefa",
"name": "google-gmail-details-get",
"label": "Get Mail Details",
"input": {
"title": "Get Mail Details",
"type": "object",
"properties": {
"access_token": {
"title": "Authorize Gmail",
"type": "string",
"oauth": "gmail",
"minLength": 1
},
"id": {
"title": "Message ID",
"type": "string",
"minLength": 1,
"description": "Select/specify ID of the message of which details you wish to retrieve",
"lookup": {
"id": "g1",
"service": "gmail",
"auth": "oauth",
"enabled": true,
"searchable": true,
"dependencies": [
"access_token"
]
}
}
}
},
"output":
{
"title": "output",
"type": "object",
"properties": {
"id": {
"title": "id",
"type": "string",
"displayTitle": "ID"
},
"threadId": {
"title": "threadId",
"type": "string",
"displayTitle": "Thread ID"
},
"labelIds": {
"type": "array",
"title": "labelIds",
"displayTitle": "Label IDs",
"items": {
"type": "string"
}
},
"snippet": {
"title": "snippet",
"displayTitle": "Snippet",
"type": "string"
},
"historyId": {
"title": "historyId",
"displayTitle": "History ID",
"type": "string"
},
"internalDate": {
"title": "internalDate",
"displayTitle": "Internal Date",
"type": "string"
}
//schema truncated for clarity
},
"usage": {
"link": {
"href": "https://support.ptc.com/help/thingworx_hc/
thingworx_8_hc/activity/google-mail/get-mail-details",
"title": "Doc Link"
},
"html": "Fetch details of an email"
},
"version": "v1",
"icon": "gmail",
"act_type": "default",
"default_value": "",
"__v": 0,
"tags": [
"Gmail"
],
"category": "service"
}
action.json ファイル内のプロパティの説明については、以下の表を参照してください。
|
プロパティ
|
JSON ファイルで各プロパティを入力します。
|
||
|---|---|---|---|
|
name
|
操作の名前。
操作 gmail-details-get では、gmail がコネクタの名前、details-get が操作の名前です。
|
||
|
label
|
操作の表示ラベル。
|
||
|
input
|
入力フォームの JSON スキーマ。表の後のサンプル入力スキーマを参照してください。
サポートされている入力フィールドのタイプは any、string、boolean、array、object です。
入力スキーマは、操作によってサポートされる認証メカニズムも定義します。
|
||
|
output
|
このプロパティは、この操作が実行されたときに返すことができる出力スキーマを定義します。
サポートされている出力キーのタイプは String、Number、Boolean、any です。
|
||
|
version
|
成果物のバージョン。ThingWorx Flow CLI を使用して作成された場合、この値を変更してはなりません。
詳細については、
コネクタ成果物のバージョン管理のトピックを参照してください。
|
||
|
tags
|
ユーザーインタフェースでどのグループの下にそのコネクタを表示するかを決定する、複数の値から成る文字列配列。通常、これはコネクタの表示名です。
|
ThingWorx Flow は複数の認証スキームをサポートしています。たとえば、次のコードには OData コネクタでの各種認証スキーム、「なし」、「基本」、「Auth」などが示されています。
{
"type": "object",
"title": "Select an Authentication Scheme",
"oneOf": [
{
"type": "object",
"title": "None",
"id": "act1",
"properties": {
"odataUrl": {
"type": "string",
"title": "Odata Metadata Url",
"displayTitle": "Odata Metadata Url",
"minLength": 1,
"description": "Please provide the odata metadata url"
},
"entitySets": {
"type": "string",
"title": "Entity Set",
"minLength": 1
}
}
},
{
"type": "object",
"title": "Basic",
"id": "act2",
"properties": {
"connection": {
"title": "Odata Connection",
"type": "string",
"connection": "odata",
"minLength": 1
},
"entitySets": {
"type": "string",
"title": "Entity Set",
"minLength": 1
}
}
},
{
"type": "object",
"title": "OAuth",
"id": "act3",
"properties": {
"oauth": {
"title": "Odata OAuth",
"type": "string",
"oauth": "odata",
"minLength": 1,
"needUrl": true
},
"entitySets": {
"type": "string",
"title": "Entity Set",
"minLength": 1
}
}
}
]
}
"type": "object",
"title": "Select an Authentication Scheme",
"oneOf": [
{
"type": "object",
"title": "None",
"id": "act1",
"properties": {
"odataUrl": {
"type": "string",
"title": "Odata Metadata Url",
"displayTitle": "Odata Metadata Url",
"minLength": 1,
"description": "Please provide the odata metadata url"
},
"entitySets": {
"type": "string",
"title": "Entity Set",
"minLength": 1
}
}
},
{
"type": "object",
"title": "Basic",
"id": "act2",
"properties": {
"connection": {
"title": "Odata Connection",
"type": "string",
"connection": "odata",
"minLength": 1
},
"entitySets": {
"type": "string",
"title": "Entity Set",
"minLength": 1
}
}
},
{
"type": "object",
"title": "OAuth",
"id": "act3",
"properties": {
"oauth": {
"title": "Odata OAuth",
"type": "string",
"oauth": "odata",
"minLength": 1,
"needUrl": true
},
"entitySets": {
"type": "string",
"title": "Entity Set",
"minLength": 1
}
}
}
]
}
操作の index.js ファイルは、次のコードに示すように、execute メソッドを使用してオブジェクトをエクスポートする必要があります。
module.exports = function () {
/*
This function will receive an input that conforms to the schema specified in
activity.json. The output is a callback function that follows node's error first
convention. The first parameter is either null or an Error object. The second parameter
of the output callback should be a JSON object that conforms to the schema specified
in activity.json
*/
this.execute = function (input, output) {
let outputData = {}
return output(null, outputData)
}
}
接続オブジェクトは、入力オブジェクトのプロパティとして使用できます。このフィールドにアクセスするには、input.connection.user_name などの定義式を使用します。
コネクタが oauth を代わりに使用する場合は、定義式 input.access_token を使用してアクセストークンを取得できます。
以下のビデオでは、ThingWorx CLI を使用して新規操作を作成する方法が示されています。
たとえば、Gmail アカウントで gmail-details-get という名前の新規操作を定義するには、action.json ファイルで入力プロパティを設定します。
以下の図には、入力プロパティコードと ThingWorx Flow キャンバスに表示される操作フォームのマッピングが示されています。
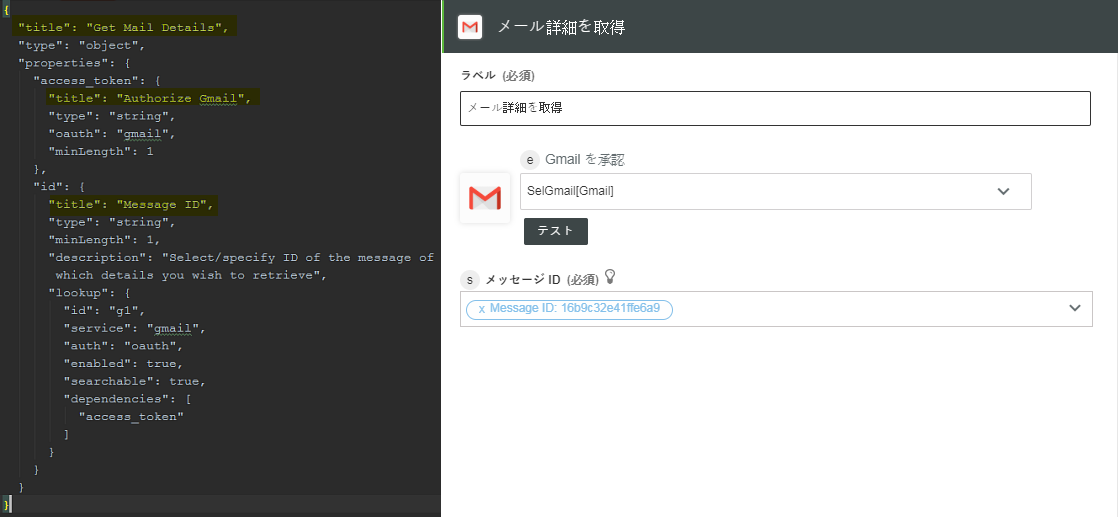
入力プロパティの説明については、以下の表を参照してください。
プロパティ | 以下の説明に従って各入力プロパティを入力 | ||
|---|---|---|---|
title | ThingWorx Flow キャンバスでの入力の受け付けに使用されるフォームのタイトル。 | ||
type (必須) | トップレベルオブジェクトのタイプは必ず object でなければなりません。 | ||
properties | 操作の実行に必要な入力のコレクション。各プロパティは、生成されるフォーム上にある、テストボックス、ドロップダウン、ラジオボタンなどの、何らかのユーザーインタフェースエレメントに対応しています。各入力には title、type、minLength (オプション)、description (オプション)、format、minValue、maxValue、pattern、minItems、maxItems (配列タイプの場合) などのプロパティが必要です。
入力スキーマで propertyorder エレメントを使用することで、操作フォーム上での各プロパティの順序を設定できます。 操作フォームにオプションのフィールドを表示するには、このプロパティを true に設定します。例: visible=true | ||
lookup | 前述の検索によってサーチされた値をフィールドに取り込むよう指定する lookup プロパティを各入力で指定できます。 lookup ごとに、次のプロパティを指定する必要があります。 • id - 関数の名前。 • service - 検索の矢印をクリックしたときに呼び出される検索関数の名前。
• auth - 接続または OAuth。 • searchable - この値が true に設定されている場合、searbyById および searchByValue メカニズムが有効になります。 • dependencies - 文字列配列。これは検索で必要なフィールドを指定します。 • onSelect - 検索によって表示されるリストから特定のアイテムを選択したときに呼び出される検索関数の名前。これは通常、フォームスキーマで処理するために使用されます。 |
同様に、action.json ファイルで出力プロパティを設定してから、index.js ファイルを実行します。詳細および例については、
付録 B: ThingWorx Flow コネクタのチュートリアルを参照してください。
操作を作成する際には以下の点に注意してください。
• サポートされている入力フィールドのタイプ - Any、String、Boolean、Array、Object
• サポートされている出力キーのタイプ - String、Number、Boolean、Any
• minLength はそのフィールドを必須としてマークします。
• minItems は配列フィールドを必須としてマークします。
• maxItems は配列フィールドの上限を設定します。
• select2-{active:true} はそのフィールドを select2 フィールドとしてマークします。
• 入力フィールドに日付/日付および時刻/時刻ピッカーを追加するには date/datetime/time というフォーマットを使用します。
• ThingWorx Flow は oneOf をサポートしています
• ThingWorx Flow は、現在のところ、ローカルのみを参照する $ref をサポートしています。
出力プロパティの説明については、以下の表を参照してください。
プロパティ | 以下の説明に従って各出力プロパティを入力 |
|---|---|
type (必須) | トップレベルオブジェクトのタイプは必ず object でなければなりません。 |
properties | 操作によって返される、以降の操作で使用可能な出力フィールドを定義するときに使用します。 |
わかりやすくフォーマットされた出力プロパティの例を次に示します。
{
"title": "output",
"type": "object",
"properties": {
"id": {
"title": "id",
"type": "string",
"displayTitle": "ID"
},
"threadId": {
"title": "threadId",
"type": "string",
"displayTitle": "Thread ID"
},
"labelIds": {
"type": "array",
"title": "labelIds",
"displayTitle": "Label IDs",
"items": {
"type": "string"
}
},
"snippet": {
"title": "snippet",
"displayTitle": "Snippet",
"type": "string"
},
"historyId": {
"title": "historyId",
"displayTitle": "History ID",
"type": "string"
},
"internalDate": {
"title": "internalDate",
"displayTitle": "Internal Date",
"type": "string"
}
//schema truncated for clarity
}
操作で使用可能な API 用の SDK については、
ThingWorx Flow コネクタ SDKのセクションを参照してください。
内容依存型ヘルプの作成
ThingWorx Flow には、コネクタ開発者が URL で内容依存型ヘルプを提供するためのメカニズムが備わっています。
上の図に示すように、内容依存型ヘルプは操作ページの  をクリックすることによって起動できます。
をクリックすることによって起動できます。内容依存型ヘルプ用に、usage エレメントの href 属性で URL を指定します。
"usage": {
"link": {
"href": "http://organization.com/help/topic",
"title": "connector:i18nkey-for-title"
},
"html": " connector:i18nkey-for-html"
}
"link": {
"href": "http://organization.com/help/topic",
"title": "connector:i18nkey-for-title"
},
"html": " connector:i18nkey-for-html"
}
href には、操作についてのヘルプを提供する任意の絶対 URL を指定できます。さらに、そのサイトが言語固有のヘルプページをサポートしている場合、言語 ID のプレースホルダーも用意されています。ThingWorx Flow サーバーによって、そのプレースホルダーがユーザー指定言語に置き換えられます。サイトで必要な場合、locale トークンを配置できます。
以下に例を示します。
ユーザー指定言語がフランス語の場合、URL では <%=locale%> が fr に置き換えられ、リンクは次のようになります。