Example: Using Windchill RV&S Actions
The following examples demonstrate the integration of the Excel Online and Windchill RV&S actions in ThingWorx Flow:
Example 1: Pull Windchill RV&S Query results into an Excel sheet
Prerequisites
Ensure that you have access to Excel Online and Windchill RV&S using the same enterprise account.
For this example, you need to create a workflow with the following actions:
◦ Execute Query under Windchill RV&S
◦ Loop
◦ Add Rows to Table under Excel Online

Step 1: Configure the Execute Query action of Windchill RV&S
The following steps provide details of the values that you need to specify in the action form for this specific example. For detailed steps on configuring this action, see Execute Query.
1. In the Queries list, select Issues.
2. Under the Attributes group, click Add, and add the following attributes:
▪ ID
▪ Summary
▪ Project
▪ Priority
▪ Severity
▪ State
▪ Description
Step 2: Configure Loop to write one row at a time into an Excel table
The following steps provide details of the values that you need to specify in the action form for this specific example. For detailed steps on configuring this action, see Loop.
1. In the Select Loop Type list, select Each Item. The loop action is executed the same number of times as the number of items in the result of the Execute Query action.
2. In the Source Array or Object field, map the value of Result Item of the Execute Query action.

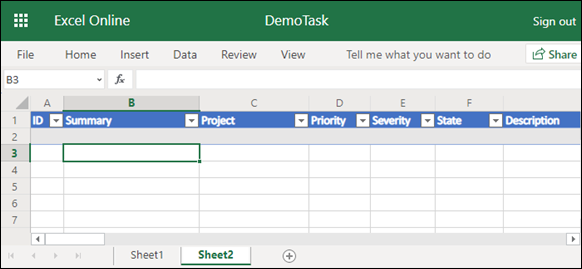
Step 3: Create a table in Excel Online
1. Log in to Microsoft Excel with the same account that you would configure the Excel Online connector.
2. Create a workbook in Microsoft Excel. For example: DemoTask.
3. Create a table, for example, Table 1 in Sheet 2 with 7 columns - ID, Summary, Project, Priority, Severity, State, and Description. These columns have the same name that you get from the Windchill RV&S query.
Step 4: Configure the Add rows to Table action of the Excel Online connector
The following steps provide details of the values that you need to specify in the action form for this specific example. For detailed steps on configuring this action, see Add Rows to Table.
1. In the Folder Name list, select Documents.
2. In the Workbook ID list, select the name of the workbook that you created in Step 3. In this case, it is DemoTask.
3. In the Sheet ID list, select the name of the sheet in which the table is present. In this case, the table is in Sheet 2.
4. In the Table ID/Name list, select the name of the table in which you want the Windchill RV&S query result to be written. In this case, the table is Table 1.
5. In the Select Entry Type list, select Single Row Entry.
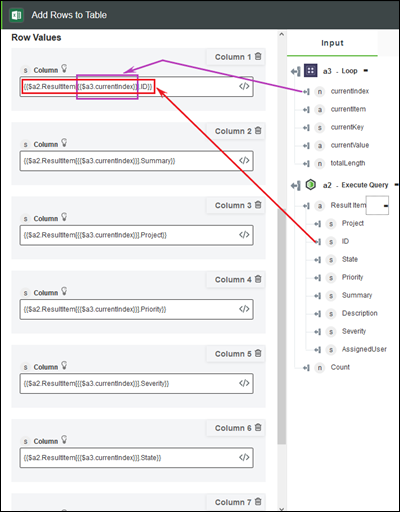
6. Under Row Values group, in the Column field, click Add, and add 7 columns for the result of the Execute Query action:
▪ ID
▪ Summary
▪ Project
▪ Priority
▪ Severity
▪ State
▪ Description
Ensure that the order of the columns is the same as in the table that you created in the Excel sheet in step 3.
These Result Items are in an array. Each time the loop runs, you need to insert the current value of the Loop index. In the index, add the current index of the loop, as shown in the following figure:
Result
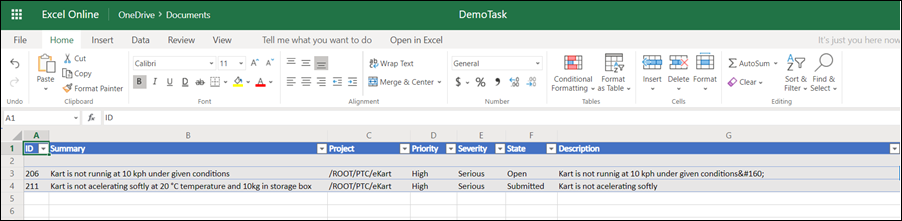
Execute the workflow to populate the Excel table with the query results.
Example 2: Edit Windchill RV&S Item Using Excel Data
Prerequisites
Ensure that you have access to Excel Online and Windchill RV&S using the same enterprise account.
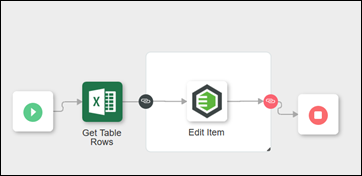
For this example, you need to create a workflow with the following actions:
◦ Edit Item under Windchill RV&S connector
◦ Loop
◦ Get Table Rows under Excel Online connector
Step 1: Edit the Excel table
Update the field values for the Priority and Severity columns to Low and Minor, respectively.

Step 2: Configure the Get Table Rows action of Excel Online
The following steps provide details of the values that you need to specify in the action form for this specific example. For detailed steps on configuring this action, see Get Table Rows.
1. In the Folder Name list, select Documents.
2. In the Workbook ID list, select the name of the workbook that you created in Step 3. In this case, it is DemoTask.
3. In the Sheet ID list, select the name of the sheet in which the table is present. In this case, the table is in Sheet 2.
4. In the Table ID/Name list. select the name of the table in which you want the Windchill RV&s query result to be written. In this case, the table is Table 1.
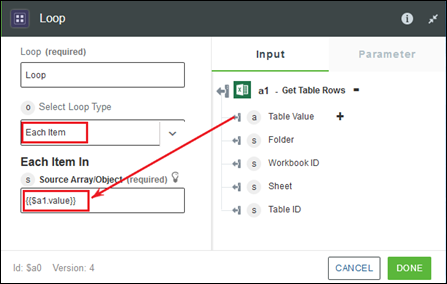
Step 3: Configure Loop to edit one Excel table row at a time
The following steps provide details of the values that you need to specify in the action form for this specific example. For detailed steps on configuring this action, see Loop.
1. In the Select Loop Type list, select Each Item. The loop action is executed the same number of times as the number of items in the result of the Execute Query action.
2. In the Source Array or Object field, map the value of the Table Value field of the Get Table Rows action.
Step 4: Configure the Edit Item Action of Windchill RV&S
The following steps provide details of the values that you need to specify in the action form for this specific example. For detailed steps on configuring this action, see Edit Item.
1. In the Queries list, select Issues.
2. In the following fields, map values for the fields as shown in the following figures:


Result
Execute the workflow to update the specified fields in Windchill RV&S.