Steam Sensor Example
The Steam Sensor example for the Java SDK provides a full project that can be run "out of the box".
The "steamsensor" project provided in the distribution bundle contains a jar (steamsensor.jar) file, as well as two script files, all in the project bin/ directory - one script for Windows (steamsensor.bat) and one script for Linux (steamsensor.sh). These script files invoke the steamsensor.jar runnable jar.
You can run these executables from a command line. There are options that allow you to test such features as data collection and tunneling (remote access).
When you extract the distribution bundle, the top-level directory is the thingworx-java-sdk directory. Navigate to thingworx-java-sdk/examples/steamsensor/bin to locate the Java executable files for this example.
When you run the example, the application sends the properties and their values to the ThingWorx Platform. You can view these “Remote” properties through ThingWorx Composer, as explained in Monitoring the SteamSensor Application. The next section explains how to set up the connection information for your environment and then run this example.
Running the SteamSensor Application
Before running the example, you must import the ./examples/steamsensor/import/Entities_SteamSensor.xml file into your ThingWorx Platform to create the interactive mashup and all the supporting entities for the application. With ThingWorx 9.x, ThingWorx Composer has changed such that you should create a project for the SteamSensor example and add all the imported entities to that project. To create the project, import the entities, and add the entities to your project, follow these steps:
1. Log in to ThingWorx Composer as a user with permissions to import files, perform CRUD (create, read, update, and delete operations on projects, mashups, and Things.
2. In the far left navigation bar, click the Browse icon ( ) and then under Modeling click +New.
) and then under Modeling click +New.3. In the General Information page, enter a Name for the project. For example, SteamSensorExample, and click the Save button.
4. In the far left navigation bar, click the Import/Export icon ( ) and in the context menu, click Import. In the Import popup window, fill in the fields as shown here:
) and in the context menu, click Import. In the Import popup window, fill in the fields as shown here: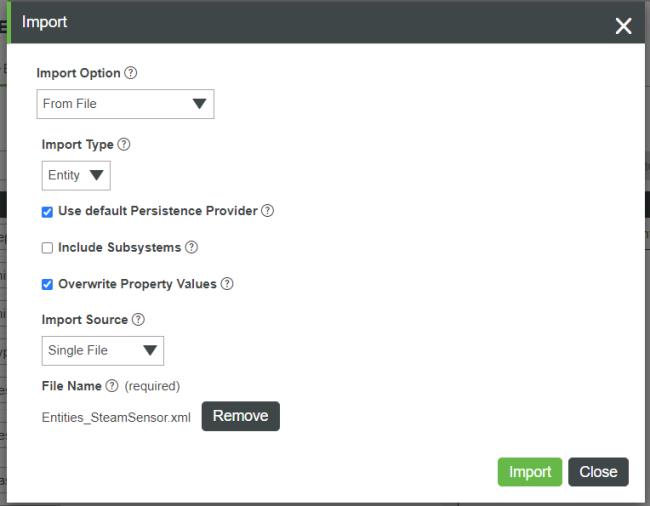
5. Go back to your project and under the name of the project, click Entities to display the Entities page. On the left side of this page are all the available entities and on the right the entities for the project. To find the entities for the SteamSensor example, enter SteamSensor in the search box next to Available Entities.
6. When the SteamSensor entities are displayed under Available Entities, select and drag them to the Project Entities panel on the right. When you are done, the Project Entities panel displays the entities for this application:

7. Click the Save button. You are ready to point the SteamSensor example at your ThingWorx Platform and view the data.
Running the SteamSensor from a Shell or Command Prompt
Depending on your operating system, you can run the application using one of the three executables in a Linux shell or in Windows PowerShell or Command Prompt:
• On Linux or Windows, use steamsensor.jar. For example, from a command line, type:
java -jar .\steamsensor.jar -h <platform_IP> -p 8080 -k <application_key> -n -l 5 -t SteamSensor
• From a Windows Command Prompt or PowerShell, you can use SteamSensor.bat. For example, from PowerShell, type:
steamsensor -h <platform_IP> -p 8080 -k <application_key> -n -l 5 -t SteamSensor
• From a Linux shell, use SteamSensor.sh. For example:
steamsensor -h <platform_IP> -p 8080 -k <application_key> -n -l 5-t SteamSensor
The mashup provided in the Entities.xml file expects the name SteamSensor. Do not use a number with the command, such as SteamSensor1. To specify multiple steam sensors, us the -c <arg> argument. |
Command Line Options for Running the SteamSensor Example
The following table briefly describes the available options and notes which ones are required:
Option | Required? | Description |
|---|---|---|
-c <arg> | Optional | Count. Specify the number of steam sensors to create. |
-d | Optional | Specify this argument to disable HTTPS error checking. By default HTTPS error checking is enabled. |
-f | Optional | Specify this argument to force the use of HTTPS on the selected port |
-g <arg> | Optional | Gateway Name. If you do not provide a name, no gateway is created. |
-h <arg> | Required | Specify the host name of the ThingWorx Platform, using an IP address. If you are running the platform on your machine for development purposes, you can also use localhost. |
-j <arg> | Optional | Specify the name of the proxy server used to access the ThingWorx Platform, using an IP address. |
-k <arg> | Required | Specify the application key for this application to use when accessing your ThingWorx Platform. |
-l <arg> | Optional | Specify the logging level: • 1 for TRACE • 2 for DEBUG • 3 for INFO • 4 for WARN • 5 for ERROR • 6 for FORCE • 7 for AUDIT |
-n | Optional | Specify this argument to enable tunneling. It is disabled by default. |
-p <arg> | Required | Specify the port number used by ThingWorx Platform. The default value is 8080. |
-q <arg> | Optional | If a proxy host is specified, specify the password for the user to present to the proxy server. |
-r <arg> | Optional | If a proxy host is specified, specify the port on the proxy server to use. |
-t <arg> | Optional | The default ThingName is SteamSensor, but you can use a different ThingName using this argument. |
-u <arg> | Optional | If a proxy host is specified, specify the user name to present to the proxy server. |
Monitoring the SteamSensor Application
Once you start the application and see that the Temperature Limit has changed, you can go to ThingWorx Composer and view your SteamSensor Thing. The white arrow in the figure below points to the messages to look for:

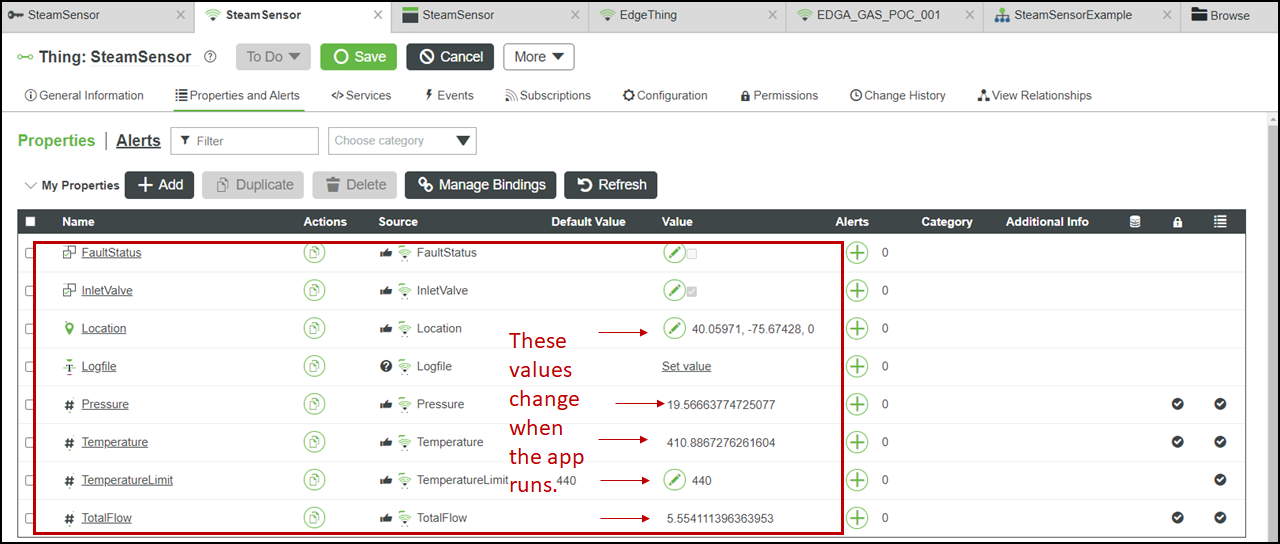
From ThingWorx Composer, browse to the SteamSensor Thing and click Properties and Alerts to display the Properties page. To see the data coming in, click the Refresh button. Here is an example of the page at runtime:
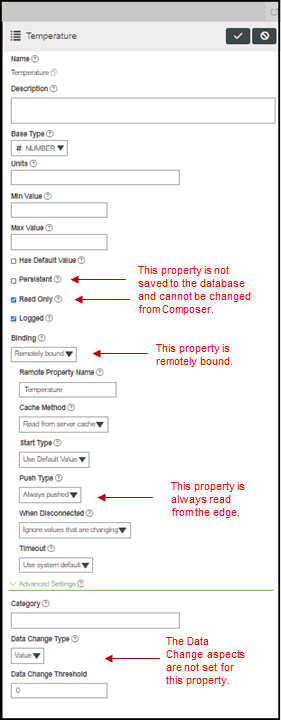
If you want to view the property definition, click the property name under the Name column. If you select the Temperature property, the right panel appears, displaying the details for this property:
Viewing the SteamSensor Mashup
Once you have the SteamSensor application running, you can view the application mashup while it runs by following these steps:
1. Assuming that you are logged in to ThingWorx Composer, select > > .
2. When the Browse | Mashups page appears, click the SteamSensor mashup to display it in edit mode.
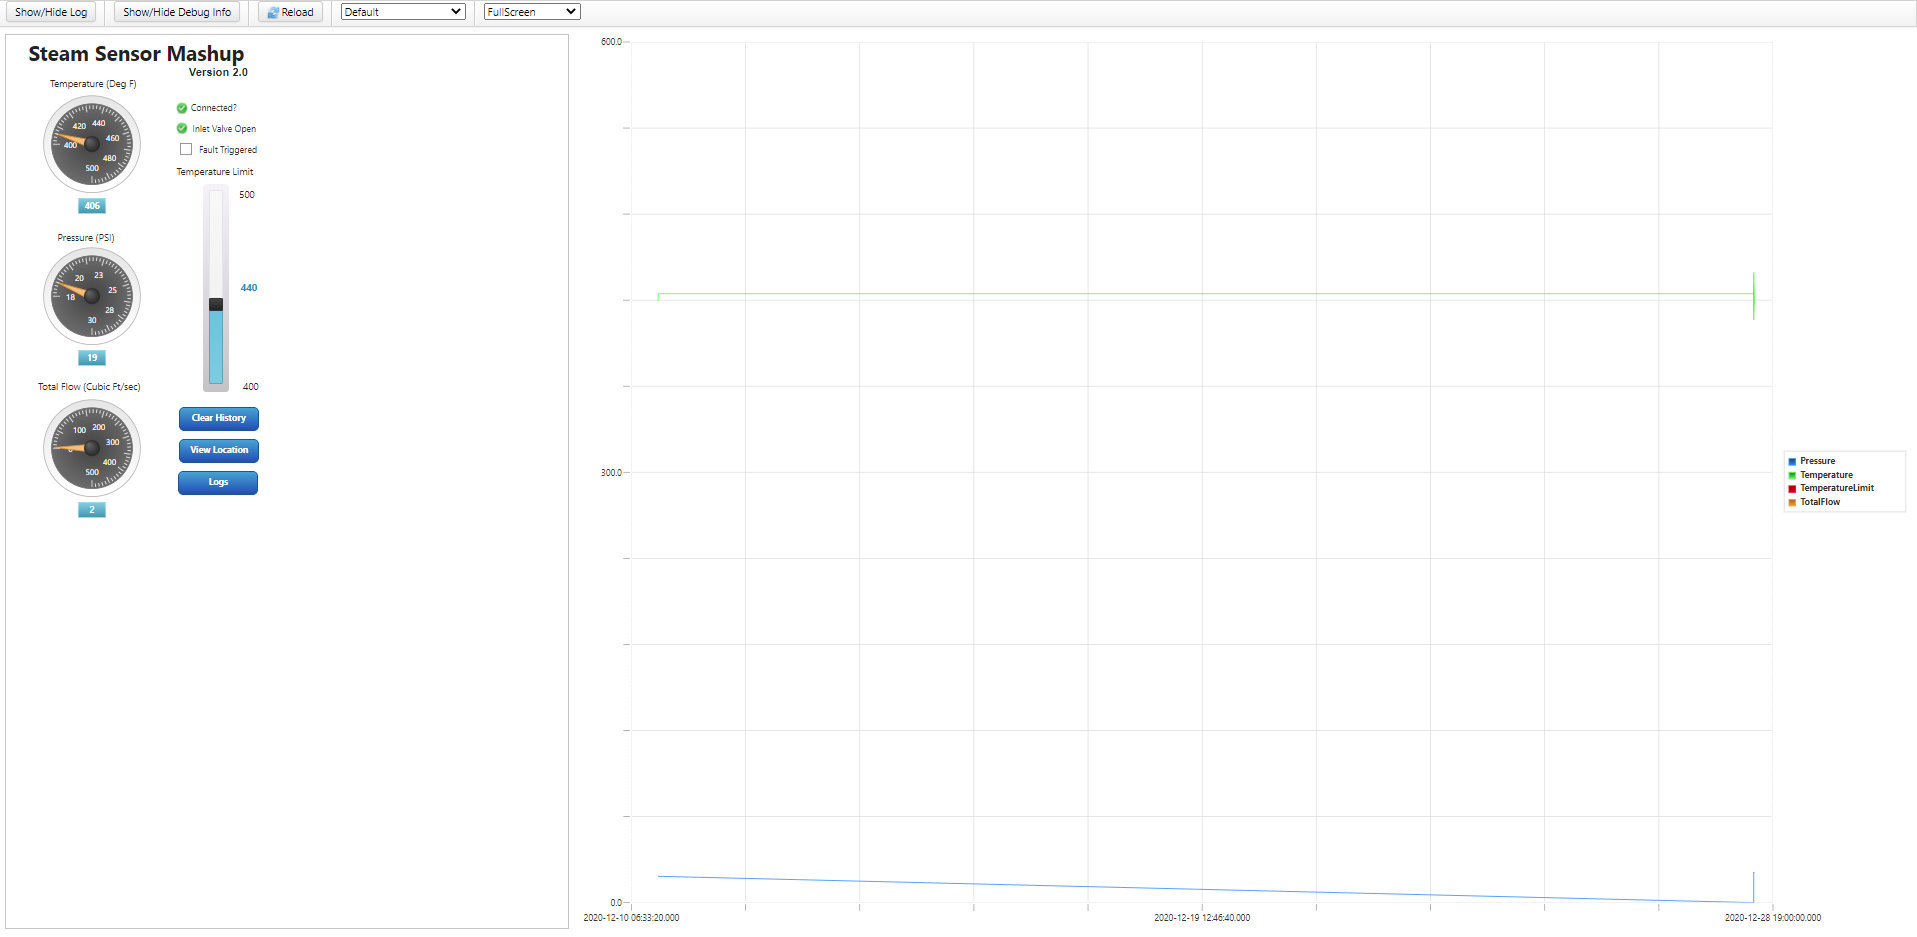
3. Click View Mashup to display the running SteamSensor mashup, shown here:
Source Code for the SteamSensor Example
The source files for this example are in the subdirectory, thingworx-java-sdk/examples/steamsensor/src/main/java/com/thingworx/sdk/steam. This subdirectory contains the following source code files:
File Name | Contents |
|---|---|
SamplePasswordCallback.java | An example of a password callback. As of v.7.0.0 of the Edge Java SDK using password callbacks to provide an application key and passwords at runtime is the way to set this sensitive information. Refer to Password Callbacks for details. |
SteamThing.java | Definitions for all the properties, services, and events for this example. |
SteamSensorClient.java | The user interface for the console. This file configures the client based on user input using the ClientConfigurator class, instantiates the client using the ConnectedThingClient class, and starts it. As long as the connection is successful, it collects values from the steam sensors. |
Managing Bindings for "Remote" Properties Using ThingWorx Composer
When you run the SteamSensor application, the properties automatically become bound "Remote" properties on the ThingWorx Platform. From the Properties page of the SteamSensor1 Thing, you can view property bindings by clicking the Manage Bindings button. These properties have been bound for you by the settings in the import/Entities_SteamSensor.xml file. If you do not create a similar file of entities to import for your application, you can bind the properties through ThingWorx Composer.
To see the results of binding remote properties, click the Manage Bindings button. The following page appears, with all properties, bound and unbound, listed in the right panel. Note the icons indicate whether a property is bound or unbound. To view only bound or only unbound properties, click the appropriate button, as indicated below:
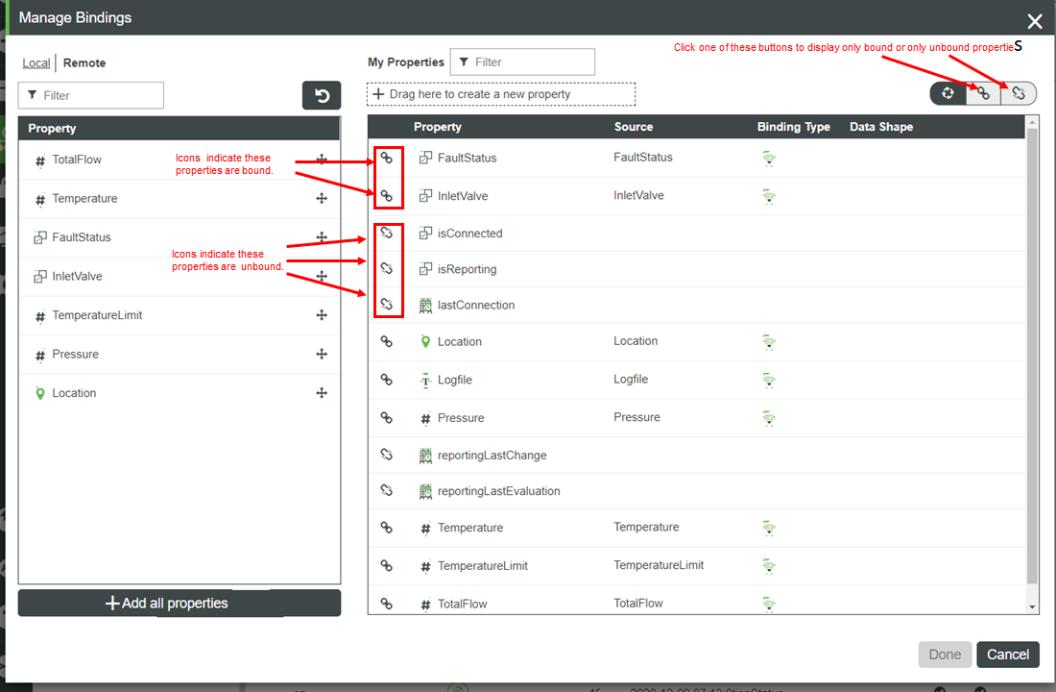
If you do not provide an Entities.xml file with properties set as remotely bound for your application, once your device connects and binds to the platform you can navigate to Properties page for the Thing representing your device and click Manage Bindings to display this page. The page will show the properties sent by the device in the left panel. To set them as Remote properties, follow these steps:
1. Start your application.
2. Log in to ThingWorx Composer and navigate to your Thing.
3. Display the Properties page.
4. Click the Refresh button to show the current values of the properties and verify that the isConnected property value is a dimmed checkbox with a checkmark.
5. Click the Manage Bindings button to browse for the remote properties.
6. In the left panel of the Manage Bindings page, click Remote to view the remote properties.
7. Check the list of properties to be sure that it displays the properties from the application/device that should be treated as remote properties on the platform.
8. To add all the displayed properties, click the +Add all properties button to add all of the remote properties to the set of remote properties for the Thing..
9. Click Done.
10. Click Save.
11. Refresh the properties and verify that they are changing.
12. Select the Services tab.
13. Click the Browse Remote Services button.
14. Click the Add All Above Services button to add the services.
15. Click Done.
16. Click Save.
17. Click the Test button next to the AddNumbers service and verify it is working.
18. Select the Events tab.
19. Click Browse Remote Events.
20. Click Add All Above Events.
21. Click the Create button next to the SteamSensor.Fault Data Shape if it has not already been created.
22. Click Save.
23. Select the Subscriptions tab.
24. Click Add My Subscriptions.
25. From the Select an Event drop down menu, select SteamSensorFault.
26. Select the Enabled check box.
27. Enter the following for the Script text that will write an event when there is a steam sensor fault:
logger.error("Steam Sensor 1 Fault: " + eventData.message);
28. Click Done.
29. Click Save.
Operating the Steam Sensor Example
The only property in the Steam Sensor example that does not update is the TemperatureLimit property. This property defines the limit for the fault of the steam sensor. The fault occurs when the value of this property is greater than zero and the temperature exceeds the limit defined by this property. If the value of this property is 0 or less, the fault does not occur.
Name | Function | Description |
|---|---|---|
Temperature | Ranges from 400-440. | Temperature of the steam sensor. |
Pressure | Ranges from 18-23. | Pressure of the steam sensor. |
TotalFlow | Starts at 0 and increments by 0-1 every scan rate. | Total flow through the steam sensor. |
InletValve | Usually true, set to false on 15– second intervals. | Inlet valve of the steam sensor. |
TemperatureLimit | If this value is greater than zero and the value of Temperature rises above this value, a fault is generated in the steam sensor. | The temperature value that, when reached, causes a fault in the steam sensor. |
FaultStatus | True when a fault occurs, false otherwise. Be sure to check what caused a fault. | Indicates that a fault occurred in the steam sensor. |
Name | Function |
|---|---|
AddNumbers (NUMBER a, NUMBER b) | Returns the sum of two double precision numbers. |
GetBigString | Returns a large string value of all zeros. |
GetSteamSensorReadings | Returns an InfoTable that contains several readings from the steam sensor. |
Shutdown | Stops the client process. Use this to stop the client from ThingWorx Composer or the user interface of your custom mashup. |
Name | Function |
|---|---|
SteamSensorFault | Occurs when the value of TemperatureLimit is greater than zero and the value of Temperature is greater than TemperatureLimit. The event data is defined by the SteamSensor.Fault Data Shape and contains only a single STRING field that is named message. When a fault occurs, the content of message is sent in the event data. |