Configuring Tunneling on the ThingWorx Platform Side
The rest of the tunneling configuration takes place in the server side of the client/server application (UltraVNC Server, for example) and on the ThingWorx Platform through ThingWorx Composer.
The main steps for the built-in client/server application for the ThingWorx Platform (UltraVNC) follow:
1. If you have not already, install UltraVNC Server on the edge device where the EMS is running.
2. Access the Admin Properties configuration screen for UltraVNC Server and make sure that the following configuration parameters are set:
◦ Allow loopback connections — Make sure that this check box is selected if you want to test the connection on the edge device itself (the VNC Viewer is installed on the same machine as the VNC Server).
◦ VNC password — Type the password that VNC Viewer users must type to access this edge device remotely.
◦ Multi viewer connection — Select the option, Keep existing connections, so that a new session with this edge device does not disconnect any existing VNC Viewer sessions.
The main steps in ThingWorx Composer follow:
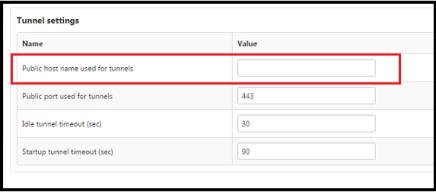
1. In the Configuration page for the Tunneling Subsystem, check the field, Public host name used for tunnel. If the IP address is a local network address, the tunnel will not work. Set this field to the external host/IP address that tunnels should use for connections. For more detail, refer to Required Setting for
the Tunneling Subsystem.
2. If you have not already, use the RemoteThingWithTunnels or the RemoteThingWithFileTransferAndTunnels template to create a Remote Thing to represent the edge device that is running EMS.
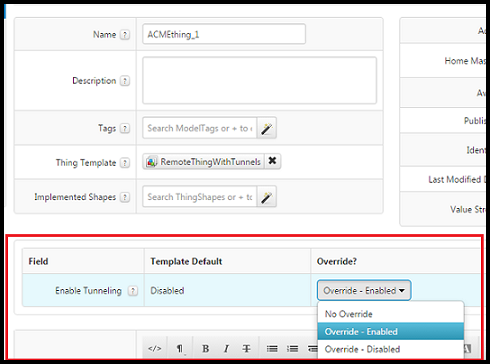
3. After creating the Thing, from the General Information page for the new Thing, enable the template Override? setting for Enable Tunneling, as shown below. By default, this setting is disabled.

4. Determine which remote applications will be used to access the edge device and whether you want to use the VNC client that is built into the ThingWorx Platform. These applications may be any of the following types:
◦ Desktop remote sessions — VNC Server on the edge devices and the corresponding Viewer client on the user machines that will access the device. The VNC Viewer is the built-in application available through the ThingWorx instance. You might create a tunnel, using the name vncClient.
◦ SSH — An SSH client/server application, such as PuTTY. For information on OpenSSH, refer to http://www.openssh.com/ or http://support.suso.com/supki/SSH_Tutorial_for_Linux. For information on PuTTY, visit http://www.putty.org/.
◦ Microsoft RDP — Refer to the Microsoft web site, more specifically, http://windows.microsoft.com/en-us/windows/connect-using-remote-desktop-connection#connect-using-remote-desktop-connection=windows-7.
◦ Custom client application that you have built
5. As long as you have enabled the template Override? setting for Enable Tunneling in the General tab for the Remote Thing, configure the tunnels for the Thing that you created:
a. Under ENTITY INFORMATION, select Configuration. If you are not in Edit mode for the Thing, click Edit.
b. Under Configuration for RemoteThingWithTunnels, click Add My Tunnel and in the displayed fields, enter the information for the client/server application. Here are examples for VNC and SSH:

When configuring a mashup for the edge device, you will need to provide the names that you assign to the tunnels. To access the list of tunnel names available on a Thing, use the GetTunnelNames service. Configure the Host and Port fields from the point of view of the edge device where the server component of the client/server application is running. For example, when a user wants to access the edge device from VNC Viewer, the user would type the IP address of the device and then the port number 5900. For SSH, you might enter 22 in the field. By default, the URL is the location of the VNC client application on the ThingWorx Platform. If you are using SSH, make sure that supply the port number and then make this field empty. The values that are displayed for the # Connections and Protocol fields are the default values and are the only values that are currently supported. |
6. Save the configuration of your new Thing.
7. When creating your mashup, add a Web Socket Tunnel widget if you are using the built-in VNC viewer (client) that is provided with ThingWorx Mashup Builder. At minimum, you need to set the following parameters for the Web Socket Tunnel widget:
◦ RemoteThingName — You must supply the name of your Thing (RemoteThingWithTunnels) that will use this tunnel (for example, the one that was created in Step 2 or earlier).
◦ TunnelName — Enter the name that you assigned to the tunnel for the built-in VNC Viewer in the configuration of the Thing.
◦ VNCPassword — Type the password that the VNC Server that is running on the edge device will expect from VNC Viewer.
If this widget is not displayed, you need to download and import the WebSocketTunnel_ExtensionPackage.zip package into the ThingWorx Platform. Refer to the ThingWorx Help Center for your release of the ThingWorx Platform, and search for the widget by name. |
If you are NOT using the built-in VNC Viewer, add a RemoteAccess widget. For example, you might use another type of TCP client/server application. For the RemoteAccess widget, set the following parameters:
◦ RemoteThingName — You must supply the name of your Thing (RemoteThingWithTunnels) that will use this tunnel (for example, the one that was created in Step 2 or earlier).
◦ TunnelName — Enter the name that you assigned to the tunnel for the other type of application in the configuration of the Thing (for example, PuTTY or another SSH client/server application).
◦ ListenPort — Enter the number of the port that the Java Web Start application will listen on when it starts up. For example, if you want to run an SSH session and the listen port is 9005, you would connect your SSH client to localhost:9005.
◦ AcceptSelfSignedCerts — If SSL/TLS is used for this connection and you are testing with a self-signed certificate, select the check box.
For complete information about configuring the RemoteAccess widget, refer to the ThingWorx Help Center for your release of the ThingWorx Platform and search for “RemoteAccess widget”.
8. Save your mashup.
9. For the EMS, tunneling is enabled by default. As long as your EMS is running and connected to a ThingWorx Platform, you can test your mashup.
Required Setting for the Tunneling Subsystem
When attempting to configure tunneling, you must check the configuration for the Tunneling Subsystem of the ThingWorx instance. There is a field where you can specify the host/IP of the end point for the tunnel, called Public host name used for tunnel. The following figure shows the configuration parameters for the Tunneling Subsystem, with this field highlighted:

Why do you need to configure this address? Suppose that you start up your ThingWorx Platform in Amazon EC2. The default IP address for the Tunneling Subsystem when the ThingWorx instance is running in EC2 might be 10.128.0.x. Unless you change that address, the Tunneling Subsystem will tell the clients to attempt to connect to that address for the tunnel websocket. Since that IP address is a local network address, the tunnel will not work. Therefore, you must populate that configuration field with the external host/IP address that tunnels will use for connections.