Administrator Tasks for Using Remote Access, File Transfers, and SCM in Asset Advisor
The following sections provide recommended configuration settings for the TunnelSubsystem, WSCommunicationsSubsystem, and FileTransferSubsystem can improve performance when performing remote sessions and file transfers for EMS assets.
|
|
The SCM application uses the File Transfer Subsystem, so the administrator tasks for file transfers are required for using SCM in Asset Advisor.
|
Creating Users, User Groups, and Organizations
Depending on which application end users need to access and on which devices they need to access, a ThingWorx administrator needs to create non-admin users, user groups, and at least one organization. When you create a user group, you add individual users to the group and then grant visibility and permissions to that user group. If you have multiple user groups that require the same visibility and permissions, consider creating an organization and adding user groups to it. You would then grant the visibility and permissions at the organization level to all users in the user groups within the organization.
To create these entities, follow these steps:
1. Log in to ThingWorx Composer, and use the navigation panel on the left to expand Security and then select Users.
2. In the Users page, select +New, and enter the following information for the user:
◦ Name — For example, cs_agent_boston for a customer service agent..
◦ Description — For example, user account for customer service agents in Boston.
◦ Make sure the check box next to Enabled is checked.
3. Click Save.
4. To create additional users, click  and repeat steps 1 through 3.
and repeat steps 1 through 3.5. When ready to create a user group, click  to return to the Browse list, and under Security, select User Groups.
to return to the Browse list, and under Security, select User Groups.6. In the User Groups page, click +New.
7. In the General Information page, type a Name for the group. For example, wsemsAgentsUserGroup, and click Save.
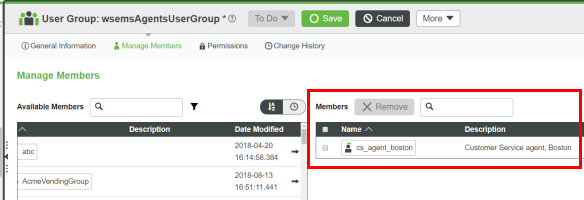
8. Click Manage Members, and under Available Members on the Manage Members page, select the check box next to the name of the user(s) you just created. Using the example, you would select the cs_agent_boston. Then, click the right-facing arrow to add this user to the new User Group. The end result should look similar to the following screen:
9. Click Save.
10. To create another user group, repeat Steps 5 through 8 for that user group and assign the users who should be able to perform remote sessions to that group. For example, you may want to create a user group for remote access (raUserGroup) or for SCM (scmUserGroup).
11. From the navigation panel, click  to return to the Browse list, and under Security, select Organizations.
to return to the Browse list, and under Security, select Organizations.12. In the Organizations page, click +New.
13. In the General Information page, type a Name for the organization. For example, wsemsOrg, raOrg, or scmOrg and click Save.
14. Click Organization and in the Organization page, click Unit1.
15. In the Unit 1 page, go to the Members field and click the plus icon to display a list of user groups and users that you can add to the organization. From the Search entity types drop-down list, select User Groups
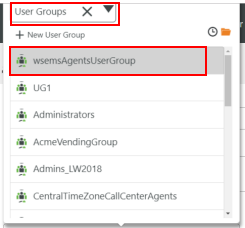
16. As indicated in the figure above, select a user group. In the example above, it is the wsemsAgentsUserGroup. The list of Members displays your addition:
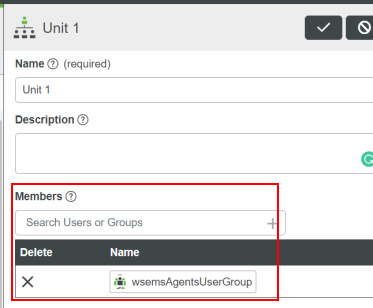
17. To save, click the checkmark icon in the upper right corner of the Unit 1 page. The page closes and returns you to the Organization page.
18. To create another organization, repeat Steps 11 through 16 now.
19. Depending on how you want to set permissions, you can do so at the Organization level, the User Group level, and the User level. To use the Remote Access and Control application, users need visibility and permissions to the Things that they either want to access through a remote session or to and from which they want to transfer files. They also need permissions to run (Service Execute permission) to the ThingWorx Copy service for file transfers.
For information on visibility and permissions for SCM, refer to Setting Up to Use ThingWorx Software Content Management (SCM) with EMS Devices.
For more information on visibility and permissions in ThingWorx, refer to the following topics in the ThingWorx Help Center:
• Visibility in Organizations — Visibility in Organizations
• Entity Permissions — Entity Permissions
• Collection Permissions — Collection Permissions
Recommended Settings for the Tunnel Subsystem
To set up the ThingWorx Platform for tunneling with EMS assets through Asset Advisor, follow these steps:
1. In ThingWorx Composer, under System, click Subsystems.
2. In the list of subsystems, click TunnelSubsystem.
3. Under Configuration, set the following values:
▪ Public host name used for tunnels — The URL for the host computer of the ThingWorx Platform with which the device is communicating. Do not use an IP address for the Tunnel Subsystem configuration.
▪ Public port used for tunnels — The number of the port on the public host to use for tunnels. By default, this port number is a secure port, 8443. Although NOT recommended, if you need to use an insecure port for testing, make sure that you change this port number before attempting to connect through the Remote Access Client. Otherwise, the platform will reject the request for a tunnel. The error message in the Remote Access Client does not explain that reason for rejecting the request.
To ensure that tunnels will work, you must set up a secure port if that is what the EMS will use when communicating with the ThingWorx Platform. |
▪ Idle timeout (sec) —The number of seconds to allow the tunnel to start. Both the EMS and Remote Access Client connect into the tunnel endpoint. The default value is 90 seconds.
▪ Tunnel startup timeout (sec) — The number of seconds to wait for additional data to be transferred before shutting down the tunnel. By default, if no data is transferred for 30 seconds, the platform shuts the tunnel down.
4. Click Save.
Recommended Settings for the WSCommunications Subsystem
If file transfers are expected to involve large files (greater than 20mb in size), increase the timeout value for request response messages to 180 seconds by completing the following steps:
1. In ThingWorx Composer, under System, click Subsystems.
2. In the list of subsystems, click WSCommunicationsSubsystem.
3. Under Configuration, enter 100 in the Amount of time a request will wait for the response message before timing out (secs) field.
4. Click Save.
Recommended Settings for the File Transfer Subsystem
To set up the File Transfer Subsystem for use by EMS devices, follow these steps:
1. In ThingWorx Composer, under System, click Subsystems.
2. In the list of subsystems, click FileTransferSubsystem.
3. Under Configuration, enter the following recommended values for each file transfer setting.
Field | Value |
|---|---|
Min Threads Allocated to File Transfer Pool | 100 |
Max Threads Allocated to File Transfer Pool | 100 |
Max Queue Entries Before Adding New Working Thread | 10000 |
Idle Thread Timeout (sec) | 60 |
File Transfer Idle Timeout (sec) | 300 |
Max FileTransfer size (bytes) | 1000000000 |
4. Click Save.