Using SSL for a Secure Connection
Your site can use 2-way SSL to secure the communication between the ThingWorx server and the Windchill application. PTC recommends using SSL when working in a production environment. The extension can use SSL to both mutually authenticate the servers to each other and protect the communication itself.
An SSL connection requires that both systems trust each other; to do this the old and the new WindchillConnector thing template must be configured to reference Java key and trust stores held on the ThingWorx server which provide keys for the transaction. The HTTP Server on the Windchill server must be configured to trust those keys.
SSL configurations vary considerably and this guide does not attempt to describe all options available in an SSL configuration. Instead, the following steps give an overview of the process for configuring SSL.
This procedure assumes that both ThingWorx and Windchill are configured to use SSL for their standard communications. It also relies on configuration scripts that come with the most recent version of the PTC HTTP Server. The most recent PTC HTTP Server is included with Windchill 11.0 M030 and later.
|
|
A commercial trusted wildcard certificate could be used for Windchill and a self-signed certificate used between ThingWorx and Windchill.
|
Configuring ThingWorx with KeyStore and TrustStore
ThingWorx requires Java key stores and trust stores.
1. Create a TrustStore for ThingWorx and import the Windchill SSL certificate.
2. Create a KeyStore for ThingWorx, and generate KeyPair in the KeyStore.
3. Configure Windchill to trust ThingWorx.
4. Reference them in the configuration of the WindchillConnector thing template used to connect ThingWorx to the Windchill system being secured.
Configuring Windchill for Client Authentication
On the Windchill server, configure SSL authentication in the PTC HTTP Server to trust the ThingWorx key and certificate.
|
|
Code examples have been reformatted to fit the page and may contain line numbers, hidden editing characters (such as tabs and end-of-line characters) and extraneous spaces. If you cut and paste code, check for these characters and remove them before attempting to use the example in your application.
|
1. Update PTC HTTP Server configuration to reference the CA certificates file.
a. Create a file in <HTTPSERVER_HOME>\conf\ca-bundle.crt. This location is recommended but not required.
b. Save ca-bundle.crt.
c. Create a sslclientauth.conf file at <HTTPSERVER_HOME>\conf\sslvhostconf.d.
d. Add SSLCACertificateFile to <PATH_TO>\ca-bundle.crt so that it refers to the ca-bundle.crt file. For example:
SSLCACertificateFile
<HTTP_Server>\conf\ca-bundle.crt
e. Save changes.
2. Add the ThingWorx client certificate to PTC HTTP Server’s list of trusted CA certificates.
a. Edit the ca-bundle.crt file you pointed to previously in the SSLCACertificateFile entry.
|
|
If the file does not yet exist, create the file and any required directories.
|
b. Edit ca-bundle.crt and paste the PEM file content of ThingWorx client certificate.
c. Save changes.
3. Configure PTC HTTP Server for the sslClientAuth URL.
a. Find the Windchill web app name in <windchill-home>/codebase/wt.properties in the entry wt.webapp.name.
b. Open a shell or command prompt and enter the following:
cd <HTTPSERVER_HOME>ant -f webAppConfig.xml -DappName=[windchill-web-app] -Dresource=sslClientAuth -DresourceAuthType=sslClientAuth addAuthResource
c. Configure Windchill to trust the ThingWorx certificate.
a. Edit <windchill-home>/codebase/WEB-INF/web.xml.
b. Find <filter-name>TrustedSSLAuthFilter</filtername>.
c. Add an additional <init-param> element after the existing one where [thingworx-cert-name] is the name of the ThingWorx certificate:
<init-param><param-name>trustedSubjectPattern.1</param-name><param-value>
[thingworx-cert-name]</param-value></init-param>
d. Save changes.
Configuring Windchill Connectors
|
|
This configuration applies when you are using Info*Engine tasks only with the old connectors.
You can also execute Info*Engine tasks using the OData connector. See “Executing Info*Engine services with the OData Connector” in Customizing ThingWorx Navigate.
|
1. In ThingWorx Composer, edit the WindchillConnector thing template that represents the connection to the Windchill system being configured.
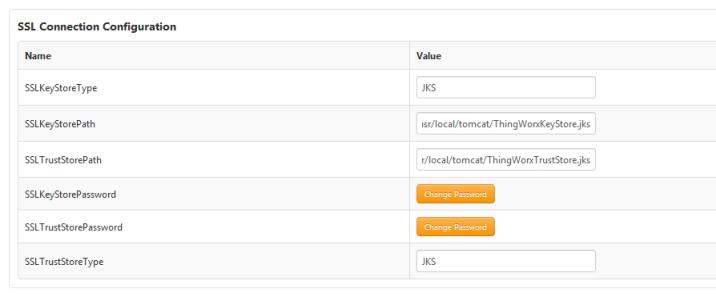
2. Specify path to ThingWorxKeyStore.jks (see example in screenshot), and also specify the password.
3. Specify path to ThingWorxTrustStore.jks (see example in screenshot), and also specify the password.
| It is recommended but not mandatory that the type is JKS. |
4. Specify the Windchillhttps address and SSL port.
5. Save the thing.
6. View the ThingWorx Application Log to verify that no configuration errors exist.
7. Launch ptc-connected-demo-mashup to verify the ThingWorx – Windchill trusted SSL configuration.